QuickBooks Error 3371 Status Code 11118: Activating Your QB
To use QuickBooks Desktop, you must download, install, activate, and register the software to access updates and features. If the QBregistration.dat file is damaged, you may encounter QuickBooks Error 3371 Status Code 11118 or -1, with messages like:
| “Could not initialize license properties. Error 3371: QuickBooks could not load the license data. This may be caused by missing or damaged files.” “Could not initialize license properties. [Error 3371, Status Code -11118] QuickBooks could not load the license data. This may be caused by missing or damaged files.” “Could not initialize license properties. [Error: 3371, Status Code -1] QuickBooks could not load the license data. This may be caused by missing or damaged files.” |
Are you struggling with this error? In this comprehensive guide, we’ll explore the causes and multiple solutions to resolve it for smooth software registration.
Why does QuickBooks say ‘Could not initialize the license properties’?
You may fail to activate your software and encounter QuickBooks error 3371 status code 11118 for several reasons, which we’ll discuss below:
- The entitlement data store might be corrupted.
- Possible damages or corruption to the QBregistration.dat File
- Incorrect or corrupted installation of QuickBooks Desktop
- Using an outdated version of Windows OS
- The Windows components are either outdated or corrupted
- Common licensing issues in QuickBooks
Read More- Update QuickBooks Desktop
Top 7 Ways to Fix QuickBooks Error 3371 Status Code 11118 When Starting Up
Proceed with the stepwise instructions provided below to troubleshoot error code 3371 when activating QuickBooks Desktop and get started with your accounting and financial management.
Various effective methods will help you resolve QuickBooks error code 3371 and ensure that you register and activate QuickBooks Desktop seamlessly. Perform these fixes one by one as mentioned below:
1. Delete the entitlement data store file
The entitlement file in your QuickBooks holds the license information, activating the software to start up and ensuring the product is valid and activated. Let’s delete this file so that QuickBooks can create the new one:
- Launch the Windows Start menu.
- Type Run and press the Enter key.
- In the Run prompt, type C:\ProgramData\Intuit\Entitlement Client\v8 and then Enter. If the folder doesn’t open, type C:\ProgramData\Intuit\Entitlement Client\v6 instead.
Note: If you are still unable to locate the V6 or V8 folder, open Windows File Explorer, navigate to C:, ProgramData, Intuit, and then Entitlement Client. Verify that File Explorer has hidden objects selected.
- Look for EntitlementDataStore.ecml. Right-click on the same file and click Delete. Select Yes for the confirmation.
- Launch QB Desktop, then follow the on-screen instructions to register the software again.
2. Run the 3371 Error Fix
The 3371 Error Fix is a utility that specifically targets issues caused by damaged or missing license files when activating or registering the software.
First, download and install QuickBooks Tool Hub in the latest available release and get started with the 3371 Error Fix utility:
- Select Installation Issues in the Tool Hub.
- Hit on 3371 Error Fix.
- Click OK.
- Launch the QuickBooks Desktop again and open your data file.
3. Re-create the QBregistration.dat file
The qbregistration.dat file contains software registration information, including product codes, that QuickBooks uses for registration. Let’s re-create this essential file to fix all the associated issues and activate the software seamlessly:
| Important Note: If multiple versions of QuickBooks are installed on your QuickBooks Desktop, you need an extra copy of the italicized text in the qbregistration.dat file. After that, make additional copies of these files. Also, replace the boldface items in the new section with the appropriate values for each version of QuickBooks. |
- Locate the folder where qbregistration.dat is located. The default location is: C:\ProgramData\Common Files\Intuit\QuickBooks
Quick tip: If you don’t see the folder, display hidden files and folders.
- If the qbregistration.dat file already exists, rename the file by adding .OLD to replace the damaged file.
- Launch your Notepad.
- Press Windows+R to launch the Run command.
- In the Run field, type Notepad, then click OK.
- Now, type the following:
Note: Notepad will display the bold red words as ordinary text. Once the text has been entered into Notepad, change the bolded red text as necessary:
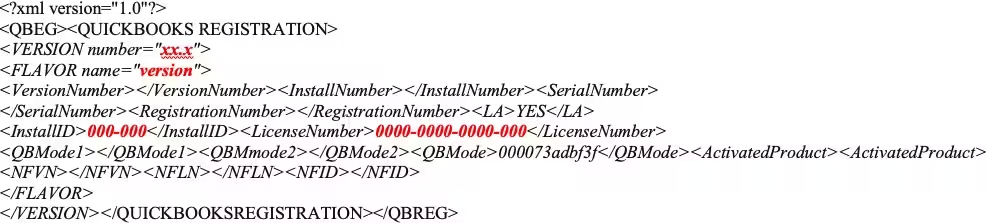
- xx.x
- Replace with 33.0 if you have QuickBooks Desktop 2023
- Replace with 32.0 if you have QuickBooks Desktop 2022
- Replace with 31.0 if you have QuickBooks Desktop 2021
- Replace with 30.0 if you have QuickBooks Desktop 2020
version
- Replace with Pro if you have QuickBooks Pro.
- Replace with SuperPro if you have QuickBooks Premier (not Accountant Edition).
- Replace with Accountant if you have QuickBooks Premier Accountant Edition.
- Replace with Bel if you have QuickBooks Enterprise Solutions (not Accountant Edition).
- Replace with Belacct if you have QuickBooks Enterprise Solutions Accountant Edition.
000-000
- Replace with your QuickBooks installation product number.
- 0000-0000-0000-000
- Replace with your QuickBooks license number.
- Now, save this file with the name qbregistration.dat.
- Navigate to File and click Save.
- Choose All Files in the Save as type list.
- Select the directory the same as step 1 (C:\ProgramData\Common Files\Intuit\QuickBooks).
Read Also: QuickBooks Error 1648 When Installing
4. Update Windows Operating System
An updated Windows operating system is necessary for the smooth functioning of QuickBooks and other software. Thus, let’s check for and install Windows updates.
- Search for Settings in the Windows Start menu.
- Hit the Enter key.
- From the left pane, select Windows Update> Check for Updates.
- If it shows the available updates, choose Download & Install.
- Wait until the update installs, and then restart your computer.
5. Run SFC scan
The SFC scan verifies the integrity of all protected system files and repairs any detected errors to ensure smoother and more reliable system performance.
- Launch the Quick Link menu by pressing the Windows+X keys.
- From the search results, select Command Prompt (Admin).
NOTE: The Windows PowerShell (Admin) can also run the System File Checker (SFC).
- Hit Yes on the UAC prompt.
- In the command prompt, type SFC /scannow and hit Enter.
- It will automatically verify the integrity of Windows system files and repair them if necessary.
- Once finished, reboot your computer.
6. Manually Fix the Windows Components
Damaged or corrupted Windows components often cause issues when installing or activating software. Repair these components by following these steps to activate your QB program successfully:
a. Repair or reinstall Microsoft .NET Framework
Windows 10 or Newer
- Exit all the company files in QuickBooks.
- Launch the Windows Start menu.
- Now, look for Control Panel in the search field and then hit Enter.
- From the options, click on Programs and Features.
- Select Uninstall a Program.
- Click on Turn Windows features on or off.
- In the programs list, look for .NET Framework.
- Now, select the settings for both .NET Framework 4.5 (or later) and .NET Framework 3.5 SP1.
Note: The steps for fixing .NET Framework 4.5, 4.6, 4.7, and 4.8 are the same.
Check NET Framework 4.5 (or later).
If the option for .NET Framework 4.5 (or later) checkbox isn’t selected:
- Mark the checkbox for .NET Framework 4.5 (or later) to turn it on.
- Now, click OK to save the changes.
- Once done, restart your computer.
If you selected the option for .NET Framework 4.5 (or later):
- Select the checkbox to turn off the .NET Framework 4.5 (or later). Do not turn it on.
- Hit OK to save the changes.
- Finally, restart your system.
- After signing back into Windows, follow the above steps to turn on .NET Framework 4.5 again.
Check the .NET Framework 3.5 SP1
If you haven’t selected the checkbox for .NET Framework 3.5 SP1:
- Turn on .NET Framework 3.5 SP1 by selecting it.
- Click OK.
- Start your computer again.
If you selected the checkbox for .NET Framework 3.5 SP1:
- Turn off .NET Framework 3.5 SP1 by selecting the checkbox and turning it back on.
- Save the modifications by clicking OK.
- Finally, restart your computer.
- After signing back into Windows, revert to .NET Framework 3.5 SP1 by following the above steps.
If you fail to turn on or off the .NET Framework, you must reach out to an IT professional or Microsoft. The issue can be related to the Windows operating system or the computer itself.
b. Repair Microsoft MSXML
a. Register MSXML DLL files if you are using a 64-bit operating system
- On your computer, launch the Windows Start menu and type CMD.
- Right-click on the CMD and tap on Run as Administrator.
- Now, enter cd\windows\syswow64 in the C: prompt.
- Type regsvr32 MSXML6.dll and click Enter on your keyboard.
- Once done, install QuickBooks again.
b. Register MSXML when using a 32-bit operating system with these commands
- Press your keyboard’s Windows + R keys to launch the Run command.
- Search for CMD and hit Enter.
- Further, enter regsvr32 MSXML6.dll and hit Enter.
- Install your QuickBooks Desktop again.
Read More: QBCFMonitorService Not Running On Your Computer
7. Reinstall QuickBooks Desktop
Reinstalling QuickBooks Desktop will automatically set up new folders and rename the old folders, replacing the files with the new folders, thereby fixing QuickBooks Error 3371 Status Code 11118.
Before getting started
- Get the installer version of the same version as QuickBooks.
- Note down the license number, which you will find on the original package, or check the confirmation email if you bought it online.
Note: You can also check the account management portal for information.
- Remove QuickBooks
- Click on the Windows icon to launch the Windows Start menu.
- Type Control Panel and press the Enter key.
- Go to Programs and Features or click on Uninstall a Program.
- Choose the version of QuickBooks Desktop you want to remove from the list of programs.
- Hit on Uninstall/Change, Remove, and then click Next.
If you can’t see the option, sign out and then sign back in to Windows as an admin.
- Install QuickBooks Desktop again
- Keep the system connected to an active internet connection.
- Locate the QuickBooks.exe file.
- Select
- Express install – This will install QuickBooks over your old version and save all of your preferences. To access your prior version, you will need to reinstall it using a custom install.
- Custom and Network Options – This enables you to maintain older versions installed while installing the current version in a different location. The new version does not incorporate your choices from the previous version.
- Now, click Next, then select Install.
- Once done, choose Open QuickBooks.
Conclusion
QuickBooks registration is essential for seamless software updates and connectivity with Intuit. However, QuickBooks Error 3371 Status Code 11118 can disrupt the registration process, delaying your ability to get started. To resolve this, try updating Windows, running the 3371 Error Fix tool, or exploring other troubleshooting solutions.
For expert assistance, connect with QuickBooks professionals via the toll-free number, available 24/7 to guide you through the process.
Frequently Asked Questions
QuickBooks error 3371 indicates problems occurring when attempting to register or activate software due to an inability to load license data, often caused by missing or damaged files or problems with the license.
There are several ways to fix registration errors, such as using the QuickBooks Tool Hub, deleting the EntitlementDataStore.ecml file, updating Windows, or reinstalling QuickBooks.
Error code 3371 in QuickBooks typically indicates a problem with the program’s license information. It may appear as “Could not initialize license properties” or “QuickBooks could not load license data.“
Here’s how to register your QuickBooks using Intuit:
- Open your Intuit account..
- Select the I forgot my user ID or password link.
- Enter your registered email, phone number, or user ID.
- Type the code you just received.
- Reset your QB password once your user ID appears.
- Once done, sign in again to QuickBooks.
On your QuickBooks Desktop, press the F2 key on your keyboard. This will open the Product Information window. Look for the product name, product number and the license number. At the end of the product name, look for your release.

