QuickBooks Error 6190, 816: Fix Multi-User Mode Error
QuickBooks error 6190, 816 can halt your work with the warning, “QuickBooks is unable to open this company file. It may have been opened by another user.”
This error often occurs when a user operates in single-user mode instead of multi-user mode, which enables multiple users to access the company file (.qbw). When users encounter this error, it signals potential issues like file conflicts or misconfiguration. Common causes include improper hosting settings, network issues, or file corruption.
In this blog, we’ll dive into these triggers and outline effective fixes, such as enabling multi-user mode, checking hosting configurations, and repairing damaged files, to restore seamless access.
What Causes Company File Error 6190, 816 in QuickBooks?
Error code 6190 often arises due to mismatched company and transaction log files, network issues, and other reasons, which we will discuss in detail below:
- Using an outdated version of QuickBooks Desktop
- Possible data damage or corruption to the company file
- Incorrect hosting settings on the workstation
- The .ND and .TLG file components might be damaged or corrupted
- Not running QuickBooks Database Server Manager on the server
- The company file location might be corrupted
- Incorrect software installation or damaged program files
- Different QuickBooks processes might hamper the network connectivity
- Incorrect folder permissions to host on the network
How to Fix Multi-User Mode Error 6190 in QuickBooks Desktop?
As discussed previously, QuickBooks error 6190 often occurs when hosting a company file. Let’s explore effective solutions to resolve this issue and ensure seamless hosting:
1. Update QuickBooks Desktop
Updating QuickBooks Desktop ensures access to enhanced features, critical security patches, and technical fixes, optimizing performance and safeguarding financial data. Regular updates improve user experience with real-time invoice tracking, better data file optimization, and bug resolutions, while ensuring compliance with tax regulations.
2. Run QuickBooks File Doctor
The QuickBooks File Doctor verifies and runs quick fixes for data damage. The tool also addresses network connectivity issues, ensuring smoother operations when working in multi-user mode.
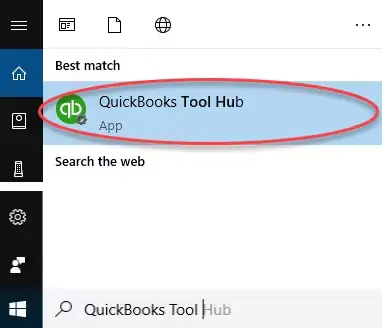
- Launch QB Tool Hub.
- Go to Company File Issues from the left pane.
- Hit on Run QuickBooks File Doctor. The tool can take up to one minute or more to open the file doctor.
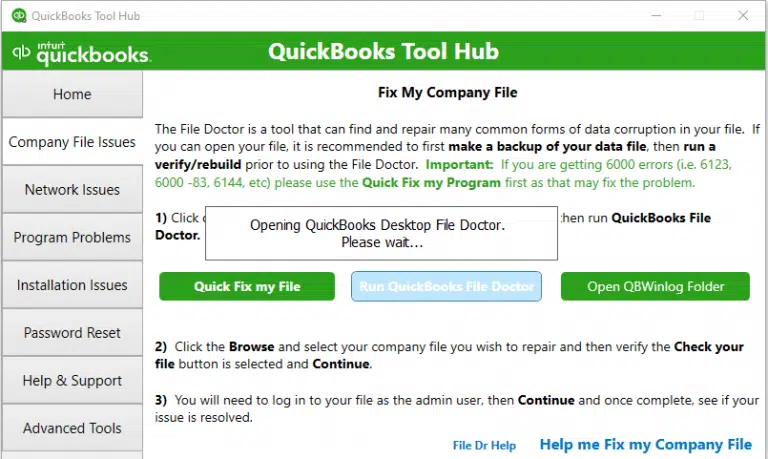
Note: If the File Doctor doesn’t open, search for QB File Doc manually in the Windows Start menu.
- Select your company file from the drop-down menu in the File Doctor. If you don’t see the file, click Browse and search your company file.
- Hit on Check your file, and then select Continue.
- Enter your QuickBooks admin password and then select Next.
After using QuickBooks File Doctor, if you continue to experience problems, follow the instructions for opening your company file.
3. Check the hosting settings
The hosting setting should be enabled only on the server computer, as this computer hosts your company file, and others are just connected to it.
Let’s check the hosting settings:
- Launch QuickBooks on the workstation.
- Press F2 on your keyboard to launch the Product Information window.
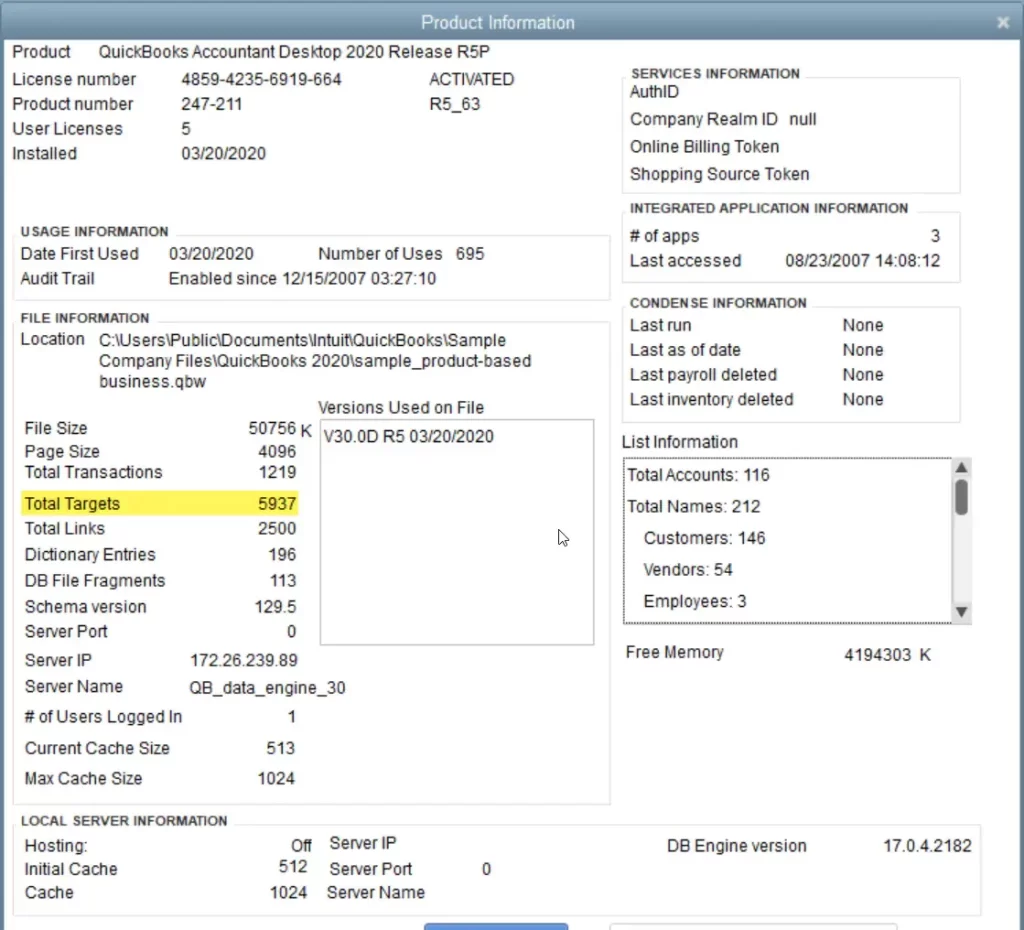
- Look for Local Server Information. Make sure the hosting is turned off.
4. Rename the .ND and .TLG files
The .ND and .TLG are the company file components and configuration files that allow QuickBooks to access a company file in a network or multi-user environment.
If these files are damaged, you will probably see an error when trying to host or open a company file on the network. Renaming these files will replace the folder files with the new ones, fixing the associated issues when scanning with the QuickBooks Database Server Manager and opening your company file.
- Locate the folder where your company is saved.
- Look for the files with the same name as your company files but with extensions .ND and .TLG.
- company_file.qbw.nd
- company_file.qbw.tlg
- Right-click on each file and hit Rename.
- Add .OLD at the end of each file name, such as: company_file.qbw.nd.OLD.
5. Run QuickBooks Database Server Manager
The QuickBooks Database Server Manager enables multi-user hosting and allows multiple users to work on the same company file simultaneously, resolving QuickBooks error 6190.
- Launch QuickBooks Tool Hub.
- Select Network Issues from the left menu bar.
- Hit on QuickBooks Database Server Manager. If you haven’t installed QuickBooks on the server, you will be prompted to do so.
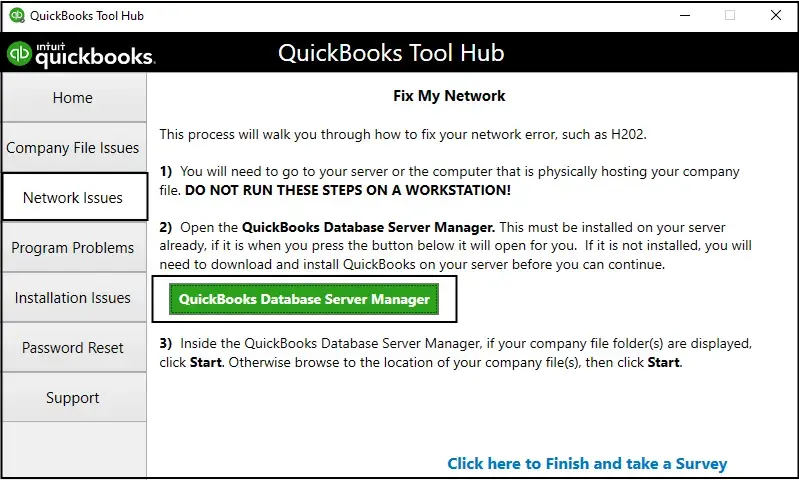
- Select Start Scan if you see your company file in the QuickBooks Database Server Manager. If you don’t click Browse and look for your company file, click Start Scan.
- Launch QB Desktop and try again to sign in to your company file. If you get the same issue, continue moving to the next solution.
6. Open a sample company file from a workstation
When you open a sample company file, you check if the issue lies with your company file or QuickBooks. If the sample file fails to open and displays an error, your QuickBooks installation is corrupted and requires repair.
- Open a Sample File in QuickBooks, then choose the file from the list of sample company files.
- If it opens, move to the next solution.
- If you fail to open the file, repair your QuickBooks program.
7. Run the QuickBooks Install Diagnostic tool
If the QuickBooks installation fails, it may lead to issues during use. Use the QuickBooks Install Diagnostic Tool to resolve common installation problems.
- Launch QuickBooks Tool Hub.
- Select Installation Issues from the left pane.
- Hit on QuickBooks Install Diagnostic Tool. The tool might take up to 20 minutes to finish, so let it run until then.
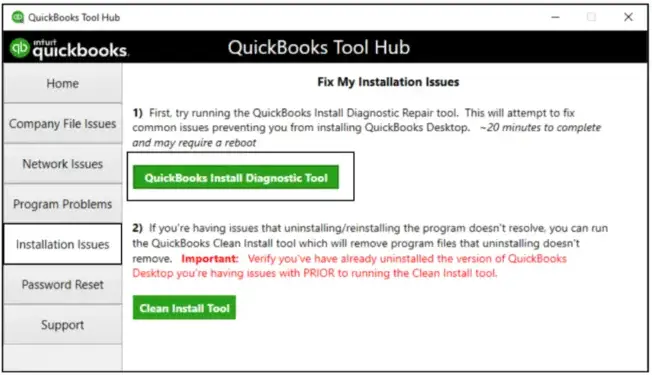
- Once it finishes, restart your computer and launch QuickBooks Desktop, then open your company file.
- Ensure QB is up-to-date with the latest release to ensure you have the most recent fixes and security updates.
8. Copy the QuickBooks file to the Desktop
By copying a company file to the desktop and opening it, you can check whether the file’s location is correct.
- If you can open the company file from the desktop, the company file location might be damaged.
- The data file might be in too many folders, exceeding the file system path limitation.
- If the data file still doesn’t open after changing the location, you might have file damage.
- Open the folder where you save the company file.
- Look for file extensions such as QBW.
- Right-click on the file and select Copy. Go to your desktop, right-click anywhere, and select Paste.
- Press and hold the Ctrl key to launch QuickBooks. This will open the No Company Open window.
- Click on Open or restore an existing company. Go to your desktop, look for your file and open it.
- Close all QuickBooks processes
Let’s end the QuickBooks processes running in the background, as they may hamper the network connectivity, causing failure to open the company file and error code 6190.
- Sign in to your server computer as an Administrator.
- Launch the Task Manager by pressing Ctrl+Shift+Esc.
- Show processes for all users, then click on Users.
- Choose each QuickBooks process, such as QBW32.EXE, qbupdate.exe, QBDBMgr.exe, then End Task.
- Now, try again to open your company file in multi-user mode.
10. Check the folder permission manually
You may encounter these errors if the folder where you saved your file lacks the correct permissions. Verify the folder permissions to ensure proper sharing of company files. Try opening the file again. If the error persists, refer to Solution 11
a. Set up folder permissions
Verify that permissions are set correctly
- Press the Windows logo key and search for File Explorer.
- Look for the QuickBooks file folder and right-click on it. Then, choose Properties.
- Go to the Security tab, then click on Advanced.
- Choose QBDataServiceUserXX and click Edit.
- Now, configure the following settings to Allowed:
- Traverse Folder/Execute File
- List Folder/Read Data
- Read Attributes
- Read Extended Attributes
- Create Files/Write Data
- Create Folders/Append Data
- Write Attributes
- Write Extended Attributes
- Read Permissions
In case the permissions aren’t set correctly:
- Right-click on your company file folder and choose Properties.
- Hit on Security, then select Edit.
- Select QBDataServiceUserXX and allow Full Control, then Allow.
- Hit Apply, then OK.
Change folder permissions
Adjust the file folder permissions by following the steps below:
- Open the Windows Start menu and search for File Explorer.
- Locate the folders below and right-click on them:
- C:\Program Data\Intuit\Entitlement Client\v8
- C:\Program Data\Intuit\Entitlement Client\v6.0
- C:\Program Data\Intuit\Entitlement Client\v5
- C:\Program Data\Intuit\Entitlement Client\v3
- C:\Program Data\Intuit\Entitlement Client
- C:\Program Data\Intuit\QuickBooks Enterprise Solutions X.0 (X = version) or C:\Program Data\Intuit\QuickBooks 20XX (XX = year)
- C:\Program Data\COMMON FILES\INTUIT
- C:\Program Data\COMMON FILES\INTUIT\QUICKBOOKS
- C:\Users\Public\Public Documents\Intuit\QuickBooks\FAMXX (XX = year)
- C:\Users\Public\Public Documents\Intuit\QuickBooks\Company Files
- C:\Users\Public\Public Documents\Intuit\QuickBooks\Sample Company Files\QuickBooks Enterprise Solutions X.0 (X = version) or C:\Users\Public\Public Documents\Intuit\QuickBooks\Sample Company Files\QuickBooks 20XX (XX = year)
Perform these steps for the folder listed above. Remember that you might not have all folders, as these are specific to the QB Desktop version:
- Right-click on the folder.
- Select Properties from the drop-down.
- Navigate to the Security tab and choose Everyone.
- Note: If you don’t see Everyone in the Group or User Name checkbox, click Add and then type in Everyone. Then, click OK.
- Choose Full Control, then hit Apply and OK.
b. Set Windows access permissions to share company files
Ensure QuickBooks has the appropriate access permissions to avoid future issues when managing company files on the network.
Windows 10
- Launch the Windows Start menu and type File Explorer.
- Locate the QuickBooks file folder and right-click on it.
- Choose Properties and Sharing, and then click on Share Add.
- Select the corresponding service QBDataServiceUserXX for the QB version you use.
- Configure the permission level of both users to Full Control and select Share.
11. Configure firewall ports and Anti-Virus Software
Windows Firewall or security software, such as antivirus or anti-malware, may block QuickBooks if they detect it as a potential threat. To ensure smooth multi-user network functionality and uninterrupted QuickBooks operations, configure Windows Firewall and add exceptions in your antivirus or antimalware settings for QuickBooks Desktop. This will help you fix QuickBooks error 6190, 816, and ensure seamless network connectivity on the server.
12. Clean install QuickBooks Desktop
A clean install of QuickBooks Desktop removes your system’s previous files and folders and ensures a fresh install. This fixes issues like crashing, errors, or problems opening company files and provides a smoother and more reliable user experience.
Conclusion
A company file error can lead to permanent data damage or corruption, potentially resulting in the loss of critical accounting data. In this comprehensive article, we’ve outlined the possible factors disrupting network connectivity and causing QuickBooks error 6190, 816, along with effective solutions to resolve it.
If you encounter persistent issues or need further assistance, we recommend contacting QuickBooks professionals. Dial our +1(866)409-5111 to connect with a QuickBooks ProAdvisor for expert support today!
Frequently Asked Questions
Running the Verify and Rebuild Data utility can help you fix the QuickBooks company file issues. Go to File> Utilities> Verify Data to verify the data file. If you see any error code, visit a detailed article on our website. Go to File> Utilities> Rebuild Data for possible data damage for a quick repair.
Error code 6176 in QuickBooks appears when trying to open a company file, usually on the server. It is mainly caused by not running the QB Database Server Manager, incorrect hosting settings, or possible data damage or corruption.
To fix errors 6189 816 and 6190 816 when opening a company file on the network or due to data damage in the company file, restart your computer and make sure to run the QuickBooks Database Server Manager. If this doesn’t resolve the error, update QuickBooks on the server and workstations and run a quick repair on your company file.
QuickBooks Desktop 6XXX error codes, such as 6104, 6000, 6144, 6175, and 6131, generally indicate issues with accessing or connecting to your QuickBooks company file, often due to corruption, incorrect multi-user setup, or network connectivity problems.
QuickBooks may fail to find your company file for several reasons, such as damage to your company file data or if the file is renamed or relocated to a different location, network connectivity issues when opening on the network, or an incorrect file path. Other causes include outdated software, damaged QuickBooks installation files, or incorrect hosting configurations.

