What is QuickBooks Error 40003 and How to Fix It?
Keeping QuickBooks and its payroll services updated is crucial for a seamless workflow, enhancing security, and accessing the latest features. However, you may encounter QuickBooks error 40003 while downloading payroll updates or performing payroll tasks. This error can disrupt critical functions like direct deposits, causing delays.
Don’t worry—our comprehensive guide will explore the common causes of error 40003 and provide clear, step-by-step solutions to resolve it. Let’s dive into fixing this issue and getting your payroll back on track.
What Causes Payroll Update Error 40003 in QuickBooks?
Before finding what can help you fix QuickBooks error 40003, you must know what could interrupt you when downloading the updates. Let’s get familiar with the possible reasons triggering the error:
- Antivirus on your computer may interrupt the payroll update.
- Incorrect account or payroll information.
- Stuck paycheck that are not sent to Intuit can also hinder the payroll update.
- Outdated QuickBooks Desktop.
- Using an older version of QuickBooks Desktop.
- Inactive QuickBooks payroll subscription.
- Incorrectly configured Windows Firewall settings.
- You might have entered the incorrect license number.
Read More- QuickBooks Payroll Update Not Working
Troubleshooting Error Code 40003 in QuickBooks Desktop with These Steps
Once you know what causes QuickBooks error 40003 when updating payroll, move to the section below to find suitable fixes. Ensure that you follow each solution in the same series as mentioned below. If you need help, you may reach out to the QuickBooks support team.
1. Disable Your Antivirus
Sometimes, the antivirus might send a false for QuickBooks Desktop and can block your process, such as updating the payroll services.
Configure antivirus for QuickBooks to ensure it’s not blocked. The steps to do so may vary depending on the antivirus product you use. Check the official site of your antivirus and set up the security settings for QuickBooks, allowing you to run your services.
2. Verify the Account Information
The payroll account should be correct and updated for the continuously using the payroll services:
- Restart your computer and the launch your QB.
- Check the account information and ensure it is correct. – Go to Employees> My payroll Service. – Hit on Update Account Payroll Info.
- Get the most recent version of QuickBooks tax table. – In QuickBooks Desktop, hit on the Employees menu. – Select Download Entire Update and then click Update.
3. Toggle the Stuck Paycheck
If your paycheck gets stuck in QuickBooks when sending, it often prevents you from downloading the QuickBooks payroll updates and encounter QuickBooks error code 40003. Below are the stepwise instructions to toggle and send the stuck paychecks:
a. Update QuickBooks and Backup the Company File Data
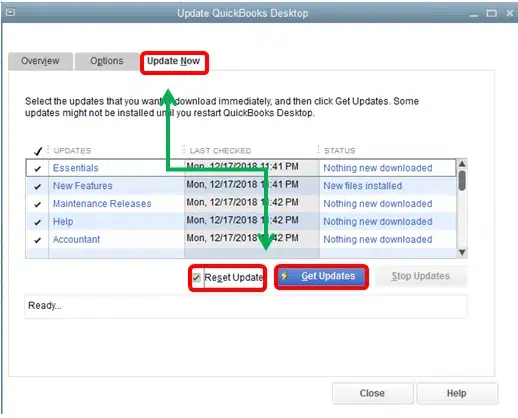
Sometime, you may see error 40003 QuickBooks Desktop when updating payroll if the program version is outdated. Let’s download the QuickBooks update to the latest release by following these steps:
- Select the Help menu at the top menu screen.
- Click on Update QuickBooks Desktop from the drop-down.
- Go to the Update Now tab in the redirected window.
- Mark the checkbox for Reset Updates to clear the previous updates.
- Finally, hit on Get Updates.
Now, let’s create a QuickBooks company file backup manually by following the below steps:
- Hover over to the File menu and click on it.
- Select Switch to Single-user Mode.
- Return to File and click on Back up Company, then select Create Local Backup.
- Choose Local Backup in the backup window and hit on Next.
- Move to the Local Backup Only section and click Browse, choose the location to save your backup file.
- Set the number of backup copies you want to save.
| Tip: Set up the backup reminders in the Local and Online Backup section. |
- It will run a test if the company file is in good shape.
- Once all done, click OK.
- Now, tap on Save it now and then OK.
b. Send the Payroll Data or the Usage Data
- Go to Employees at the top and select My Payroll Service> Send Usage Data.
- It will open the Send/Receive Payroll Data window. Select Send All. When prompted, enter the payroll PIN to access it. If the send is successful, retry to download the payroll updates. If the send is unsuccessful, reach out to our support team.
c. Find the Stuck Paycheck
- Navigate to the Edit menu and hit on Find.
- Move to the Advanced tab and then scroll down to the Choose Filter section.
- Choose Detail Level from the Filter list.
- Click on Summary Only.
- Return of the Filter list and scroll down to click on Online Status, then Online to Send.
- Click on Find to look for the paychecks that aren’t sent to Intuit.
d. Verify Your Company File Data and Rebuild It
- In QuickBooks, go to Window and click on Close All.
- Navigate to the File menu> Utilities> Verify Data.
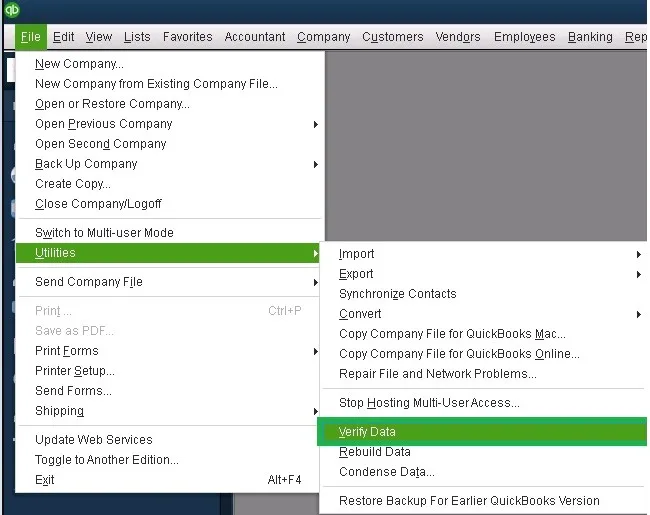
- Now, you will see: – QuickBooks detected no problems with your data: Your data is safe and clean. – An unknown error message. – Your data has lost integrity: Data damage is found and you must rebuild it.
Rebuilding the Company File Data
- Hit on the File menu> Utilities> Rebuild Data.
- Click OK when asked to create a company file backup. A backup is necessary to ensure your data is safe and protected.
- Choose the location where you want to save the backup file on your computer and click OK.
- In the File Name, enter a new name and click Save.
- Once you see Rebuild has completed, click OK.
Once done, try again to download the payroll update.
e. Toggle the Stuck Paycheck
- Find the oldest stuck paycheck and open it.
- Click on the Paycheck Detail button.
- In the redirected Review Paycheck window, move to the Earnings section. Enter the item earning same as the last item earnings in the list.
| Example: If the last item in the item earning list is Hourly Rate, add the same item as Hourly Rate in the list. |
- Now, you see Net Pay Locked message on your screen. Select No.
- Ensure that there are no changes to the tax amounts and net pay. Hit OK.
- Click Yes if you receive a past transaction message.
- Close the paycheck by clicking Save & Close.
- Reopen the paycheck and hit on the Paycheck Details button.
- Delete the item that you just added in the Earnings section.
- Further, verify that there are still no changes to the tax amount and net pay. Click OK.
- If you have other paycheck stuck, repeat the above steps.
Learn – QuickBooks Payroll Updates: Get the Latest Tax Tables
5. Reactivate the Payroll Subscription
You can reactivate your QuickBooks payroll subscription via three ways. Below we will discuss the two of them for QuickBooks Payroll Enhanced and Basic. You can also get the subscription directly from QuickBooks.
Through Your Company File
Getting the subscription from your QuickBooks Desktop company file is the best way. Here’s how you can do so:
- Go to the Employees menu and click on My Payroll Service.
- Hit on Account/Billing Info.
- Sign to your Intuit account using the admin credentials. The QuickBooks Account page will open.
- Move under the Status bar and click Resubscribe.
- Now, adhere to the on-screen instructions to complete the process.
Through Your Intuit Account
Reactivate the payroll services directly from the Intuit web version:
- Go to the Intuit’s official site and sign in to it.
- Select Resubscribe under the Status section.
- Finally, reactivate the payroll services by following the on-screen instructions.
6. Configure the Windows Firewall Settings
The Windows Firewall is a gateway that manages the data entering your system and the existing one. If it finds something wrong, it may block the service or data from the port.
Similarly, if the Windows security application considers QuickBooks a threat, it will block services such as updating the payroll services and trigger error code 40003 QuickBooks payroll. Thus, you must configure the Windows Firewall settings and unblock the program to run the services successfully.
7. Manage the QuickBooks License Number
Not finding the license number you received when purchasing the product or entering it incorrectly usually trigger error code 40003 in QuickBooks Desktop. Find the QuickBooks license number and then reactivate the payroll subscription by following the below steps:
a. Find the QuickBooks license Number
- Sign in to your Customer Account Maintenance Portal (CAMPS) and then look for the Product number and License number.
- After getting your product information, move to the next step.
b. Reactivate Your QuickBooks
- Navigate to the Help menu> Manage my license> Change my license number.
- Rather than entering the license number, replace all the number with 0.
- Don’t enter the validation code and then click Finish.
- Return back to Help> Manage my license> Change my license number.
- Enter the license number, click Next and then Finish.
- Finally, try again to update the QuickBooks payroll again.
Conclusion
In conclusion, we’ve outlined the potential causes of QuickBooks error 40003 during payroll updates, along with expert-curated solutions to resolve it effectively. These steps are designed to help you overcome the error with ease.
If you encounter any difficulties or need professional assistance, we recommend contacting a QuickBooks ProAdvisor. For immediate support, dial our toll-free number +1(866)409-5111 to connect with our dedicated team for a swift resolution.
Frequently Asked Questions
Error code 40003 is a payroll error that indicates problems when attempting to update payroll services, often due to a corrupted QuickBooks file, related components, or problems with your Internet connection or firewall. It may also appear if the system date and time are incorrect or there are permission inconsistencies in the company file.
Error 40001 in QuickBooks often occurs when updating payroll due to a slow or interrupted internet connection, using an outdated version of the software, or a mismatch between your QuickBooks Realm ID and Intuit’s records, which can prevent payroll updates from completing successfully. Problems with user permissions can also cause it.
Here’s how to download and install the QuickBooks Payroll update:
-
Navigate to the Help menu.
Select Update QuickBooks. -
Go to the Update Now tab.
-
Hit on Get Updates.
-
Choose File, then click Exit.
-
Once done, restart QuickBooks Desktop.
There could be multiple reasons why QuickBooks Payroll is not updating, such as a weak or inactive internet connection, an outdated QuickBooks or Windows OS, insufficient permissions to receive updates, or the Windows Firewall blocking the update.
Try updating QuickBooks Desktop and the payroll tax table to fix the payroll error. If this doesn’t work, verify your company file data and payroll settings. You may also need to check your internet connection, firewall settings, and antivirus software.

