Is Your QuickBooks American Express Not Syncing?
Although you can download the transactions manually, for a more seamless and automated experience, linking the American Express account directly to your credit card in QuickBooks saves time and reduces the chances of error while reconciling.
Such integration not only saves time but also makes it easier to track and categorize expenses, helping you better manage finances. However, you may experience QuickBooks American Express not syncing error when trying to reconcile the transactions.
This not only prevents you from downloading the transactions but also hinders other related accounting tasks. Read this detailed article to learn the possible reasons for QuickBooks not syncing with American Express and quick ways to fix the issues in both desktop and online versions of QuickBooks.
Why is American Express Not Syncing with QuickBooks?
There are several issues you may face while syncing American Express with QuickBooks that can lead to failure to download bank feed transactions. Below we have outlined all the possible reasons behind the issue in both QuickBooks Desktop and Online version.
Let’s get familiar with them one by one:
For QuickBooks Desktop
- The connection between American Express and QuickBooks may be interrupted.
- Any unread notifications, alerts or display issues on your bank’s website, security updates are blocking transaction downloads.
- Third-party interference or technical issues with the browser may cause problems while syncing American Express with QuickBooks.
- Excessively stored cookies and caches on the browser.
- Using a version incompatible with QuickBooks or American Express.
For QuickBooks Online
- Issues during automatic bank feed updates can interrupt the connection between QuickBooks and American Express.
- Connectivity issues while manually updating the bank feed.
- Incorrect financial institution.
- An outdated financial institutions Directory.
Finding out the possible reasons why you fail to sync American Express with QuickBooks helps you perform the troubleshooting solutions accordingly.
Important Fixes for Issues When Syncing American Express to QuickBooks
We have divided the troubleshooting section into two parts; one for QuickBooks Online and the other for QuickBooks Desktop. First, we will discuss the suitable fixes for QuickBooks Online and the further section explores for QuickBooks Online.
Fix the American Express syncing issues in QuickBooks Online
This section covers all the solutions you need to fix for the American Express syncing issues in QuickBooks Online. To know the solutions for QuickBooks desktop, go to the next section.
Solution 1. Disconnect and Reconnect Your American Express Business Account to QB Online
Disconnecting and reconnecting your American Express business account in QuickBooks Online (QBO) refreshes the connection and can help resolve synchronization issues and ensure accurate data transfer.
This procedure may be necessary if the connection is lost, if the user who initially set up sync becomes inactive, or if you are troubleshooting a connection error.
a. Disconnect American Express with QB Online
- Navigate to Transactions and choose Bank transactions.
- Choose your bank account icon.
- Click on the Pencil icon and then select Edit account info.
- Mark the Disconnect this account on save checkbox.
| Note: If QuickBooks is currently busy in downloading new transactions, you won’t be able to see this option; wait until this finishes. |
- Click Save and close once done.
b. Reconnect American Express to your QuickBooks Online Account
Let’s connect AMEX Account to QuickBooks Online again by following the below steps:
- Go to Transactions and then select Bank transactions.
- As we are connecting the account for the first time and have already connected online banking accounts in the past, select Link account.
- Look for one of the following accounts, depending on your American Express account user type:
- If you are the admin or primary account holder: search for American Express Business Credit Card & Checking (US) and select it.
- If you’re a delegate user on a card account: Search for American Express (Delegate) and select it.
- Hit on Continue.
- Now, sign in with your American Express user ID and password in the pop-up window. Follow the instructions displayed on your screen if American Express requires additional security steps.
- Choose the accounts that you want to connect with QuickBooks.
- Select the account from the dropdown menu for each account. This is the same account you have created before connecting with American Express at the first time.
- Choose a specific date range for the download.
- Finally, select Connect.
Solution 2. Check for Any Notifications or Alerts on the Bank’s Website
To check for any notifications or alerts on your bank’s website, visit the official bank website and find the notification or alerts section in the account settings or dashboard.
Look for areas where you can configure which alerts you receive and what their triggers are, such as low balances, large transactions or unusual activity. Some banks also provide alerts via push notifications, which you can enable in your browser settings.
Solution 3. Connect AMEX Account to QBO in Private Window
Linking your Amex account to QuickBooks Online (QBO) in a private window provides added privacy and security when entering Amex login credentials.
Google Chrome
Windows: Press Ctrl + Shift + N.
Mac: Press Command + Shift + N.
Mozilla Firefox
Windows: Press Ctrl + Shift + P.
Mac: Press Command + Shift + P.
Microsoft Edge
Windows: Press Ctrl + Shift + P.
Mac: Press Command + Shift + P.
Safari
Mac: Press Command + Shift + N.
Solution 4. Clear the Browser’s Cache and Cookies
Excessive stored cookies and cache in your browser negatively impact browser performance, privacy, and even cause glitches. They can affect performance, speed, memory issues, interfere with software running on the browser such as QuickBooks Online.
Proceed with the steps below as per the browser you use and clear cookies and cache for better performance to ensure bank connection.
a. Clear your browser’s cache
Firefox
- Select the Menu button from the right corner of the Firefox browse.
- Choose Settings.
- Select Privacy & Security from the right pane of your screen.
- Scroll down to Cookies and Site Data section and then click Clear Data.
- Unselect the Cookies and Site Data checkbox.
- Now, exit the Settings page.
- This will automatically save all the recent changes you just made.
Google Chrome
- Launch the Google Chrome browser.
- Select the More icon at the top right corner.
- Click on Clear Browsing Data from the options.
- Choose the time range you want to clear the caches for, such as the Last hour or All time.
- Select the data type to remove and click Clear Data.
Safari (Mac)
- Open the Safari app and choose History.
- Select Clear History.
- Click on the pop-up menu and select the date range to clear the browsing history.
Microsoft Edge
- Select Settings and more ⋯ at the top corner of your browser.
- Click on Settings and then choose Privacy, Search, and Services.
- Scroll down to the Clear Browsing Data section and click on Choose what to clear under Clear Browsing Data now.
- Now, select the specific time range to clear the browning data under the Time Range.
- If there’s any specific data you wish to clear, select it. For example, you might wish to clear the browsing history and cookies while keeping passwords and other data.
- After this is done, click Clear Now.
Safari for iPad or iPhone
- Launch Settings on your iPad or iPhone.
- Look for the Clear History and Website Data option and select it.
- Now, remove the browsing history, cookies, and other data. Keep in mind that clearing this data won’t affect the changes to your Autofill information.
b. Clear Intuit-specific cookies from your browser
Google Chrome
- Choose the More icon at the top right corner of the browser.
- Select Settings and then Privacy and security.
- Click on Cookies and other site data.
- To find the Intuit cookies, type ‘Intuit’ in the search bar.
- Hit on Remove all shown or the trash can icon.
- Now, restart your Google Chrome for the changes to take effect.
Mozilla Firefox
- Select the Menu icon at the top right corner of the browser.
- Choose Settings and then click on Privacy & Security.
- Hit on Manage Data under Cookies and Site Data.
- In the search bar, type Intuit and hit enter to find the Intuit specific cookies.
- Click on Remove All Shown.
- Select Save Changes.
- Once done, restart Mozilla Firefox to take the changes an effect.
Safari
- Open Safari and click on Safari beside the apple icon to the top left.
- Choose Preferences and then select Privacy, then Manage Website Data.
- In the search bar, type Intuit to find the Intuit cookies.
- Hit on Remove All and select Remove Now.
- Choose Done.
- Restart Safari to save the changes.
Solution 5. Use Other Compatible Browser
Usually QuickBooks Online supports the current and two previous versions of the compatible browsers mentioned below. The software does not usually supports any older versions.
These are the following browsers supported on both web and mobile devices:
Note: QuickBooks no longer supports the Internet Explorer browser.
- Google Chrome: version 78 or newer
- Mozilla Firefox: version 76 or newer.
Note: To preview and print the form on Mac OS, you will also need the Firefox PDF plugin.
- Microsoft Edge: version 79 or newer
- Safari: version 12 or newer (Mac only)
- Opera: version 68 or newer
- Samsung: version 10 or newer
Workaround: Upload Transactions by Downloading the CSV Files
To ensure that you do not enter duplicate transactions, you must know the oldest current transaction in your account that you want in your QuickBooks.
a. Pick a start date
- Navigate to Settings and then choose Chart of accounts.
- Now, choose your account in which you want to upload your transactions, then select View register.
- Select the most oldest transactions and write down the date.
- Note: Usually, the oldest transactions is your opening balance in QuickBooks.
b. Get transactions from your bank
You’ll need to download your CSV transaction file from your bank to upload to QuickBooks:
- Open your bank or credit card website and sign in to it.
- Adhere to your bank’s instructions to download CSV files of your transactions to your computer.
- Note: The steps to download the CSV file varies up to the financial institution. So, visit the official site of your bank and then proceed.
- Review the date range for downloading the CSV file and make sure it is at least one day earlier than the date of your oldest transaction.
- Now, download your transactions and save the file somewhere you can easily access it such as your computer’s desktop or the Download folder.
| Note: Your bank may have several file formats, choose only those that support QuickBooks Online format or QBO file format. These are formatted specifically for QuickBooks Online. You can also upload transactions from a CSV or Quicken (QFX) file. |
c. Manually upload the transactions
- Go to Transactions and then select Bank transactions.
- Choose the CSV file that you downloaded and want to upload the transactions into.
- Click on the Link account dropdown, then choose Upload from file.
| Note: If you haven’t connected your account to the online banking, select Upload from file. |
- Select Drag and drop or choose files and select the file you just downloaded from your bank.
- Now, select Continue.
- Choose the account you want to upload the transactions into in the QuickBooks account dropdown. Then, select Continue.
| Note: If you’re new to QuickBooks, you may not have an account to upload transactions to. If you don’t see an account, select Add New from the dropdown to create a new bank account. |
- Follow the instructions displayed on your screen to match the columns on file to the correct fields in QuickBooks. Then select Continue.
- Select your transactions that you wish to import and select Continue.
- Choose Yes and then click Done.
| Note: There is a limit of 1,000 rows for each upload. |
Fix the American Express Syncing Issues in QuickBooks Desktop
Is your QuickBooks Desktop American Express not syncing? Check out the section below, in which we have listed all the effective solutions that can be applied to resolve the issue.
Solution 1. Refresh the QuickBooks Connection
Sometimes, QuickBooks updates your bank feed for a more secure and better banking experience. In that case, you need to refresh QuickBooks and American Express accounts to continue banking services.
Before proceeding to the steps below, it is recommended to know that such updates affect American Express Banking if you are using a version older than 03/30/2023.
- Select American Express Card QBDT in Bank Feed Setup for Credit Card, Charge Card, or Checking accounts.
- Now, click on the American Express Delegate option in Bank Feed Setup.
- As a Delegate User and Non-Account Holder, you have the authority to connect accounts in any of Intuit’s products.
- If you want to link an account that is not a credit card, charge card, or checking account.
- American Express bank feed @work is not available. We are working with American Express to fix this issue.
Once done, proceed with the below steps to refresh the QuickBooks Desktop and American Express connection:
a. Preparing to Switch QuickBooks to Express Web Connect
First, make sure to download the QuickBooks update and create a backup of your company file before switching to Express Web Connect.
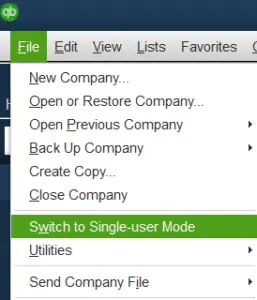
- Go to the File menu at the top in QB, then select Switch to Single-user mode.
- Further, choose Company and then click My Company.
- Sign in to Intuit if you haven’t already done so.
| Note: If you haven’t, you can create a new Intuit account or recover using the registered user ID and password. |
- If there are any pending online payments or bills, delete them.
- Once you delete, add and match the previously downloaded transactions.
Read More- How to Create a New Company in QuickBooks Online
b. Turn off bank feeds for your account
Before updating the bank feed connection, it is advisable to disconnect all the related accounts to ensure that you do not face any discrepancy. There is nothing to worry as we will set it up again in the next step.
For Windows
- Navigate to Lists and then click on Chart of Accounts.
- Select and right-click on the account to turn it off.
- Choose Edit Account.
- Now, click on Bank Settings.
- Hit on Deactivate all online services, then select OK.
- Finally, select Save & Close.
For Mac
- Go to Lists and click on Chart of Accounts.
- Highlight the account you want to delete and select the pencil icon to edit.
- Choose Online Settings.
- Select Download Transactions then click on Not enabled.
- Hit OK to confirm, then select OK.
c. Set up an account for Bank feeds
You will first need to set up an account for bank feeds to download your transactions:
- Navigate to Banking and select Bank Feeds.
- Click on Set Up Bank Feed for an Account.
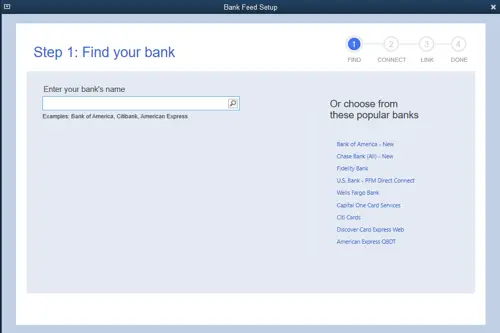
- Enter your bank name and then select Next.
| Note: Use the updated bank name shown in the Account reconnection required list and return here to complete Step 4. |
- The My Company sign in page will open on your screen.
- Now, sign in using the Intuit Account user ID.
- Enter the online banking information, then select Connect. QuickBooks will automatically connect you to the bank’s server.
| Note: You bank might prompt you to enter one-time password (OTP). |
- Choose the account (s) that you want to connect to QuickBooks, then select Connect.
- Hit on Close.
| Note: Chase requires you to authenticate and redirect you to an external browser. Once sign in, return to QuickBooks. |
Also Read- QuickBooks Online Banking Connection Error 101
d. Download transactions with Express Web Connect
Now, everything is set. The next time you use the bank feeds, it will automatically auto-download the transactions in QuickBooks Desktop.
| Note: Once you have everything set up, check the transactions from the previous day that need to be reviewed and categorized. Make sure any duplicates are removed. |
- Navigate to Banking and then select Bank Feeds.
- Now, choose Bank Feeds Center.
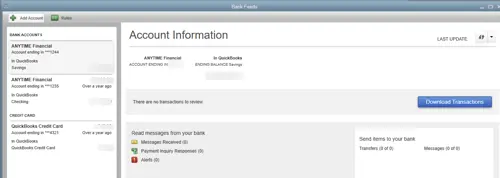
- Choose the account you wish to download.
- Hit on Download Transactions.
- Once done, choose Transaction List to process the transactions.
| Note: You can also select the Add Account dropdown (v) then select Manage Accounts to view any connection/bank errors. |
Solution 2. Update QBDT Bank Feed for American Express
When you update bank feeds in QuickBooks Desktop, it ensures an automated process of importing transactions and ensuring that all transactions are accurate.
- Launch QuickBooks Desktop and go to the Banking menu.
- Choose Bank feeds from the dropdown.
- Click on the Bank Feeds Center option.
- Select the bank feeds for which you want to update the account.
- Now, click on the Refresh icon multiple times at the top right corner of the screen.
Once this is done, return to QuickBooks Desktop and make sure American Express is syncing. If you still see the ‘QuickBooks American Express not syncing’ issue, continue moving to the next solution.
Solution 3. Verify Your Financial Institutions Website
If your bank’s server is down or QuickBooks failed to access the bank’s server, it is common to encounter the QuickBooks American Express not syncing issue.
It is recommended that you ensure that the financial institution is correct and that the servers are accessible.
- Check and confirm that the URL used by QuickBooks to connect to American Express is correct.
- Go to Bookkeeping in QuickBooks and select Transactions, then choose Bank Transactions.
- Click on Link Account to connect to your bank. It is not necessary to have an account; you just need to add a link to your bank.
- Select American Express and then click on it.
- Copy the bank’s website URL and log in to your account using the same URL.
If you are successful in connecting your bank without any issues, everything seems fine and the transactions will be downloaded to QuickBooks. Proceed with the below steps to ensure that:
- Open your bank’s website in Browse and confirm that there are no pending notifications, alerts or messages.
- Make sure QuickBooks Desktop doesn’t have any display problems. If there are any problems, the program may prevent the bank’s website from downloading transactions.
- Now, check if there have been any announcements of new security requirements. If so, the first thing to do is to acknowledge these announcements, notifications, or messages before downloading the transactions.
When this is done, relaunch QuickBooks Desktop and follow the steps below:
- Navigate to the Bookkeeping section and choose Transactions.
- Select Bank Transactions and click on the Refresh option.
- Once this is done, make sure that QuickBooks is syncing with American Express without any issues.
If you still see the QuickBooks not syncing with American express issue, proceed with the below troubleshooting steps.
Solution 4. Update the Financial Institutions Directory
Updating the Financial In Institutions Directory makes sure the bank information you have in QuickBooks is updated. Before you move further, make sure:
- You use the most recent version of QuickBooks Desktop.
- Create a company file backup to protect your data.
- Use a compatible version of QuickBooks.
Once that’s done, proceed to the section below and follow the steps to update the financial institution directory.
- Now, find the fidir.txt file on your computer.
| Product | File Location |
| Enterprise | C:\ProgramData\Intuit\QuickBooks Enterprise Solutions XXXX\Components\OLB\branding\filist |
| Pro/ Premier | C:\ProgramData\Intuit\QuickBooks XXXX\Components\OLB\branding\filist |
- Right-click on this file and choose Rename.
- Now, remove the file extension at the end from .txt to .old and save the changes by clicking outside the field.
- Select the QuickBooks version you currently use.
- Once the file is downloaded, save it on your computer.
- Move back to your computer and right-click the fidir.txt file, then select Copy.
- Access the file folder.
- Right-click anywhere on the same folder and then select Paste.
- Now, close and reopen QuickBooks Desktop to ensure the financial directory is updated.
Summary
Syncing American Express with your QuickBooks is important to automatically download transactions for easy and accurate reconciliation. This way businesses can save time, effort and reduce errors and gain better insight into their spending habits. However, if QuickBooks American Express is not syncing, following the information above will help you resolve the issue.
If you face challenges or need expert assistance, it is advisable to contact the professionals. Dial +1-866-409-5111 and talk to QuickBooks ProAdvisor’s now!
Frequently Asked Questions
No, QuickBooks does not inherently refuse to accept American Express payments. However, there may be problems syncing or processing transactions with American Express, especially when using QuickBooks Money or Go Payment
To connect and sync your American Express account with QuickBooks, you’ll need to sign in to QuickBooks Online, navigate to the Banking or Transactions menu, and then select the option to update your connection. Follow the on-screen prompts to connect your American Express account and ensure you’ve selected the correct account on your QuickBooks Chart of Accounts.
You’ll need to compare your QuickBooks records to your American Express statement to ensure accuracy. This includes verifying that all transactions recorded in QuickBooks match those on your statement.
In QuickBooks, reconcile Amex refers to the process of comparing your American Express credit card transactions in QuickBooks to your Amex statement to ensure accuracy and identify any discrepancies. It’s a crucial step in financial record-keeping to confirm your QuickBooks records match your actual bank statements.
To add an Amex card to QuickBooks, you must link your American Express account to your QuickBooks Online account. This involves signing in to QuickBooks, going to the Banking or Transactions section, and following the on-screen instructions to add your Amex account. You will need to enter your Amex login credentials and may be prompted for additional verification steps.

