Why is QuickBooks Email Not Working and How to Fix?
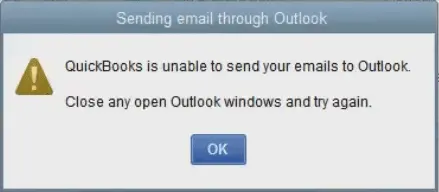
Emailing invoices, transactions, and PDFs is vital for businesses, and any disruption can delay payments and workflows. The “QuickBooks email not working” error, such as “QuickBooks is unable to send your email to Outlook,” can stem from issues like incorrect QuickBooks settings or an outdated Microsoft Office 365 version.
This guide explores the causes and provides clear, actionable solutions to permanently resolve the issue. By addressing this error promptly with our comprehensive troubleshooting advice, you can ensure smooth business operations.
Why QuickBooks Fails to Email Invoices to Outlook?
Here’s why Microsoft Outlook might prevent you from sending emails, based on common issues:
- An outdated QuickBooks Desktop version can lead to email issues.
- Check that QuickBooks isn’t set to always run as an administrator.
- Email preferences in QuickBooks may be set incorrectly.
- Incorrect configuration of Internet Explorer email settings.
- Malware or a damaged MAPI32.dll file can affect email functionality.
- Damaged or corrupted QuickBooks program files.
- System permissions or a misconfigured .INI file could be the culprit.
- Your antivirus software might be blocking QuickBooks.
Try These Steps If QuickBooks Email Not Working
We’ve discussed the reasons why QuickBooks may fail to send emails. Below, explore the most effective solutions to resolve this issue quickly, and email your files:
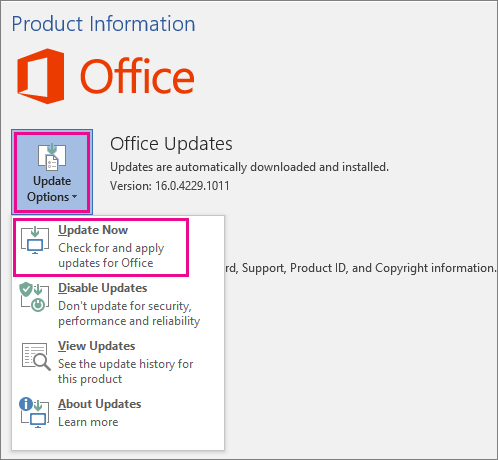
1. Update Microsoft 365
Outdated software increases security risks substantially and makes it vulnerable to malware attacks. It can also cause problems when sending emails in outdated Outlook. Thus, it is recommended to keep it updated to the latest release.
- Launch one of the Office apps, such as Microsoft Word or Paint.
- Select File at the top and click on Account.
- Scroll down to Product Information and click on Update Options.
- Choose Update Now.
| Note: If you can’t see the Update No option, click Enable Updates immediately. |
- Once the “You’re up to date” displays, close the window.
- Hit the Update Options button to Disable Updates or View Updates you installed.
2. Update QuickBooks Desktop
Update QuickBooks Desktop to the latest release to ensure you have the latest fixes and improved features. An outdated program often hinders crucial operations and causes delays, such as emailing invoices to customers, transactions, or other documents.
3. Edit the Admin Privileges
If your QuickBooks is set to automatically run as administrator, causing the email from QuickBooks not working. Follow the steps below to run it without administrator rights:
- Exit the QuickBooks application.
- Hit the Windows logo key and search for QuickBooks. Then, hit Enter.
- Right-click the QuickBooks Desktop icon and select Open file location.
- Move to the Compatibility tab.
- Ensure the Run this program as Administrator checkbox is not selected. Select Show Settings for All Users if the option is not visible or greyed out. This will make the option visible.
- Select Apply, then hit OK.
- Open QuickBooks and try emailing a sample transaction. If this doesn’t help you fix the issue, proceed with the next solution.
Open QuickBooks and try to email a sample transaction. Proceed with the next solution if this doesn’t help you fix the issue.
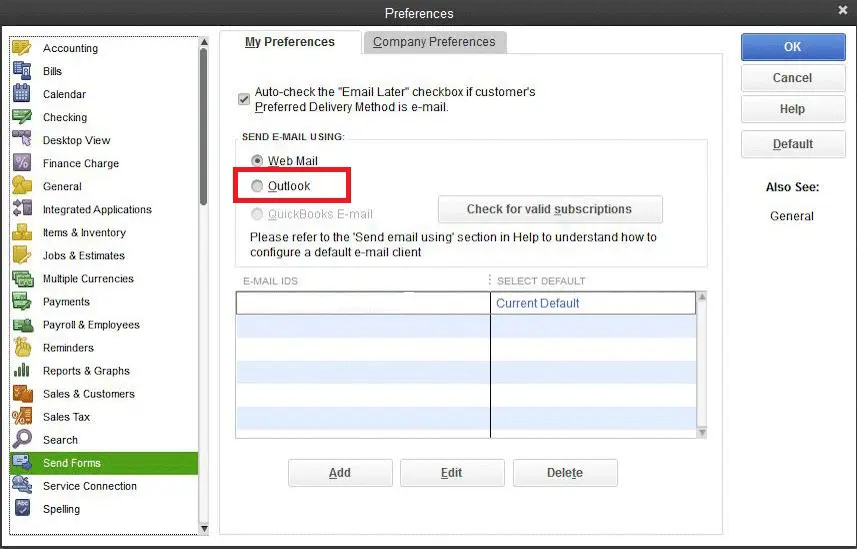
4. Modify the Email Preferences in QuickBooks
The email preferences should be correct to ensure you can email your invoices, transactions, and other documents:
- In the top menu bar, choose Edit.
- Select Preferences. You need to sign in to Outlook separately if you use Microsoft Outlook with Microsoft Exchange Server. Then, tap on Send Forms.
- Choose My Preferences.
- Choose Outlook as your primary email and click OK.
Test whether you can email through Outlook in QuickBooks. If you still see the error, toggle the preferences.
- Select Edit at the top.
- From the drop-down menu, choose Preferences. Then, hit Send Forms.
- Now, click on the My Preferences tab.
- Tap on QuickBooks E-mail or Webmail and then OK. Doing this will automatically toggle your preferences off.
- Repeat the above steps.
- Move back to the My Preferences tab and choose Outlook. Then, hit OK.
- Exit QB Desktop and other open programs.
- After this, restart your QuickBooks to let the changes take effect.
5. Review the Email Preferences in Internet Explorer
QuickBooks uses Internet Explorer to run the program and services in the background. Thus, the right set of permissions for Internet Explorer and the preferences are required to run the specific operations:
- Exit QuickBooks Desktop.
- Open Internet Explorer> Tools> Settings.
- Select Internet Options.
- Move to the Programs tab and choose Set Programs. Then, select Set your default programs.
- Choose your preferred email service provider.
- Hit on Apply, then OK.
- Exit Internet Explorer.
6. Repair your MAPI32.dll
The Messaging Application Programming Interface (MAPI) is a crucial component of your system that is required to send your data, especially emails or other data.
The following steps to fix the problem are quite difficult. Follow these steps only if you are a confident computer user. Otherwise, consider seeking help from an IT expert.
Let’s narrow down the issue first
- Restart your computer.
- Launch the Microsoft Word application.
- Create a new document on the app.
- Go to the File menu and select Send.
- Select Email as PDF Attachment.
Run a quick repair on the MAPI32.dll file if you can send emails from Microsoft Word but fail in QuickBooks Desktop:
- Close the applications or programs actively running on your system.
- Launch the Windows Start menu.
- Look for File Explorer in the search field and hit Enter to open it.
- Type C:\Windows\System32 into the search.
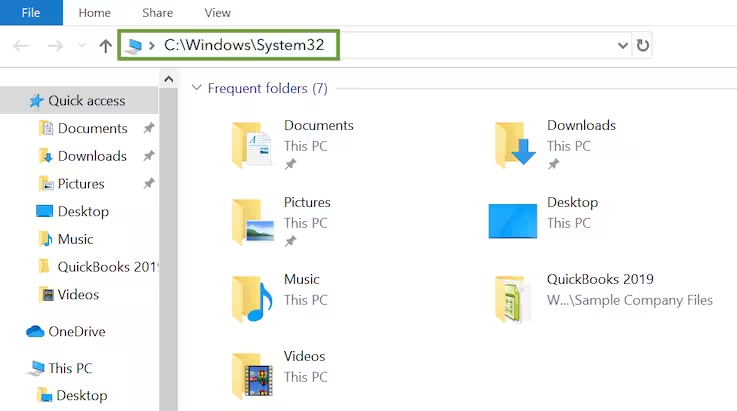
- Look for the Fixmapi.exe file and open it.
- Run the repair by following the on-screen instructions.
- Once the repair is finished, open QuickBooks and try again to email an invoice.
7. Rename the QBWUSER.ini file
If your QBWUSER.ini file is missing or corrupted, renaming it can fix the issue.
Note: When you rename the QBWUSER.INI file, the list of your previously opened corporate files is deleted. You will have to reopen your company file manually.
To rename the file:
- Locate the folder where the QBWUSER.ini file is saved: Users[Your user name]AppDataLocalIntuitQuickBooks [year]
- If you can’t find the folder, enable hidden files and folders.
- Right-click on the QBWUSER.ini file and choose Rename.
- Add .OLD at the end of the file name, such as QBWUSER.ini.old.
- Also, rename the EntitlementDataStore.ecml file.
- Finally, launch QuickBooks Desktop and try again to email invoices.
Still experiencing QuickBooks email not working? It is recommended that you create antivirus exclusions for QuickBooks Desktop and ensure nothing blocks the software processes.
8. Change Your System Permissions
Your email from QuickBooks not working because of the system permissions for your operations, such as emailing invoices and more. Consider editing the .INI system file to allow your program the correct set of permissions:
- Launch your QB program.
- Press the F2 key, then F3 to launch the Tech Help window. Then, select the Open File tab.
- In the list on your screen, search for QBW.ini.
- Choose Open File to open it in the Notepad.
- At the bottom of text in the Notepad file, you need to add a new line.
- Click Add.
- Write or add [QBWEBMAIL]CUSTOM_CERT_ENABLE=1 to the line.
- Choose Save from the File menu drop-down.
- Finally, shut down QuickBooks and close the Notepad.
9. Re-install QuickBooks Desktop
Uninstall and install your QuickBooks Desktop to address the damage or corruption to your QuickBooks Desktop program files. Proceed with the below steps and get the email from QuickBooks not working problem fixed:
Before starting the reinstallation:
- Download the QuickBooks installer of the same version as the program itself.
- Note down the license number. You will find it in the original package, or check the confirmation email to see if you bought it online.
| Note: You may also check the account management portal to find the details. |
a. Uninstall QuickBooks Desktop
Remove the QuickBooks program from your system:
- Hit the Windows logo key on your keyboard.
- In the search bar of Windows Start menu, type Control Panel and hit Enter.
- Click on Programs and Features or Uninstall a Program from the options displayed on your screen.
- Choose your current version of QuickBooks Desktop to uninstall.
- Tap on Uninstall/Change, Remove and then click Next.
b. Reinstall Your QuickBooks Program
- Ensure an active internet connection before starting.
- Locate the QuickBooks program file: QuickBooks.exe.
- Choose – Express install – This will install your QuickBooks over the previous one while saving the preferences. – Custom and Network Options – The new version will install on a different location while keeping the prior version installed without any previous preferences.
- Click Next, then Install.
- Once done, open QuickBooks Desktop.
Conclusion
Resolving the QuickBooks email not working issue is crucial for seamless business operations. Following the seven proven solutions outlined in the blog, you can help you email your documents or invoices without any issues. Make sure to test each solution systematically to identify and fix the issue.
For persistent problems, consult an IT expert or QuickBooks support on +1(866)409-5111 to ensure uninterrupted invoicing and communication, keeping your business running smoothly.
Frequently Asked Questions
Ensure the email settings in QuickBooks Desktop are configured properly, verify your email address, or ensure your email provider settings are correctly configured within QuickBooks. If you’re experiencing issues with customers not receiving emails, you may need to reset your email address, clear and re-enter it, or ensure your server settings are correct.
QuickBooks may fail to send emails due to incorrect email settings, damaged installations, blocked domain administrators, incompatible email provider security settings, and other reasons.
QuickBooks may fail to connect to your email due to incorrect email settings, issues with your internet connection, outdated QuickBooks software, or conflicts with firewall or antivirus software. Additionally, problems with your email service provider, incorrect login credentials, or even issues with your MAPI32.dll file can cause connection errors.
The QBWuser.ini file in QuickBooks Desktop is typically located in the following folder: C:\Users\[Your Username]\AppData\Local\Intuit\QuickBooks[YYYY], where [YYYY] is the year of your QuickBooks version (e.g., 2024).
Try updating QuickBooks Desktop, restarting your computer, and making sure the company file is not damaged or corrupted. Additionally, check if antivirus or Windows Firewall is blocking normal software processes and interfering with normal functioning.

