Fix QuickBooks Error H303: Multi-User Mode Issues
QuickBooks’ multi-user mode enables simultaneous access to a company file over a network, requiring proper hosting settings and the QuickBooks Database Server Manager. However, incorrect settings or other issues may trigger QuickBooks error H303, displaying the warning:
“This company file is on another computer, and QuickBooks needs some help connecting.”
This error disrupts multi-user connectivity. To resolve it, we’ve outlined potential causes and effective solutions to restore a stable multi-user network. Follow this concise guide to troubleshoot and fix the issue efficiently.
What Causes QuickBooks Multi-User Mode Error H303?
Either there are incorrect hosting settings, or else there are other reasons that can trigger the error. Let us see one by one why you see QuickBooks error H303:
- Not using an up-to-date version of QuickBooks
- Incorrect hosting settings on the server or workstation
- Possible data damage, corruption, or network connectivity issues
- Not running QB Database Server Manager on the server
- The hosting services might be inactive on the server
- Insufficient permissions to the company file or the services
- The Windows Firewall might be blocking QB and the programs
- Inability of server or workstation to connect to the network
Effective Ways to Resolve QuickBooks Error H303 When Hosting
Let us proceed with the suitable fixes that will help you resolve the underlying issues and ensure you can share the company file on the network:
1. Update QuickBooks Desktop
A software update is released with bug fixes, recent features, updated technology, and more, which are important for a seamless and uninterrupted work experience. Not updating QuickBooks Desktop can be the reason why you may see error code H303. Ensure that you update QuickBooks to the latest available release and enjoy the multi-user connection.
2. Run QuickBooks Database Server Manager
A server computer is the main computer that hosts your company’s files on the network, and others are just connected to it. For this seamless connection, it is necessary to run the QuickBooks Database Server Manager. Here’s how to do so:
- Select Network Issues from the left pane.
- Hit on QuickBooks Database Server Manager. If QuickBooks isn’t saved on the server, it will prompt you to install it.
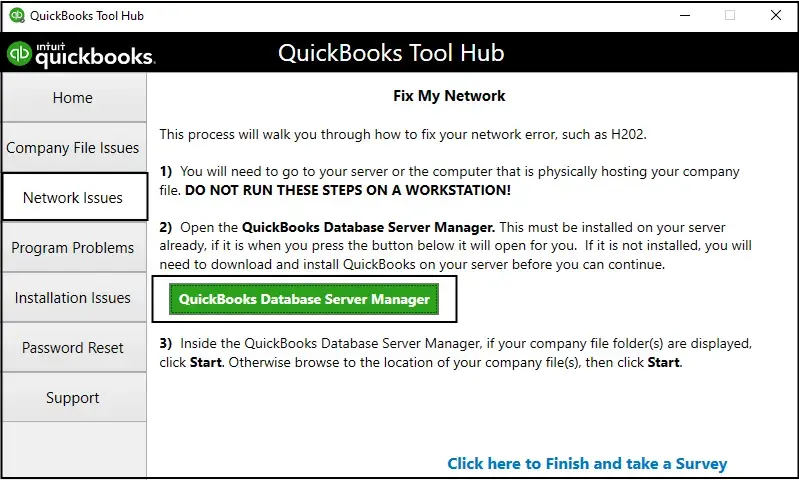
- In the QuickBooks Database Server Manager, choose Start Scan if you see your company file folder(s). In case, you don’t, click Browse and locate to your company file, then click Start Scan.
- The QB Server Manager will automatically repair the Windows Firewall permissions and other issues. Once done, select Close.
- Launch QuickBooks on the workstation where you see error code H303. Go to File, then Switch to Multi-user Mode. If the server computer as a workstation, make sure to verify it too.
3. Run QuickBooks File Doctor
The QuickBooks File Doctor verifies the company file data and the network connectivity; if there are issues, the tool also runs an automatic fix. Ensure you download and install the latest release of QB Tool Hub to access the File Doctor utility.
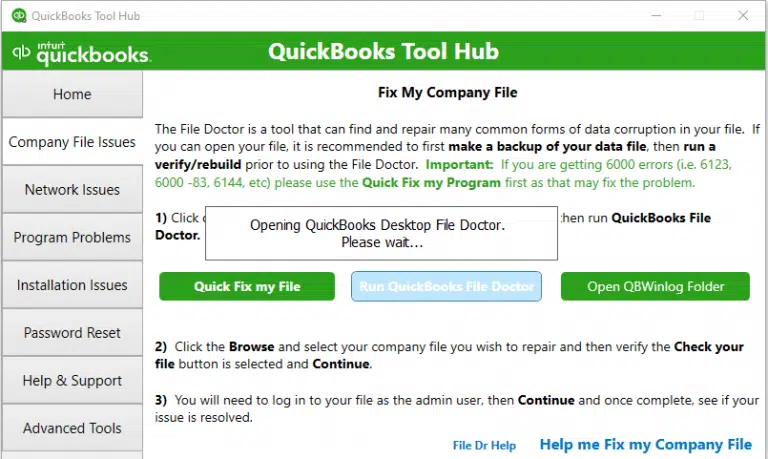
- Select Company File Issues in the tool hub.
- Hit on Run QuickBooks File Doctor. The utility might take a minute or more to open; wait until then.
Note: If the File Doctor doesn’t open, manually search for the tool in the Windows and select it to open manually.
- In the File Doctor, choose your company file from the drop-down menu. If you can’t see the file, click Browse and ind your company file.
- Hit on Check your file and Network and then click Continue.
- Now, type the QuickBooks admin password to allow the access and select Next.
If the workstation can connect to the server, the problem is resolved. Otherwise, go to the next solution.
4. Check the services on your server
Important for the Full Program option: Make sure to enable the hosting settings if you use full version of QuickBooks on your server computer.
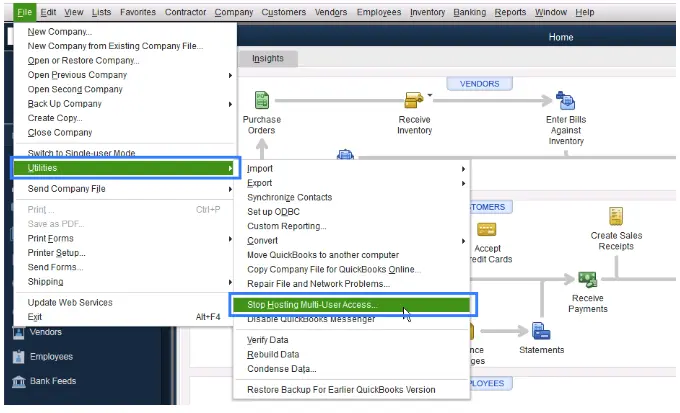
| Launch QuickBooks on the server computer. Select File from the top menu bar and hit on Utilities. If the option says, Host Multi-User Access. If you the Stop Hosting Multi-User Access option, don’t select it. |
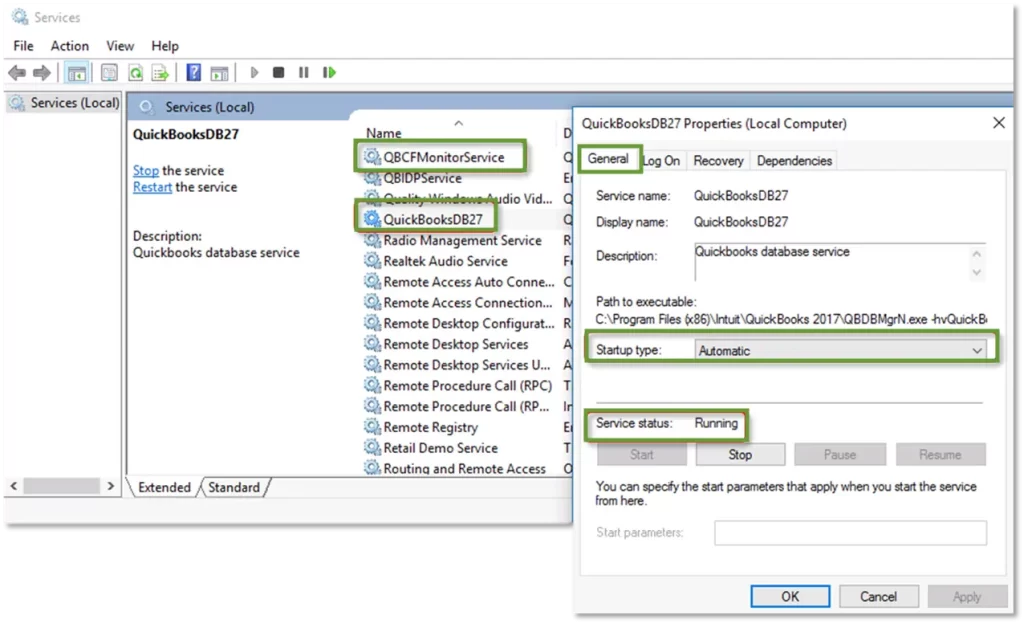
Make sure the QuickBooks hosting services are running on the server computer. Follow the below steps to review QuickbooksDBXX. Once done, repeat the same steps for QBCFMonitorService.
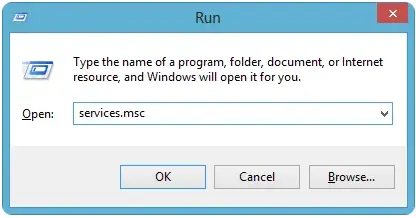
- Launch the Windows Start on the main computer.
- Type Run in the Windows search and select Run to open.
- Type “services.msc” into the Run prompt and press Enter.
- Find the QuickBooksDBXX on the list and double-click on it. Here, XX denotes to QuickBooks 2023 is QuickBooksDB33.
- For the Startup Type, choose Automatic.
- The service status should be either Running or Started. If it’s neither, select Start.
- Move to the Recovery tab.
- Now, select Restart the Service from each of the following drop-downs: First failure, Second failure, and Subsequent failures.

- Select Apply, then click OK to save the changes.
- Repeat the same steps for QBCFMonitorService.
Once this is done, launch QuickBooks on each workstation. GO to the File menu and choose Switch to Multi-user Mode. If everything works fine, error code H303 is fixed.
5. Add services to your Windows admin group on your server
QuickBooksDBXX and QBCFMonitorService must have administrator permissions to run on the server and ensure multi-user connections. See how to set Windows access permissions for sharing a company file on the network and add the service to the Windows Administrators group:
a. Set up folder permissions
Verify that the permissions are set correctly for the file folder
- Launch the Windows Start menu.
- Type File Explorer and select the application to open it.
- Right-click on the company file folder, then select Properties.
- Go to the Security tab and select Advanced.
- Choose the QBDataServiceUserXX service and click on Edit.
- Configure the following settings to Allowed:
- Traverse Folder/Execute File
- List Folder/Read Data
- Read Attributes
- Read Extended Attributes
- Create Files/Write Data
- Create Folders/Append Data
- Write Attributes
- Write Extended Attributes
- Read Permissions
If the permissions aren’t set correctly:
- Right-click on the company file folder and select Properties.
- Go to Security and click Edit.
- Now, select QBDataServiceUserXX and click Full Control, then Allow.
- Finally, click Apply, then OK.
b. Set Windows access permissions to share company files
If you need to adjust folder permissions:
- Launch File Explorer on your computer.
- Find and right-click on the below folders
- C:\Program Data\Intuit\Entitlement Client\v8
- C:\Program Data\Intuit\Entitlement Client\v6.0
- C:\Program Data\Intuit\Entitlement Client\v5
- C:\Program Data\Intuit\Entitlement Client\v3
- C:\Program Data\Intuit\Entitlement Client
- C:\Program Data\Intuit\QuickBooks Enterprise Solutions X.0 (X = version) or C:\Program Data\Intuit\QuickBooks 20XX (XX = year)
- C:\Program Data\COMMON FILES\INTUIT
- C:\Program Data\COMMON FILES\INTUIT\QUICKBOOKS
- C:\Users\Public\Public Documents\Intuit\QuickBooks\FAMXX (XX = year)
- C:\Users\Public\Public Documents\Intuit\QuickBooks\Company Files
- C:\Users\Public\Public Documents\Intuit\QuickBooks\Sample Company Files\QuickBooks Enterprise Solutions X.0 (X = version) or C:\Users\Public\Public Documents\Intuit\QuickBooks\Sample Company Files\QuickBooks 20XX (XX = year)
Now, follow the steps below for these folders. Remember that you may not have these folders, as some of these are specific to certain versions of QuickBooks Desktop:
- Right-click on one of the folder and select Properties.
- Select Everyone from the Security tab.
Note: In case Everyone isn’t listed in the Group or User Name checkbox, choose Add and type in Everyone, then click OK.
- Choose Full Control, then click on Apply and OK.
Once all done, launch QB on the server computer and workstations. If you still se QuickBooks error H303, move to the next solution.
6. Configure your Firewall settings on your server
Windows Firewall and security applications like antivirus or anti-malware protect your computer by blocking unwanted data, viruses, and threats that could harm or steal system information. These may block software deemed a threat or if settings are misconfigured. Adjust Windows Firewall and antivirus settings to ensure software services run smoothly without errors.
7. Ping your server from a workstation
Let’s ping a server from a workstation to test the connection. Make sure to ping your server from each workstation where you see error code H303.
First, enable the Network Discovery on your server computer and the workstations where you are getting QuickBooks error H303
- Launch the Windows Start menu on the server or workstations.
- In the search, type Network and select Network and Sharing Center.
- Click on Change advanced sharing settings.
- Make sure to select Turn on network discovery in the Network Discovery and File and Printer sharing sections.
Now, get the server name from your server:
- On your server computer, launch the Windows Start menu.
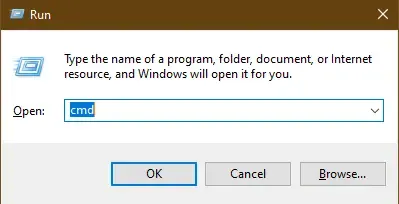
- Type Run in the search and select Run to open.
- Type CMD in the Run prompt and press Enter.
- In the prompted CMD window, type “ipconfig/all,” then press Enter.
- Look for the Host Name in the Windows IP Configuration section. The server name is on the right side.
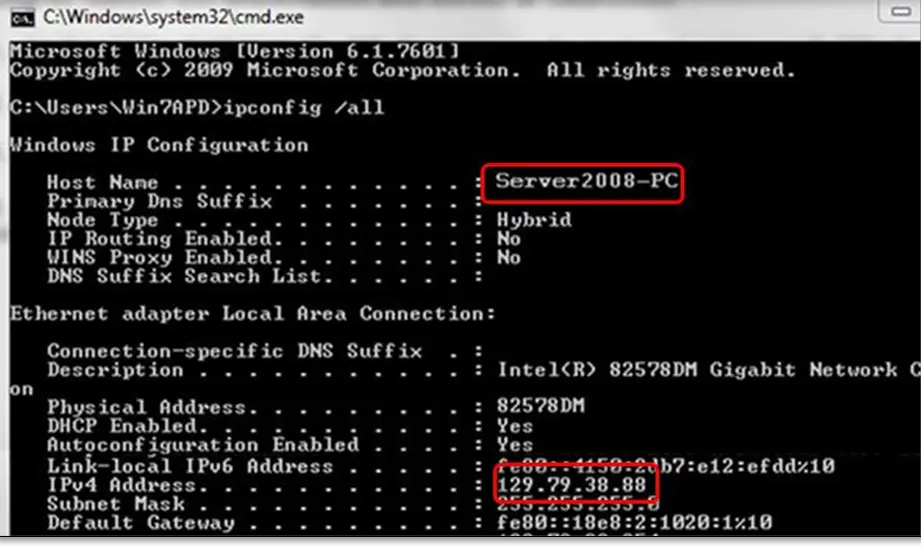
- Now, note down the host name, or copy it to a word document so you can access it easily.
Move back to your workstation to test the server. These steps are a bit complex, you might want to move to an IT professional for assistance.
- On your workstation, open the Windows Start menu.
- Type Run in the search field and select Run.
- In the Run prompt, type CMD and press Enter.
- Now, type “ping [your server name],” and then press Enter. Avoid the brackets around your server name.

- Finally, repeat the above steps for each workstation for error code H303.
If you receive a reply for each packet without any loss, it means the server is fine and can establish the connection on the network, move to the next solution. If there’s packet loss connect with IT or QuickBooks professionals for help.
8. Check the hosting settings
If you see error code H101, H202, H505, on one or more workstations is set as the server QuickBooks. Your server is the only that hosts your company file on the server that must be set as the multi-user mode.
The hosting settings must be turned off on the workstations. These are the computer that connects with the server on the network. Your server is the only computer that should be hosting.
Note: You can also follow the below steps before opening the company file.
- Launch QuickBooks on the workstation where you see error code H101, H303, or H505.
- Navigate to File and select Utilities instead of opening a company file.
- If the option is Host Multi-User Access option, don’t select it. Move to your next workstation. This isn’t causing the problem when hosting.
- If the option says Stop Hosting Multi-User Access, select it.
Now, repeat the same steps on each of the workstations where you see error H303.
After checking the workstations, move to the server computer. A server computer is the one that hosts your company file.
- Open QB Desktop on the server computer.
- Go to File, then select Utilities.
- If the option says Host Multi-User Access, select it. If the option says Stop Hosting Multi-User Access, don’t select it.
Conclusion
A multi-user error can disrupt network connections, potentially causing QuickBooks Error H303. This blog has outlined all possible causes and effective solutions to resolve the error, ensuring a seamless connection.
If the issue persists, we recommend contacting a QuickBooks ProAdvisor for expert assistance. Dial the toll-free number 1-866-409-5111 to connect with a professional who can help restore uninterrupted access to your QuickBooks multi-user environment.
Frequently Asked Questions
QuickBooks error H303 typically occurs in a multi-user environment when a workstation cannot connect to a company file hosted on another computer (server). This usually indicates a problem with the hosting setup or network configuration that prevents the workstation from accessing the shared file.
To fix QuickBooks error 403 when connecting to the bank, ensure proper user permissions, verify Internet settings, and check for any problems with security software or the QuickBooks application. If the error persists, check for any notifications or updates on the bank’s website or refresh the connection.
Here’s how to turn off the multi-user mode in QuickBooks Desktop:
- Go to the File menu.
- Select Utilities.
- Now, select if the option is Stop Hosting Multi-User Access.
In QuickBooks Desktop, verify your login credentials, including email and password, paying attention to case sensitivity. Also, add Intuit as a trusted site and clear Intuit-specific cache and cookies for a better experience.
QuickBooks might not allow multi-user mode due to several reasons, such as incorrect hosting configuration, firewall or antivirus interference, issues with the database server, or problems with Windows file permissions. Additionally, not installing QuickBooks on the server computer may also be the reason why QuickBooks won’t allow the multi-user mode.

