QuickBooks Web Connector Error QBWC1039: Resolution Guide
The QuickBooks Web Connector enables seamless data exchange between QuickBooks and third-party applications. However, disruptions such as internal issues or changes to your company file location can interrupt the connection, often triggering the QuickBooks Web Connector error QBWC1039. This error typically displays the following warning message:
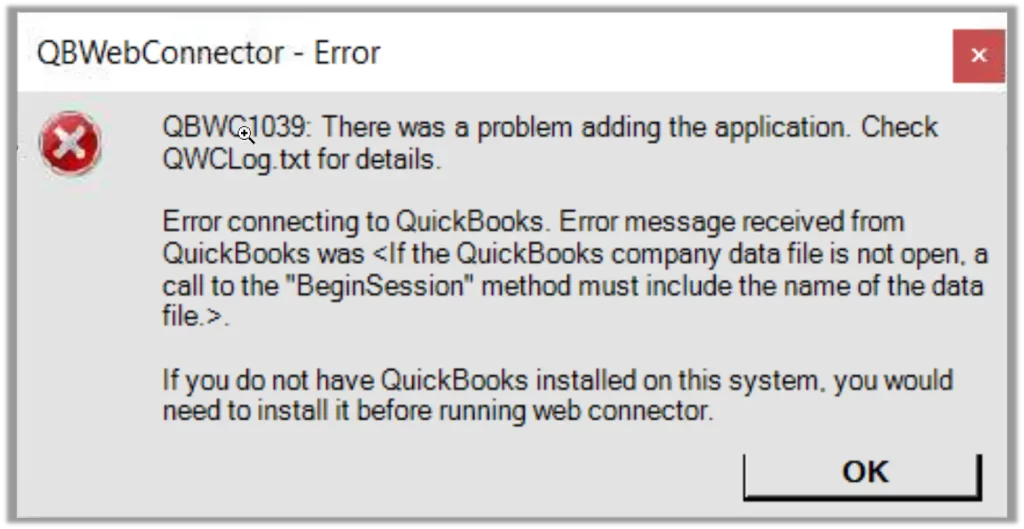
QBWC1039: There was a problem adding the application. Check QBWCLog.txt for details.
Depending on the cause and timing of the error, you may encounter different variations of this message. This guide explores all possible error messages associated with QBWC1039 and provides practical, actionable solutions to resolve the issue effectively.
Overview of QuickBooks Web Connector Error QBWC1039
See the overview below about the Web Connector, how it works, and what hinders the connection between QuickBooks and third-party services:
What is QuickBooks Web Connector?
QuickBooks Web Connector is a Microsoft Windows application that allows the connection between third-party applications and QuickBooks without opening the firewall ports. The web connector bridges web-based applications and QuickBooks, allowing you to easily sync your data as customers, such as vendors, invoices, bills, payroll information, and more. Web Connector is installed on the same computer as QuickBooks to provide a seamless connection between the web service and server.
The older version of QuickBooks Web Connector supports all the versions and products of QuickBooks Desktop for data exchange or synchronization.
QuickBooks Web Connector 2.2.0.34 and other newer versions will only work with the specific products and versions mentioned below:
- U.S. editions of QuickBooks Financial Software products
- QuickBooks Enterprise Solutions (2015 or later)
- QuickBooks Premier (2015 or later)
- QuickBooks Pro (2015 or later)
- Canadian editions of QuickBooks (2015 or later)
- UK editions of QuickBooks (2015 or later)
QuickBooks Web Connector 2.2.0.34 and newer versions support TLS 1.0, TLS 1.1, and TLS 1.2.
Interruptions to QuickBooks Connection with Third-Party Applications
Incompatibility between third-party applications or QuickBooks Web Connector, network problems, incorrect configuration, and trying to connect various apps at a time in different locations can interrupt QuickBooks’ connection with other web-based services.
Troubleshooting involves identifying the underlying issue and performing steps such as updating the software if there are incompatibility issues. If you see different errors or are unsure what to do to get past the problem, consider moving to the section below.
Troubleshooting Web Connector Error QBWC1039 in QuickBooks in No Time
Error code QBWC1039 appears on your screen with a variety of error messages, in different aspects, and for different reasons.
Explore the suitable fixes depending on the error message that pops up on your screen and establish the connection between the services and QuickBooks.
Error 1: QBWC1039: Error connecting to QuickBooks. Error message received from QuickBooks was
You see this error message when the Web Connector and QuickBooks company file are in different locations.
Here’s what to do
Locate your company file, and the QuickBooks Web Connector is in the same location. Follow the steps below to find your company file location manually:
- Launch the Windows Start menu on your computer.
- In the search bar, type File Explorer and select File Explorer to open.
- From the navigation bar, go to My Computer or select This PC.
- Again, search for *.qbw or *.qbb to find all QuickBooks company files. Remember to include the asterisk (*) before the extension. You can even look for the files in QuickBooks, such as *.qb.
Learn More- How To Update QuickBooks Company File
Error II: QBWC1039: If the QuickBooks company data file is not open…
You will see this error when:
- If you have renamed your company file and moved to a different location, or it is incompatible with the third-party applications.
- You haven’t configured the QuickBooks Web Connector to run when QuickBooks is closed.
Also Read- QuickBooks Desktop Won’t Open or Freezes
What to do to fix the error:
1. If you moved or renamed your company file:
a. Rename your company file
- Create a backup for your QuickBooks company file.
- Now, check the location of the company file in QuickBooks.
- When you are on the Home page, press F2 or Ctrl+1 to launch the Product Information window.
- Note down the location listed in the File Information field.
- Move to the specified location of your company file.
- Right-click on the Windows icon from the toolbar and select File Explorer.
- Right-click on your company file and choose Rename. You will see the company file name as [CompanyName].qbw or just [CompanyName].
- Change your company file name and press Enter.
- Click Yes for the confirmation.
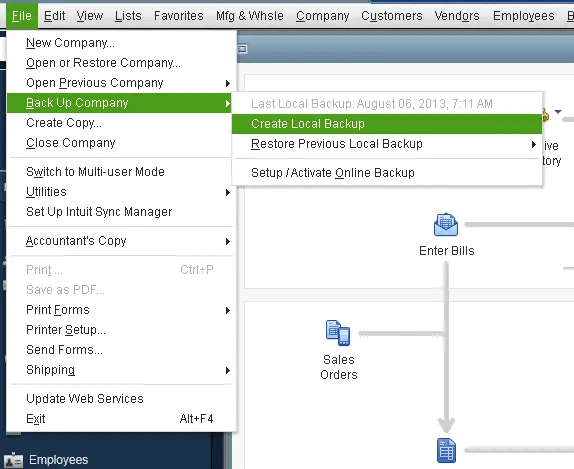
b. Make a backup of your company file and then restore it to its original location if you moved it.
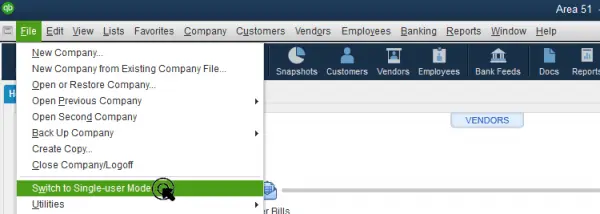
- Navigate to File and choose Switch to Single-user Mode from the drop-down. Then, click on Create Local Backup.
- Choose Local Backup in the prompted window and then click Next.
- Hit Browse in the Local Backup Only and then choose the location to save your backup company file.
- Although this is optional, you can set the number of backups you want to keep.
Tip: No worries if you forget when to back up the file. Simply use the options in the Online and Local Backup section to set backup reminders.
- Now, this will run a quick test on your company file to analyze if the backup file is in good shape before saving the copy.
- Click OK once all is done.
- Hit Save it now and Next.
Now, let’s restore it to the original location
QuickBooks creates a new company file (.qbw) when you restore using the backup company file (.qbb).
Important: You must first transfer your backup company file to your local hard drive if it is stored on an external device, such as a USB, or a hosting service, such as Box. Then proceed as directed.
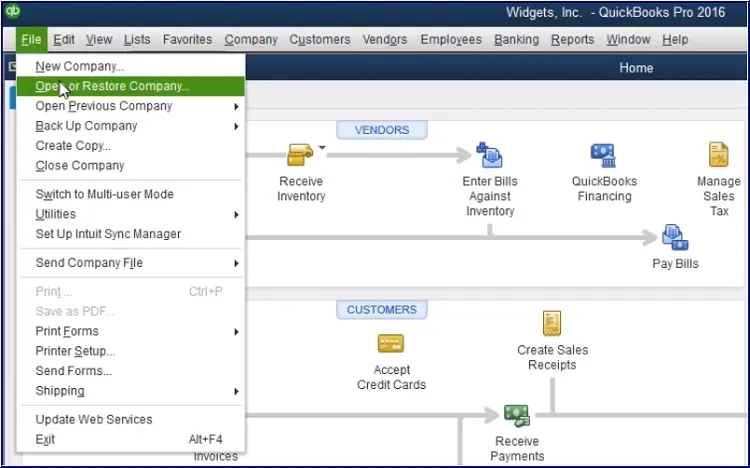
- Open QuickBooks and go to the File menu.
- Click on Open or Restore Company from the drop-down.
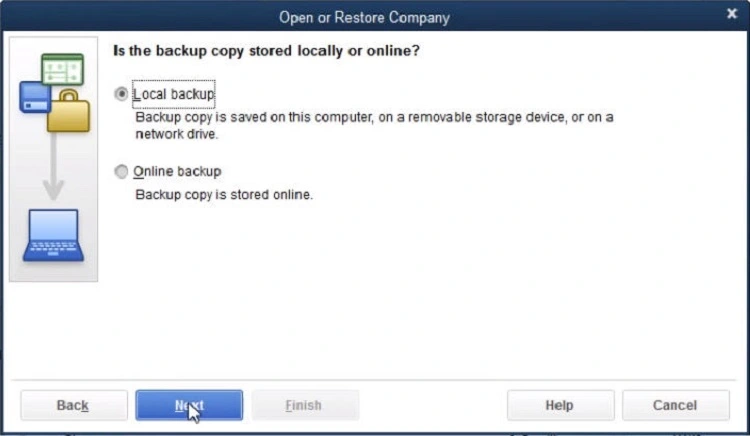
- Hit on Restore a backup copy and then Next.
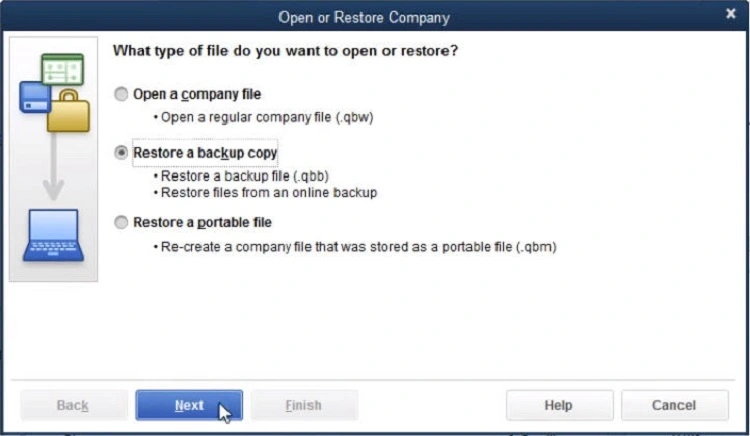
- Choose Local Backup and then click Next.
- Browse your computer to find the backup copy: [Your company name].qbb.
- Choose the folder where you want to save the restored copy of your backup file. Then, select Open.
Note: You risk overwriting your data if you open the backup in the same folder as your current company file.
- You can give the backup or your current company file a distinctive name to prevent overwriting. Another option is to save the backup in a whole other folder.
- Once you are all set, select Save. If you see a warning message about possibly overwriting your data, choose the option that fits you well. Don’t overwrite anything until you’re sure.
After you’re done, you may need to request that your program’s support staff move their files to the same area as yours.
2. Configure Web Connector run when QuickBooks is closed
- Sign in to QuickBooks Desktop with all the admin rights.
- If the program is in multi-user mode, go to the File menu and choose Switch to Single-user Mode.
- Go to the Edit menu and choose Preferences.
- Choose Integrated Applications and then move to the Company Preferences tab.
- Select the third-party app you are connecting to and click on Properties.
- Mark the checkbox for Allow this application to log in automatically.
- Click Yes in the prompted Authorization window.
- Choose User to log in, then OK.
Case III: QBWC1039: If the QuickBooks company data file is not open, a call to the “BeginSession” method must include the name of the data file.
The error message appears when Web Connector isn’t set up to run when QuickBooks Desktop isn’t open. Either you renamed your company file or moved it to a different location, or you cannot connect with a third-party application.
Try this to fix the issue
If you haven’t set up the Quickbooks Web connector to run when QuickBooks isn’t open yet, follow the steps below to set it up now:
- Sign in to QuickBooks with all the admin rights.
- If you use QuickBooks in the multi-user mode, go to the File menu and choose Switch to Single-user Mode.
- Choose Preferences from the Edit menu.
- Select Integrated Applications and then go to the Company Preferences tab.
- Now, select the application you want to add and then click on Properties.
- Mark the box for Allow this application to log in automatically.
- Click Yes on the Authorization window.
- Finally, choose User to sign in and click OK.
If you have renamed the company file or moved it to another location, refer to the steps mentioned in Case I to save it in the default location and correct the name.
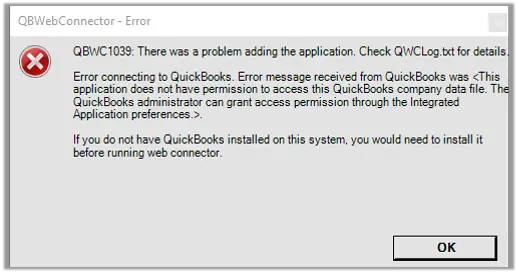
Case IV: QBWC1039: There was a problem adding the application. Check QBWCLog.txt for details
You failed to connect to the third-party application and see the error message when you do not have an open QuickBooks company file or the location has moved. This can also happen if you are not using an up-to-date version of QuickBooks.
What you should do
If you change the company file name or location, undo all the changes and move the file back to its original location. This will help you open the company file and fix the error.
- To modify the location or rename your file, uninstall the QuickBooks Web Connector program.
- Change your location or rename your file.
- Establish a connection with the Web Connector.
What you should do
Make sure each version of QuickBooks on your system is on the newest release.
If you haven’t installed the latest version of QuickBooks or uninstalled the one you’re currently using, you may need to reinstall the new version or update the QuickBooks software. QuickBooks products are only compatible with the latest version for a better user experience.
Example: QuickBooks 2020 is upgraded to QuickBooks 2021. You opt to utilize QuickBooks 2020 instead of 2021. Installing and updating QuickBooks 2021 to the most recent version is required. The program must be installed and updated, but you are not required to use it.
- Download QuickBooks
- Once done, install QuickBooks Desktop to the latest release for all versions of QuickBooks you use on your computer.
Follow the below steps if you are not sure how QuickBooks install works
- Make sure your computer has an active internet connection.
- Locate the QuickBooks program file, QuickBooks.exe, in the file folder.
- Select
- Express install – This will install over your old version of QuickBooks and save all of your preferences. To get your old version back, you’ll have to reinstall it using a custom install.
- Custom and Network Options – This allows you to leave older versions installed and install the latest version somewhere else. The new version does not include your previous version choices.
- Select Next and hit Install.
- Once done, choose Open QuickBooks.
Case V: QBWC1039: This application does not have permission to access the QuickBooks company data file…
This occurs when the third-party app doesn’t have the QuickBooks administrator’s permission to connect to the software.
What you should do
Note: If you are not an admin, you can ask the admin to follow the steps below to grant the permissions.
- Sign in to QuickBooks with all the admin rights.
- If you run QuickBooks on the multi-user mode, select File at the top menu bar and the click on Switch to Single-user Mode.
- Move to the Edit menu and choose Preferences.
- Choose Integrated Applications and then go to the Company Preferences tab.
- Make sure the checkbox for ” Don’t allow any applications to access this company file isn’t selected.
- Click Yes on the SDK App Authorization pop-up.
- Select the third-party applications to allow the admin permissions.
- Finally, click OK.
Case VI: QBWC1039: This application has not accessed this QuickBooks company data file before
This occurs when you add a QWC file to Web Connector while not logged in as the administrator.
What you can do
- Launch QuickBooks Desktop.
- Sign in as an admin and make sure the software is in single-user mode.
- Now, open Web Connector.
- Click on Add an Application and then select the QWC file.
Case VII: QBWC1039: Unable to add FileID to company file for this Application

This happens when attempts are made to connect to an app more often than usual. Any application can be added only once on one location.
Here are the steps to add and manage apps via Web Connector:
a. Add an app
You can link your third-party online application’s .qwc file to QuickBooks if you have it.
- Launch QuickBooks.
Note: Ensure you log into QuickBooks and Intuit accounts with all the administrative rights.
- Navigate to File, choose App Management, and then tap on Manage Web Apps.
- Click on Set up next to the app you want to set up. You will then be directed to the app’s website to log in.
- Hit on Connect to QuickBooks on the app website.
- Launch QuickBooks Desktop and hit Done on the Access Confirmation screen to complete your setup.
b. Manage an app
When connecting, log in as an administrator to your QuickBooks and Intuit account to manage your apps.
- Launch QuickBooks.
- Go to the File menu, choose App Management, and then click on Manage Web Apps.
- Now, click on Connected apps to view your apps and make the required changes.
Case VIII: QBWC1039: Unique OwnerID/FileID pair value required
This occurs when you try to add an app already on QuickBooks.
What you can do
To resolve this, you must delete the current Owner ID.
- Launch QuickBooks Desktop.
- Now, get the CP3 tool and click on Open.
- Hit on Select file and then look for the QWC file. This will put this file in the Enter QBWC file Location.
- Choose Open and click on Remove Stamp.
- Click Yes on the QuickBooks Application Certificate window, then Continue.
- In the prompted Access Confirmation window, select Done.
- Follow the on-screen instructions on your screen and click OK.
- Once done, you will receive a confirmation that the Owner ID has been removed. Then, select OK.
- Exit and reopen QuickBooks and Web Connector, then try to add your third application again.
Summary
So, this is the end of this blog after covering a brief introduction to the web connector and a detailed discussion of the possible error messages you may see with QuickBooks Web Connector Error QBWC1039, with troubleshooting solutions. We hope the above is helpful for you to build a connection between third-party web-based applications and QuickBooks.
If you get stuck or need further help, call +1(866)409-5111. Our team of experts is available 24/7 to assist you.

