QuickBooks Hosting Mode is Off? Here’s What to Do
When QuickBooks hosting mode is off, the software is not configured to allow multiple users to access the company file over the network simultaneously. Sometimes, you may fail to host your company file even if the hosting setting is enabled because of network connectivity issues between workstations and the server due to Windows Firewall,
“Error: Cannot communicate with the company file due to firewall.”
Moreover, you may also get QuickBooks H-series errors due to incorrect hosting settings or other reasons, with a warning message saying,
“This company is on another computer, and QuickBooks needs some help connecting.”
To enable multi-user access, you must switch to multi-user mode and set up user permissions on the host computer. The article includes step-by-step instructions for enabling file and printer sharing, firewall exceptions, and adding users with appropriate access levels.
Why is QuickBooks multi-user mode not working?
There can be many reasons why you fail to host or open your company’s file on the network, such as a faulty Windows firewall or misconfigured hosting settings. Let’s look at all the possible factors that can occur on the network in detail:
- The folder permissions might not allow you to share the company file on a network
- Network Discovery might be disabled on your device
- Failure to scan the company using QuickBooks Database Server Manager for hosting
- Not running the QuickBooksDBXX or QBCFMonitorService service on the server
- Any damages or corruption to the .ND and .TLG configuration files
- The network connectivity between the workstation and the server is hampered
- Any damages or corruption to QB company file
- Ongoing issues with your QuickBooks program
Resolve the Hosting or Networks Issues in QuickBooks Desktop
Are you experiencing the QuickBooks hosting is off issue, or do you encounter errors like QuickBooks error H202, QuickBooks error H303 or QuickBooks error H505 when trying to host or open your company file on the network? Don’t worry, the section below contains all the possible fixes that ensure the error or issues are fixed, and you can host the company file without interruption.
1. Configure the default hosting settings
Learn how to configure default hosting settings in QuickBooks Desktop:
- Launch QuickBooks Desktop on your server computer.
- Navigate to the File menu and choose Utilities.
- Now, click on Host Multi-user Access.
- Select Yes to enable the hosting mode.
Once that is done, you must configure network sharing, firewall settings, and possibly the database server manager.
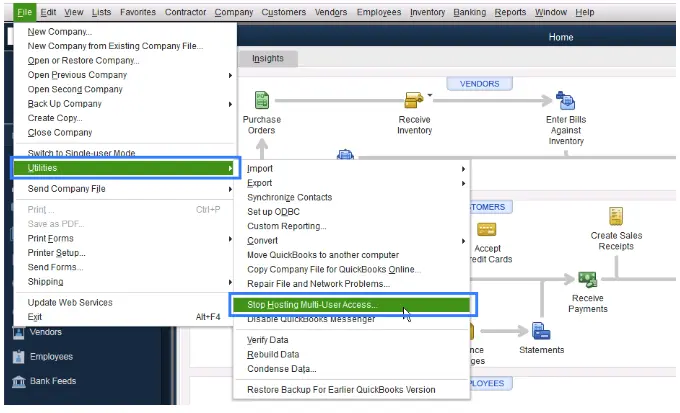
As your server computer is the main computer that hosts your company file, the hosting should be disabled on the workstation.
- Launch QuickBooks on the workstation where you encounter the hosting issues.
- Navigate to File> Utilities> Stop Hosting Multi-User Access. If you don’t see the option, move on to the next workstation.
- Now, select Stop Hosting Multi-User Access and repeat these steps on each workstation where you encounter hosting issues.
2. Check the folder permissions on your server computer
To access a company file or folder on a multi-user network, ensure you have the correct set of Windows permissions. Each QuickBooks version has corresponding components that must be updated to function in multi-user mode.
In this section, we will explore the steps to verify and configure Windows permissions correctly:
a. Set up folder permissions
Verify that permissions are set correctly
- Click on the Windows icon from the Taskbar.
- Now, search for File Explorer and press Enter.
- Select and right-click on the folder that contains your company file.
- Choose Properties.
- Move to the Security tab and select Advanced.
- Choose QBDataServiceUserXX and then click on Edit.
- Configure the following settings to Allowed:
- Traverse Folder/Execute File
- List Folder/Read Data
- Read Attributes
- Read Extended Attributes
- Create Files/Write Data
- Create Folders/Append Data
- Write Attributes
- Write Extended Attributes
- Read Permissions
If the permissions for the above folder are incorrect:
- Right-click on the folder where your company file is saved and select Properties.
- Choose Security and then click on Edit.
- Now, select QBDataServiceUserXX and select Full Control, then click Allow.
- Click on Apply, then OK.
Change folder permissions
Follow the below steps if you need to update the folder permissions:
- launch the Windows Start menu on your computer.
- Type File Explorer and press the Enter key.
- Find the below folders and right-click on each:
- C:\Program Data\Intuit\Entitlement Client\v8
- C:\Program Data\Intuit\Entitlement Client\v6.0
- C:\Program Data\Intuit\Entitlement Client\v5
- C:\Program Data\Intuit\Entitlement Client\v3
- C:\Program Data\Intuit\Entitlement Client
- C:\Program Data\Intuit\QuickBooks Enterprise Solutions X.0 (X = version) or C:\Program Data\Intuit\QuickBooks 20XX (XX = year)
- C:\Program Data\COMMON FILES\INTUIT
- C:\Program Data\COMMON FILES\INTUIT\QUICKBOOKS
- C:\Users\Public\Public Documents\Intuit\QuickBooks\FAMXX (XX = year)
- C:\Users\Public\Public Documents\Intuit\QuickBooks\Company Files
- C:\Users\Public\Public Documents\Intuit\QuickBooks\Sample Company Files\QuickBooks Enterprise Solutions X.0 (X = version) or C:\Users\Public\Public Documents\Intuit\QuickBooks\Sample Company Files\QuickBooks 20XX (XX = year)
b. Set Windows access permissions to share company files
- Open the Windows Start menu on your computer.
- Search for File Explorer and then hit Enter.
- Locate the folder with your company file and then right-click on it.
- Choose Properties and click on Sharing. Then, select Share Add.
- Select the corresponding QBDataServiceUserXX for the QB version you use.
- Finally, configure the permission level for both users to Full Control and select Share.
3. Turning on the Network Discovery on your device
It is necessary to turn on network discovery and ensure it appears when opening a file using a UNC path. Additionally, if password-protected sharing is turned on, Windows always asks for the network password. This way, you can log in using the network password or turn off the feature.
Perform the procedure below on the server or host computer and all workstations that need to access QuickBooks remotely over the network.
- Launch the Windows Start menu by pressing the Windows logo icon.
- Search for Control Panel and then press Enter.
- Go to Network and Sharing Center, then select Change advanced sharing settings.
- Now, expand the Profile type you are currently using.
- Choose Turn on network discovery under Network Discovery.
- Under Password protected sharing, then click on Turn off password protected sharing.
- Hit on Save changes.
4. Scan your company file using QBDSM
QuickBooks Database Server Manager is a utility that scans your folders and company files to allow server computer hosting. This tool lets users share the company file over the network and with the team by creating configuration files on the server computer.
a. Scan your folders
- Launch the Windows Start menu on your server computer.
- Search for Database and choose QuickBooks Database Server Manager.
- Move to the Scan Folders tab.
- Click Browse and choose the folder with your company file (.QBW).
- When you are done, click OK.
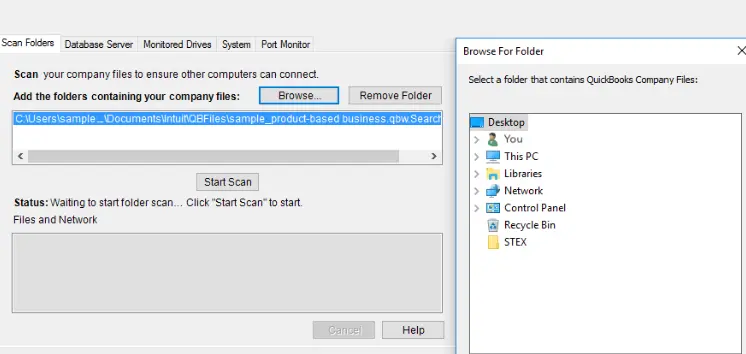
- Finally, select Start Scan.
Once the scan finishes, you will see the company file folder in the QuickBooks company files found section. Now, users connected to the server can open the company file using these folders.
b. Monitor your drives
- Navigate to the Monitored Drives tab.
- Mark all the checkboxes on the hard drives that hold your company file.
Note: Make sure to add the only drives that have your company file.
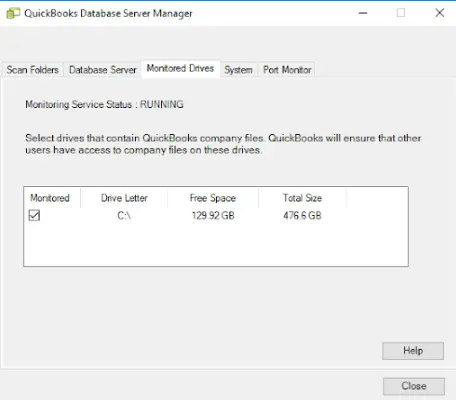
- You cannot access the drive that is not mapped.
c. Manage Database Server Manager
There are other tabs as well in QuickBooks Database Server Manager which helps you run the processes smoothly:
- The System tab in the tool shows where the QuickBooks Database Server manager is installed on your server computer.
- The Database Server tab lets you gain the tool’s real-time status and who’s connected to it.
5. Rename the .ND and .TLG files
.ND and .TLG are configuration files or components of QuickBooks company files that hold configuration information, allowing you to access the company file across a network or in a multi-user environment. If these components are damaged, you will encounter any error codes or issues when opening the company file over the network.
You need to rename these files to replace damaged or corrupted files with new ones. Follow the steps below to learn how to rename file components:
- Locate the folder that has your company file.
- Locate the folder with your company file.
In the folder, look for files with the same name as your company file but with the extensions .ND and .TLG.- company_file.qbw.nd
- company_file.qbw.tlg
- Now, right-click each file, select Rename, and then add the word .OLD at the end of each file name. Example: company_file.qbw.nd.OLD
- Launch QuickBooks and then try again to sign in to your company file.
6. Check if QuickBooks services are running
QuickBooksDBXX and QBCFMonitorService allow users to access the company file simultaneously over the network and with your team.
QuickBooksDBXX manages the database server, allowing workstation computers to connect to the server. QBCFMonitorService monitors the company file and ensures it is available for multi-user access.
- Launch the Windows Start menu on your server computer.
- Type Run in the search field and press the Enter key.
- Now, type services.msc into the Run prompt, then click OK.
- Look for the QuickBooksDBXX service on the list and double-click on it. Here, XX stands for your version of QuickBooks plus 10.
Example: QuickBooks 2024 is QuickBooksDB34.
- Choose the Startup Type as Automatic.
- Check and confirm the Service status is either Running or Started. If it’s none of these, select Start.
- Navigate to the Recovery tab.
- Now, select Restart the Service from the dropdown menus for the First failure, Second failure, and Subsequent failures.
- Select Apply and then click OK to save your changes.
- Once done, repeat the same steps for QBCFMonitorService.
7. Run QuickBooks File Doctor
When you run the QuickBooks File Doctor utility, it will run a quick test for your company’s file and network problems and, if any problems are found, run a quick repair.
Follow the steps below to run the File Doctor utility:
- Launch QB Tool Hub.
- Select Company File Issues from the left pane.
- Hit on Run QuickBooks File Doctor. The tool might take one minute or more to open file doctor to open the file.
Note: If the QuickBooks File Doc doesn’t open, look for the QuickBooks Desktop File Doc and then open it manually.
- Choose the company file from the dropdown menu in QuickBooks File Doctor. If you can’t see the file, click on Browse and browse your company file.
- Hit on Check your file, which is the middle option and then Continue.
- Enter the QuickBooks admin password to allow access to the company file and select Next.
The scan time depends entirely on the size of your company file, which can range from 10 to 15 minutes. The scan may fail even if it fixes the issues. After the scan is finished, open QuickBooks and then select your company file.
8. Set the Windows Firewall permissions
Sometimes, the Windows Firewall blocks the QuickBooks program due to incorrectly configured settings or because the software may be considered a threat to your computer. Therefore, you may experience QuickBooks hosting mode stopped and also trigger an error code when opening the company file over the network.
To fix this, you need to configure the Windows Firewall settings for QuickBooks Desktop and ensure that it does not interfere with software processes such as hosting.
9. Re-install QuickBooks Desktop
Any damage or problems with your QuickBooks program files when updating QuickBooks or payroll tax tables can interrupt the process and trigger QuickBooks error 15271. To resolve the issue, you must remove and reinstall QuickBooks Desktop because doing so replaces the old program files with new ones.
Before you start
- Download the installer of the same version as your QuickBooks Desktop.
- Keep the QB license number handy; you will need it when activating the program after re-installation. You can find it on the original package or check the confirmation email if you purchased it online.
Note: You can also check the account management portal to get the same information.
a. Remove QuickBooks
- Launch the Windows Start menu by pressing the Windows icon key on your keyboard.
- In the search field, type Control Panel and then hit Enter.
- Select Programs and Features and then click on Uninstall a Program.

- Now, choose the version of QuickBooks that you want to uninstall from the list of programs.
- Select Uninstall/Change, Remove and then hit Next.
If you can’t see the option to remove the program, sign out and then sign in again to Windows with the admin rights.
b. Install QuickBooks again
Once you remove QuickBooks, proceed with the steps below steps below to install QuickBooks Desktop. This will replace the older version of QuickBooks with the ones, fixing all the associated issues.
- Make sure your computer has an active internet connection.
- Find the QuickBooks program file QuickBooks.exe and double-click on it.
- Now, select
- Express install – The software will save all of your previous settings and install over your old version of QuickBooks when you expressly install it. You must choose the Custom and Network settings in order to access the newly installed QuickBooks.
- Custom and Network Options – This allows you to maintain older versions of QuickBooks installed while installing a new version in a different place. The new version does not include your choices from the prior version.
- Tap on Next and then select Install.
- When all is done, select Open QuickBooks.
10. Ping your server from a workstation
When you ping a server from a workstation, it runs a test to check the connection. Consider pinging the server from each workstation where you see the QuickBooks hosting mode is off issue.
Before getting started, you must ensure that Network Discovery is enabled on the server computer and the workstation where you see error code H202.
- Launch the Windows Start menu both on your server and the workstation.
- In the search field, type Network and select Network and Sharing Center to open.
- Choose Change advanced sharing settings.
- Now, select Turn on network discovery in the Network Discovery and File and Printer sharing sections.
Now, get the server name from your server computer
- On your server computer, launch the Windows Start menu.
- Type Run in the search file and then press Enter.
- In the Run prompt, type CMD and then press Enter.
- Again, type ipconfig/all into the CMD window and then press Enter.
- Now, look for the Host Name in the Windows IP Configuration section. You will see the server name on the right.
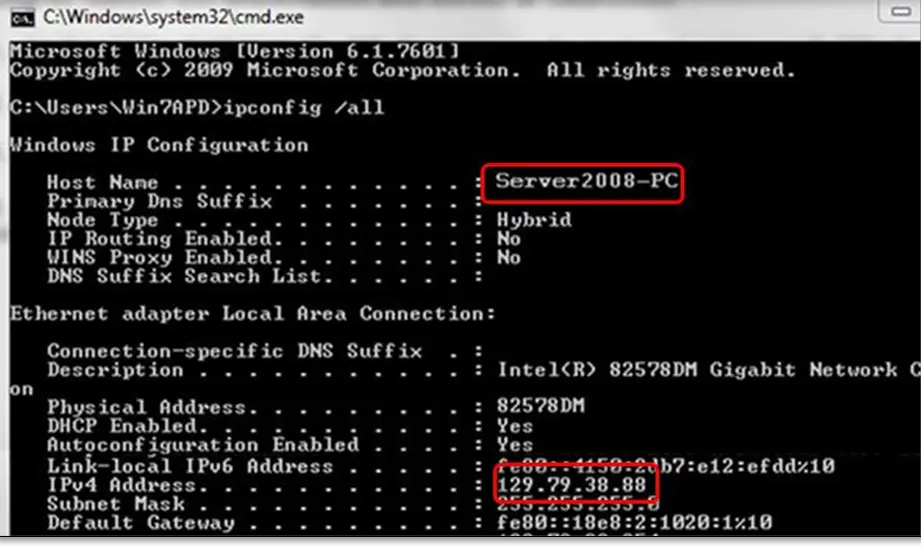
- Note down the hostname or copy it somewhere you can easily find.
Now, go to your workstation to test the connection with the server computer. These steps require IT expertise, so if you are unsure, you can opt for an IT expert.
- Launch the Windows Start menu on your workstation.
- In the search field, type Run and press the Enter key.
- In the Run window, type CMD and then press Enter.
- Enter “ping [your server name],” and then press Enter. The brackets are just for reference. You don’t need to include the brackets around your server name.

- Repeat these steps on each workstation where you see the QuickBooks hosting mode is off issue.
If you get a response for each packet without any loss, then your server computer will work fine.
In case there’s packet loss or the reply is slow, stop there and reahc outto IT support to help you with the network.
Summary
So, this was all about the QuickBooks hosting mode is off issue, possible causes and troubleshooting steps to ensure a seamless experience when collaborating with your team. We know how challenging it can be when your workflow is interrupted, or you suddenly see unknown errors on your screen.
Hopefully, the solutions above have helped you overcome the issues and return to your business. If not, or if you need further assistance, we recommend you connect with QB Pros. Dial +1-866-409-5111 now!
Frequently Asked Questions
To enable hosting mode in QuickBooks Desktop, go to the File menu, choose Utilities, and finally, choose Host Multi-User Access. Confirm by clicking Yes when prompted. This allows other users to access the company file over the network.
QuickBooks hosting is a service that allows users to access their QuickBooks accounting software and data remotely through a cloud-based server rather than installing it on a local computer. You can work with your accounting data anytime, anywhere, from any internet-connected device, and collaborate with team members in real time.
QuickBooks may not connect to the server due to network problems, firewall/antivirus restrictions, incorrect server settings, or problems with the company file or QuickBooks installation. Troubleshooting steps include verifying Internet connectivity, checking firewall/antivirus settings, and ensuring proper hosting configuration on the server.
To turn off hosting mode in QuickBooks Desktop, open QuickBooks on the host computer, go to File, then Utilities, and finally, select Stop hosting multi-user access if it is displayed. If Stop hosting multi-user access is shown, it means the hosting mode is already turned off.
QuickBooks Desktop hosting is a cloud-based service that allows users to access their QuickBooks desktop accounting software from anywhere with an internet connection, essentially running the software on a remote cloud server. This approach offers benefits such as increased accessibility, real-time collaboration, and improved security compared to a traditional on-premises installation.

