A Quick Guide to Repair QuickBooks Missing PDF Component
Encountering the QuickBooks missing PDF component error in QuickBooks can be frustrating, especially when you need to generate or print PDF invoices and reports. This issue often stems from problems with the Microsoft XPS Document Writer or outdated PDF drivers, disrupting QuickBooks’ functionality. In this guide, we’ll walk you through simple, effective steps to resolve the missing PDF component error, ensuring seamless PDF creation. Whether you’re a small business owner or an accountant, follow our troubleshooting tips to get QuickBooks back on track and keep your workflow uninterrupted.
Why is QuickBooks Missing PDF Component?
There are several reasons why QuickBooks fails to work when saving as PDF. Let us understand the steps one by one below:
- Common printing issues such as errors when printing checks, invoices, or reports or issues with the file
- Incorrect temp folder permissions
- problems with the print spooler service
- Issues with the XPS Document Writer components or possible damages
- Antivirus of the Windows Firewall might be blocking QuickBooks
- Not using an up-to-date version of Adobe Reader
- Incorrect saving your PDF
- Possible damages or corruption to the QBPrint.qbp file
Instant Ways to Resolve the PDF Issues in QuickBooks Desktop
We have discussed multiple factors that can trigger the error when saving a file as a PDF in QuickBooks. To get past all these possible factors, perform the effective troubleshooting solution mentioned one by one:
1. Run the QuickBooks Print & Print Repair Tool
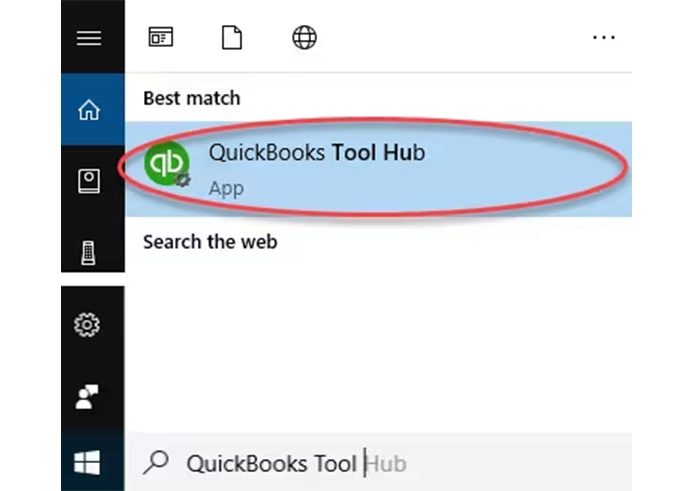
The QuickBooks Print & Print Repair tool verifies your company file and the PDF & printing related components to find the issues and then rebuilds the issues promptly. To get started, download and install QuickBooks Tool Hub to the latest release:
- In QB Tool Hub, select Program Problems.
- Hit on QuickBooks PDF & Print Repair Tool. The tool might take a minute or more to run; wait until then.
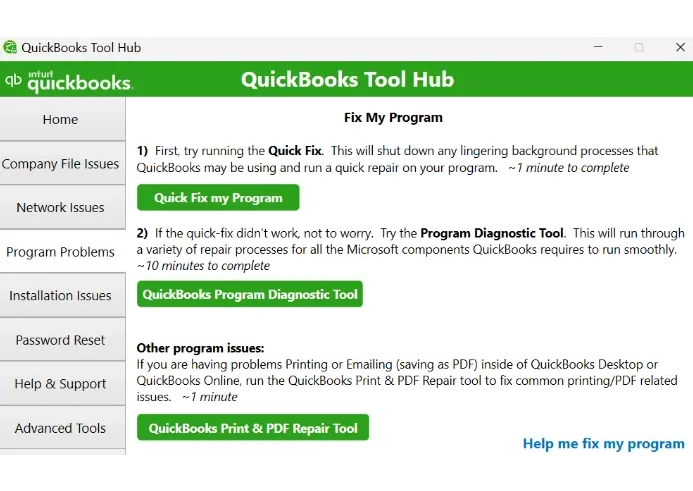
- Now, try again to print, email, or save as a PDF from QuickBooks Desktop.
2. Restart and reset your temp folder permissions
Restarting the computer will stop background processes, refresh the software, and update the system. After doing so, clear the temporary folder permissions to ensure QuickBooks processes are not blocked and run without interruption.
a. Reset your temp folder permission
- Launch the Run command by pressing Windows+R keys.
- Now, type %TEMP% and press Enter.
- Right-click anywhere in the empty area near the temp folder and select Properties.
- Hit on Security.
- Make sure all the user names and groups under Security is assigned with Full Control.
- Once done, save as a PDF in QuickBooks again.
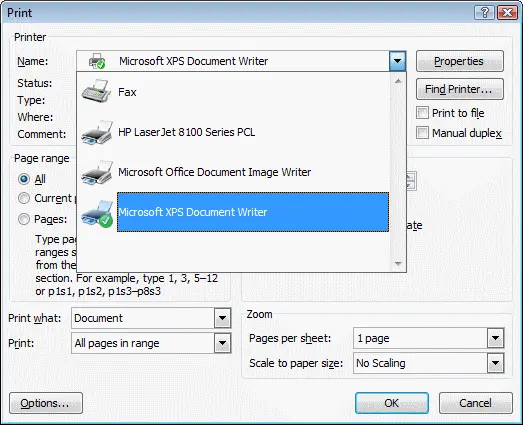
b. Test if you can print to your XPS
QuickBooks Desktop uses parts of the XPS Document Writer to save your document as a PDF. Test if the XPS Document Writer is really working, or if it is the core reason why QuickBooks is missing PDF component:
- Launch Notepad.
- Name the file in Notepad as Test.
- Go to File and then select Print.
- Choose the XPS Document Writer and select Print.
- Note: Allowing your computer to print to your XPS printer is necessary if you don’t see XPS Document Writer.
- Now, type a filename and save the copy to your desktop.
- Finally, go to your desktop and view the XPS document you printed from the notepad.
If you still fail to print using the XPS Document writer outside of QuickBooks, you must connect with QuickBooks professionals or Microsoft experts for help.
Now, allow your computer to your XPS printer
- Launch the Windows Control Panel and switch it to Category View.
- Go to Programs.
- Hit on Turn Windows features on or off under Program and Features.
- Mark Microsoft XPS Document Writer from the list of services.
- Finally, click OK.
3. Create a new template or form
The template for your form or the document you are trying to save as a PDF can be damaged or have other associated issues. Consider creating a new template or form with these steps:
- Go to the Lists menu.
- Select Templates.
- Modify the transaction type on your template.
- Finally, create your PDF (.pdf).
You can also customize the template as per your preferences.
4. Update the Print Spooler service properties
QuickBooks Desktop utilizes the Print Spooler service to generate PDFs and facilitate printing tasks. If the service stops or incorrect services are configured, ensure that you update the service properties.
- Right-click on the Windows icon and select Run.
- In the Run prompt, type Services.msc and select OK.
- Look for the Print Spooler service.
- Right-click on the same service and choose Properties.
- Navigate to Startup type, choose Automatic.
- Now, select Apply, then OK.
- Right-click on the Print Spooler service and click start to initiate the service.
This must have fixed the issues and should be able to save or email a PDF.
5. Update Adobe Reader
See the below steps to learn how to manually download and install the Adobe reader:
- Launch your Adobe Acrobat Reader or Acrobat.
- Navigate to Help and hit on About Adobe Acrobat or Adobe Acrobat Reader.
- Adhere to the on-screen steps in the Updater window to download and install the latest updates.
- Note down the version, then exit the software.
6. Reconcile window disappears or doesn’t show
If QuickBooks appears to lock up after you select reconcile from the Banking menu, but PDF functions work, the reconcile window may show off screen.
- Look at all open windows to see if your reconcile window is listed.
- Select Close All and begin the reconciliation again.
7. Reinstall Microsoft XPS Document Writer
QuickBooks utilizes the XPS Document Writer, a Microsoft Windows component. For seamless operation when printing, it is necessary to run the tool fine. However, issues with the XPS Document Writer can prevent you from printing. Follow the below steps to resolve this issue:
- Close QB Desktop.
- Launch your Notepad and then type Test.
- Go to File and select Print, then click on XPS Document Writer.
- Select Print, then name your company file.
- Save the file to your desktop and open the same to ensure the format is accurate.
- If you failed to open the file, it shows that there is some issue with the Microsoft XPS Document Writer.
If you encounter issues when printing with XPS Document Printer, it is recommended to connect with QB professionals or Microsoft experts.
If the printer works fine, make sure that you selected to correct the printer in QuickBooks Desktop Proceed with the below steps to resolve the QuickBooks missing PDF component:
a. Check if the XPS services are turned ON
- Press the Windows logo on your keyboard.
- In the Windows search, type Control Panel.
- Go to Programs, then click on Turn Windows features on or off option.
- In the Windows feature, select XPS Service.

- Check-mark the XPS Service option and click OK.
- Finally, try to save as a PDF in QuickBooks again.
b. Reinstall Microsoft XPS Document Writer
- Press the Windows+R keys to launch the Run command.
- In the search field, type Control Printers, then press Enter.
- Now, select the Add Printer option.

- Choose The printer what I want isn’t listed, then click on Add a local printer or Network printer with manual settings.
- Select Use an existing port and hit Next.
- In the left pane, select Microsoft.
- Click on Microsoft XPS document writer, then select Next.
Once done, try again to save the file as PDF in QuickBooks Desktop to check if QuickBooks missing PDF component issue is fixed.
c. Modify security software configurations
System security software such as Windows Firewall, anti-virus, or anti-malware often blocks software if considered a threat to the computer or due to incorrect settings. To make sure you can print in QuickBooks Desktop and run other processes without interruptions, ensure that you configure the Windows Firewall or other anti-virus or anti-malware settings.
d. Modify Windows user permissions for the XPS Document Writer
If QuickBooks does not have the proper set of permissions, such as Windows administrator, it is common to encounter issues when running various processes, including QuickBooks saving as PDF not working or failing when printing using the XPS Document Writer. To fix the issue, ensure that you run the program with administrator rights.
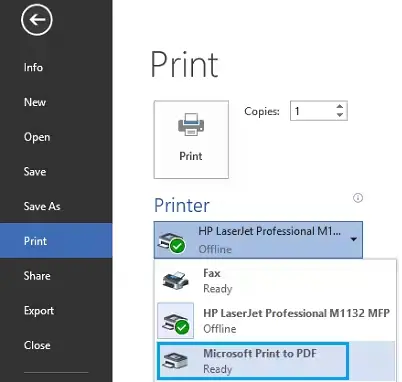
7. Change how you save a PDF
Try changing the way to save a PDF in QuickBooks Desktop:
Follow the below steps instead of; Save and then Save as PDF:
- Go to File at the top.
- Select Print Invoice and then click on Microsoft Print to PDF as the printer.
8. Rename the QBPrint.qbp file
Make sure to rename the QBPrint.qbp file to resolve the possible data damages or corruption and ensure you can save as a PDF or print the files seamlessly:
- Locate the QBPrint.qbp file in your QuickBooks folder.
- Quick tip: If you don’t see the company file, you need to display hidden files and folders or search for files using Windows to find these files in Windows.
- Windows 10: C:\ProgramData\Intuit\QuickBooks 20XX
- Note: Here, 20XX shows the QuickBooks version you use.
- Server 2012: C:\Program Data\Intuit\QuickBooks year and C:\Users\**remote user**\AppData\Roaming\Intuit\ YEAR VERSION\TSPrinterSettings
- Note: Terminal Service users report discovering duplicate Qbprint.qbp files alongside stored client data files; verify all folders for unusual occurrences.
- Now, right-click on the QBprint.qbp file for your QuickBooks version and choose Rename.
- Add the .OLD extension at the end of the file name such as QBPrint.qbp.old.
- Launch QuickBooks Desktop.
- Navigate to File and select Printer Setup.
- Choose any of your transaction in the Form Name and click OK. This will automatically create a new QBprint.qbp file.
- Note: It is not necessary to do this for each transaction.
- Finally, try again to open and print your transactions.
Conclusion
We conclude this blog with a comprehensive list of potential reasons behind the QuickBooks missing PDF component issue, along with effective troubleshooting methods. This information has been carefully curated with expert insights to ensure you can print your documents seamlessly using QuickBooks Desktop.
For further assistance, we recommend connecting with QuickBooks professionals via the Toll-Free Number +1-866-409-5111. Enjoy hassle-free printing with QuickBooks Desktop!

