How to Troubleshoot QuickBooks Error PS032 (Payroll Update)?
To ensure accurate tax calculations, maintaining an up-to-date tax table is essential. QuickBooks provides payroll updates to streamline tax filing, employee payments, and other payroll processes.
However, errors like QuickBooks error PS032, which displays the warning message, “[PS032] QuickBooks is having trouble installing your payroll update,” can disrupt these critical tasks.
Error PS032, part of the PSXXX series, frequently interrupts payroll updates. In this blog, we’ll explore the technical causes behind these update failures and provide effective solutions to ensure seamless payroll updates.
What Causes Update Error PS032 in QuickBooks?
Let’s look at the list of possible factors that are responsible for interrupting payroll update and showing the error code PS032:
- QuickBooks software may be out of date
- Your paychecks may be stuck in Online to Send.
- UAC settings on your system may block payroll updates
- Possible damage or corruption in the CPS folder
- Program files may be damaged, or software installation may go wrong
Read More- QuickBooks Error PS038 (Fix the Payroll Update Error)
Best Ways to Fix QuickBooks Error PS032 When Updating Payroll
Previously, we discussed factors that may disrupt payroll updates and trigger QuickBooks error PS032. Follow the solutions outlined below to fix the issue and ensure smooth payroll updates:
1. Update and back up your QuickBooks data
Update your QuickBooks Desktop to the latest release to ensure this isn’t interrupting the payroll updates. Once you reset the update, restart your QuickBooks Desktop. Click Install Now on the QuickBooks Update Service. Then, let’s update your tax table:
- Navigate to the Employees menu.
- Hit on Get Payroll Updates.
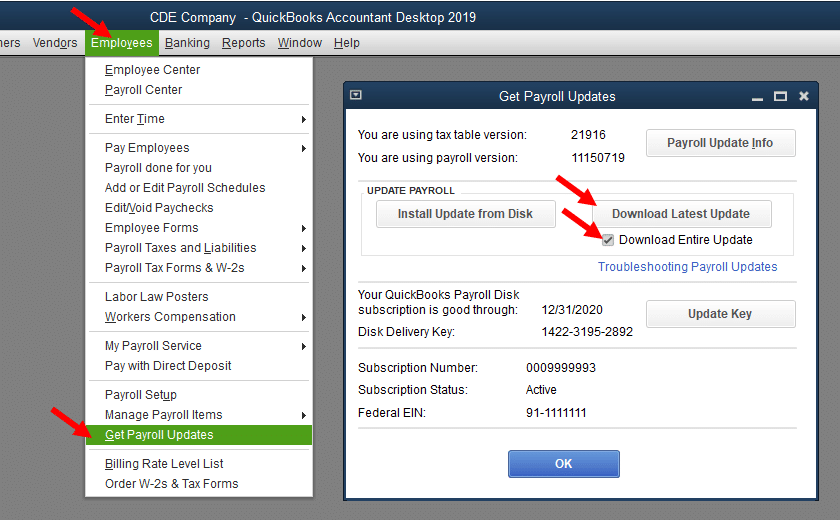
- Make sure to check the Download Entire Update option.
- Finally, click Download Latest Update.
Once done, create a company file backup to ensure data security and proceed to the next solution.
2. Verify the payroll subscription
QuickBooks offers several methods to subscribe to its payroll service. Follow the steps below to verify your payroll subscription using different approaches:
Through your company file
The best possible way to turn on payroll service is directly from your QuickBooks Desktop company file:
- Navigate to Employees in the QuickBooks Desktop company file, and choose My Payroll Service.
- Hit on Account/Billing Info.
- Sign in to your Intuit Account using your login info. It will open the QuickBooks Account page.
- Select Resubscribe under the Status bar.
- Adhere to the on-screen instructions to reactivate the payroll services.
Through your company file
Let us reactivate the payroll services directly from the web:
- Sign in to the account using Intuit login info like you normally do.
- Click on Resubscribe under Status.
- Adhere to the on-screen steps to reactivate the payroll subscription.
- Note: The payroll subscription may take up to 24 hours to fully reactivate. Once done, the subscription status will show as Active.
3. Toggle the stuck paycheck
Toggle off Stuck Paychecks to ensure they aren’t stuck as Online to Send, which can interfere with payroll updates by preventing data transmission to Intuit.
a. Send your payroll data or usage data
- Go to Employees at the top and choose My Payroll Service. Then, select Send Usage Data. If you can’t see the option, follow the steps below.
- Go to Employees, then click on Send Payroll Data.
- Select Send All in the Send/Receive Payroll Data window. Enter the payroll service PIN when prompted.
Once the send is successful, try again to get the payroll updates. If error code PS032 still appear, proceed to the next steps. However, if the send fails, reach out to us for help.
b. Identify stuck paychecks
- Go to Edit at the top and select Find.
- Navigate to the Advanced tab.
- Select Detail Level in the Choose Filter section.
- Click on Summary Only.
- Move back to the Filter list. Scroll down to Online Status and select it, then hit Online to Send.
- Choose Find, and you’ll see paychecks that are stuck or weren’t sent to Intuit.
- Note down the “Number of matches” on the Find window. Proceed to the next step.
c. Verify and Rebuild your data
Let us repair the company file data integrity issues by using the Verify and Rebuild Data utility:
i. Verify your company file data
- Go to the Window and select Close All.
- Navigate to File> Utilities> Verify Data. If you see:
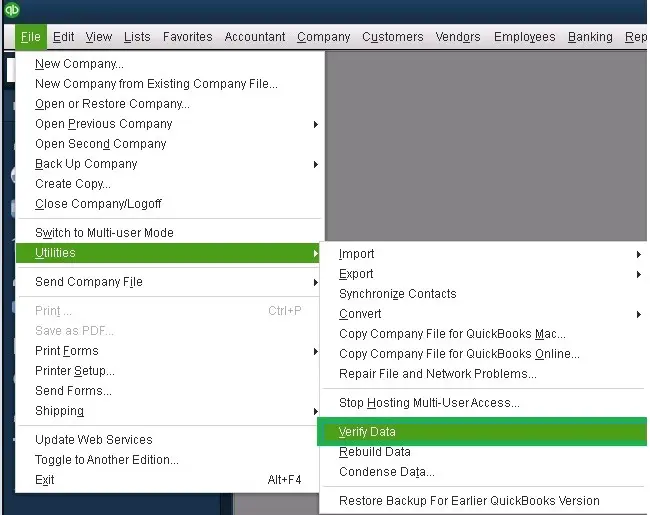
- “QuickBooks detected no problems with your data,” You don’t need to do anything, the file data is doing fine.
- A specific error message. Check our website for suitable fixes on the same error.
- “Your data has lost integrity” means the data is damaged, and you must rebuild it.
ii. Rebuild the data damages
- Go to File> Utilities, then Rebuild Data.
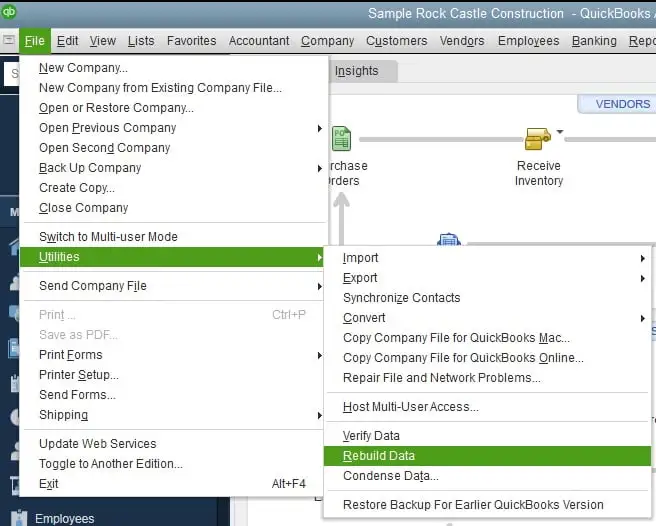
- A warning will appear to backup your company file; click OK. A company file backup is necessary before a rebuild because, in rare circumstances, the operation might need to remove transactions or list entries in order to correct the file. Before any modifications are performed, a backup will guarantee that you have a safe duplicate of your firm file.
- Choose the location to save the backup copy, then click OK.
- Select No if a message asks if you want to replace another backup file. Enter the file name in the respective field and click Save.
- In case the backup fails, click Cancel at the Rebuild prompt and reach out to an expert for assistance.
- Once the backup finishes, the Rebuild utility will start.
- Click OK when you see the “Rebuild has completed” message.
d. Toggle the stuck paychecks
These are the same paychecks found in Step 3.
- Find and open the oldest stuck paycheck.
- Hit the Paycheck Detail button.
- Scroll down to Earnings in the Review Paycheck window, and add the same earnings item as the last earnings item in the list.
Example: If you see the last item as Hourly Rate, add another earnings item named Hourly Rate to the list.
- You will see a message saying Net Pay Locked. Select No.
- Ensure the tax amounts and net pay are the same, then click OK.
- Select Yes only if you see a Past Transaction message.
- Hit on Save & Close to close the paycheck.
- Click Yes to the Recording Transaction warning message
- Open the paycheck again and select the Paycheck Details button.
- Delete the earning items that you just added in the Earnings section.
- Make sure not to change the tax amounts and net pay. Select OK.
- Repeat the steps below for all the stuck paychecks found in Step 2.
- Repeat solution 1 and download the tax table update when this is done.
4. Rename the CPS folder
The CPS folder contains payroll components or related files that are needed for updates and payroll processing. Consider renaming the file to a name that will fix potential damage or corruption:
- Press the Windows+E keys to launch File Explorer.
- Choose This PC.
- Go to the Local Disk C.
- Run the Program Files (x86), then the Intuit folder.
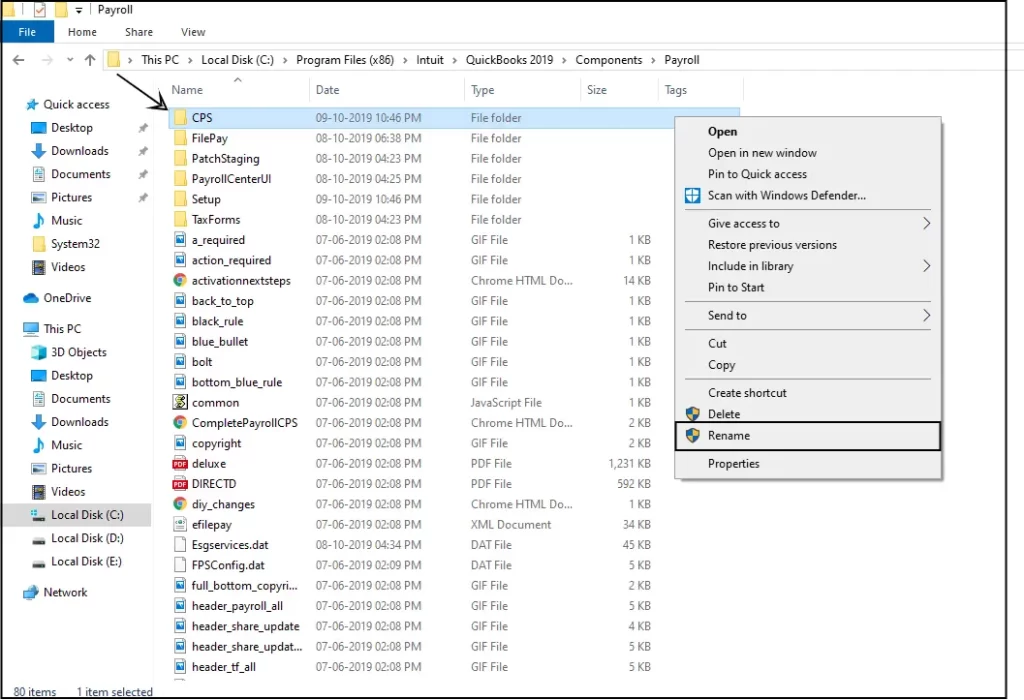
- Open the QuickBooks Desktop folder of the same version as your QuickBooks.
- Go to Components and select the Payroll folder.
- Now, right-click on the CPS folder and choose Rename. Enter a new folder name, then press Enter to rename it successfully.
5. Temporarily disable the UAC setting
UAC settings are responsible for how Windows interacts with QuickBooks. These permissions might prevent you from having administrative rights and, thus, the payroll updates, causing QuickBooks error PS032. Temporarily disable the UAC setting to get the updates:
- Exit QuickBooks Desktop.
- Right-click on the QuickBooks icon and select Run as administrator.
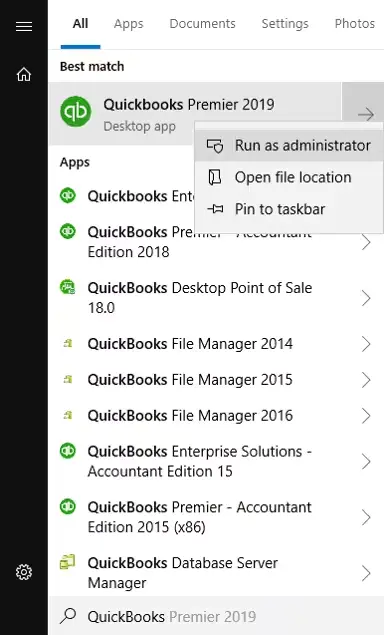
- You will see a pop-up window on your screen asking if you will allow the program to make changes to the computer. Click Yes.
- Now, the software will open normally. All the sessions that UAC has been controlling are disabled temporarily.
- Exit the window and open IE like you normally would; UAC controls will default to active.
6. Repair QuickBooks Desktop
Incorrect installation or damaged program files may hamper the payroll updates. Let us repair the QuickBooks program by following the steps below:
a. Run Quick Fix my Program
The Quick Fix my Program tool will shut down the background processes hampering the payroll updates and run a quick repair on your program.
- Launch QuickBooks Tool Hub.
- Select Program Problems from the left pane.
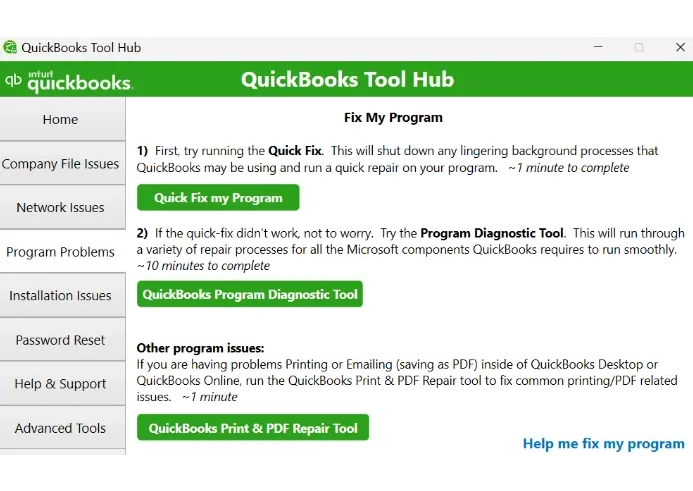
- Hit on Quick Fix my Program.
- Launch QuickBooks Desktop, then open the company file.
b. Run QuickBooks Install Diagnsotic tool
If there is an issue with the QuickBooks installation, it can cause interruptions when trying to run the related processes. Fix the typical installation issues using the QuickBooks Install Diagnostic Tool:
- Launch QuickBooks Tool Hub.
- Go to Installation Issues from the left menu bar.
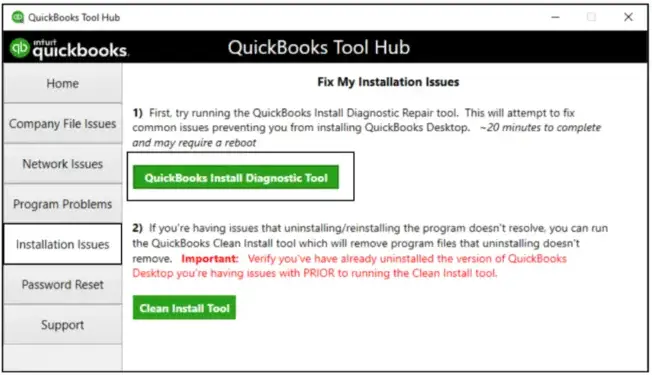
- Hit on QuickBooks Install Diagnostic Tool. The tool usually takes up to 20 minutes, so let the tool run until then.
- When it finishes, restart your computer and launch QuickBooks Desktop. Then, open your company file.
- Make sure QuickBooks is up-to-date to ensure the most recent fixes and security updates.
Conclusion
In conclusion, resolving QuickBooks Error PS032 during payroll updates involves addressing factors like incorrect billing details, outdated software, or corrupted files.
For persistent problems, consult QuickBooks support for expert guidance on +1-866-409-5111. Keep your payroll process seamless and error-free with these solutions.
Frequently Asked Questions
Error codes PS032 or PS077 are part of the PSXXX series that usually appear when a user tries to update the payroll services. You may also see a warning message on the screen stating,
“[PS032] QuickBooks is having trouble installing your payroll update.”
Either an inactive payroll subscriber, a damaged program, or incorrect permissions might be blocking the updates.
To repair QuickBooks Desktop, use the QuickBooks Program Diagnostic Tool and QuickBooks Install Diagnostic Tool. These utilities verify data issues, fix program file errors, and ensure smooth functionality. Always back up your company file before running repairs.
Your QuickBooks payroll subscription might not be active, or using an outdated version of QuickBooks may hamper the payroll updates. Additionally, a damaged CPS folder, stuck paychecks to Online to Send, or incorrect UAC settings can cause the payroll services to fail to update.
Error code 3003 indicates a synchronization problem or a problem accessing company files. It often occurs when users try to synchronize a database or open a company file. This error can occur for various reasons, including a damaged company file, network connectivity issues, insufficient permissions, or problems with system resources or firewall settings.
To resolve a QuickBooks payroll error, ensure QuickBooks Desktop and payroll are up-to-date. Check your employees’ payroll information in QuickBooks and the payroll item setup. If everything seems fine, consider troubleshooting common issues like a damaged company file or conflicts by running QuickBooks tools or a clean reinstallation if necessary.

