Verify and Rebuild Data in QuickBooks Desktop
You must be in a situation where your data won’t be able to synchronize between QuickBooks Desktop and Method. Such a situation of failure of non-sync may be due to minor or major data damage in the QuickBooks file.
In this dedicated blog on verify and rebuild data in QuickBooks desktop, we covered the most tested and trending solutions to complete your requirements. Just go through with this piece of work and bookmark this guide for future reference.
Call a QuickBooks Specialist +1(866)409-5111 if:
- You do not have enough time to verify and rebuild data.
- Looking to outsource the task to save your time and energy.
- Technical gap to complete the task.
- Tried 2-3 attempts and do not want to lose the data with further try.
- Need a quick-fix and proceed with your payroll process workflow
Learn to verify and rebuild data in QuickBooks Desktop
Now, we are moving forward with the solutions to verify and rebuild any damaged or corrupt data in QuickBooks Desktop.
Verify your company data
- Click on Windows and choose Close All.
- Navigate to the File option and click on Utilities.
- Click on Verify Data.
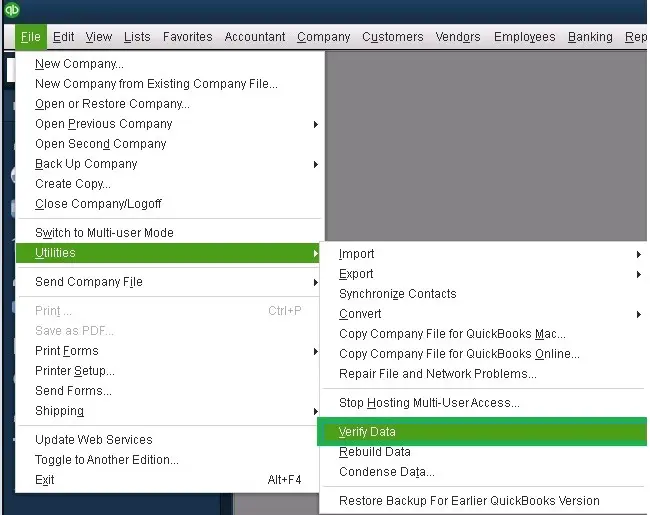
- In case you see:
- QuickBooks detected no problems with your data. It means your data is clean, and it does not require anything.
- An error message- search for it on our QuickBooks Desktop support site for how to fix it.
- Your data has lost integrity- Data was found damaged in the file. Rebuild your data to fix it.
Learn More – QuickBooks Tool Hub
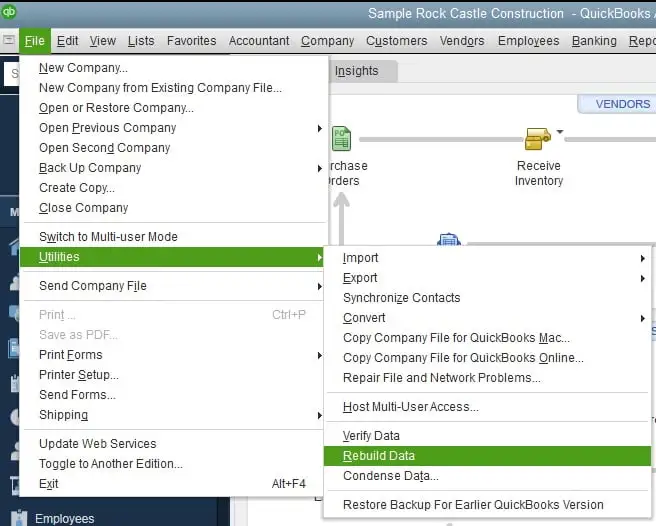
Rebuild the QuickBooks company file data.
- Click on File > Utilities.
- Now, select RebuildData.
QuickBooks may ask you to ensure a fresh backup of your company file before it rebuilds the company file.
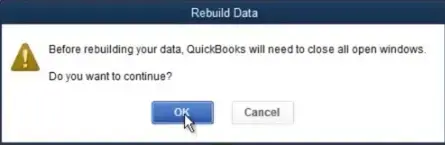
- Click OK, and a backup is required before proceeding with the rebuild process.
- Choose the location to save your backup and click OK.
Note:- Do not try to overwrite a new company file on an old company file.
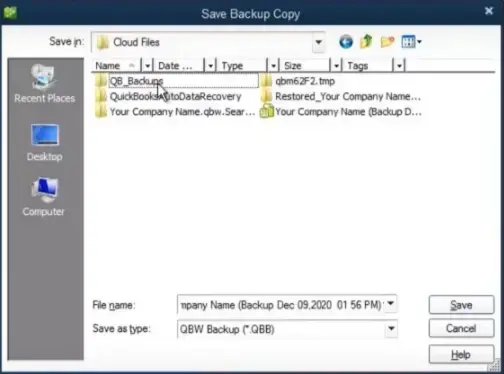
- Give the fresh backup a new name in the File name and save it.
- Navigate to the File > Utilities.
- Now, click on Verify Data again to check for additional damage.
- During verification, if it is found that the damage is more than expected, you need to manually fix it.
- If there is no error, please restore your recent backup. Click on the File menu and select Open or Restore Company.
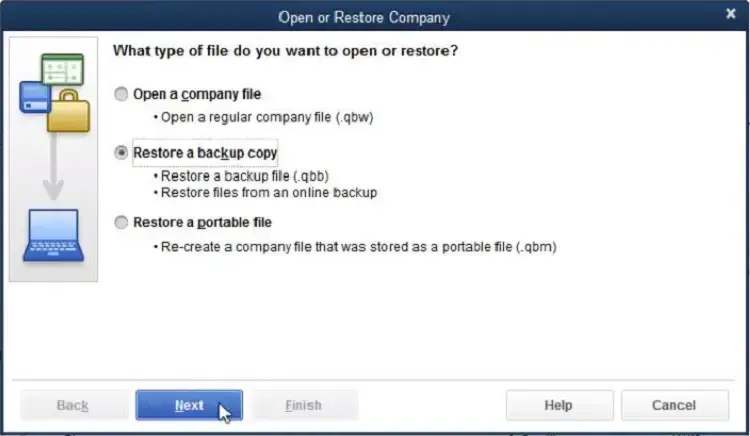
Note:- Ensure not to replace your old company file. You need to enter the info into your company file again.
Learn to verify and rebuild data in QuickBooks Desktop for Mac
How can you verify your company file data?
- Click on File > Utilities.
- Click on Verify data and click on OK. It will close all windows.
- In case you see a message, “Your data has failed the integrity check”, you are required to rebuild your file.
- If there is no issue with your data, you are good to go.
How to rebuild your company file data?
- Click on the File > Utilities.
- Click on Rebuild Data > OK.

- It will close all windows.
- Before rebuilding your company file, QuickBooks will ask you to make a backup of your company file and click on OK.
- If you are not moving forward with a backup, click on Cancel.
- In case you did not set up any backup preferences, the QuickBooks application will ask you to update it. So, click on Backup Preferences.
- You can edit it as per your requirements and click OK.
- Once the backup process is finished, click on Show in Finder and locate the backup.
- Or, click on OK if you are done.
- Click OK after the rebuild process is finished.
Ensure that your file is free from errors or data damage. You can re-verify your company file. Confirm if the error is fixed or not. If you still struggle with errors, rebuild your file.
Correct your errors manually using transaction record numbers.
Before we start with the steps, first understand what a record number is. The record numbers are the list of errors that would help you to find the errors that QuickBooks finds at the time you verify your company file.
If your file is found to be dealing with any error, you are required to open your QuickBooks.log.file. This is the file that contains the list of errors.
- To find your QuickBooks.logfile at any time:
- You need to hold your company key, then click on Go and Library.
- Click twice on the Logs folder.
- Double-click on the file QuickBoks.log.
- From the QuickBooks.log file:
- In the log file, you would see record numbers as RecNum and RefNum. QuickBooks uses them as internal record numbers.
For example, if you get an error that appears with the message “Verify Employee YTD Bal: ytd out of balance. Name = James T. Cameron. Ref = 59.”
- The record number in this case is 59.
- Click on Edit and select Find.
- Search for @recnum, then enter the record number.
- Using this, the application QuickBooks would fetch the records that have the transaction number.
If the problem is still not fixed, we would recommend that you contact a senior QuickBooks specialist at +1(866)409-5111.
1. Repair your company file using the Rebuild Data tool
- Click on the File > Utilities.
- Click on Rebuild Data.
- Select OK on the QuickBooks Information window. Proceed with the on-screen steps and save a backup.
- Let the tool finish its job of repairing your file.
Note:- QuickBooks may look stuck, but the actual picture is that it is working.
- Click OK when the tool finishes its work.
- Navigate to the File > Utilities, and click on Verify Data.
- Let the tool check your file for data issues.
2. Manually repair your company file
- Click on the File menu > Utilities.
- Click on Verify Data and let the tool check your file to confirm if there is any data issue.
- Click on Expand All from the Verify Results screen to see the error.
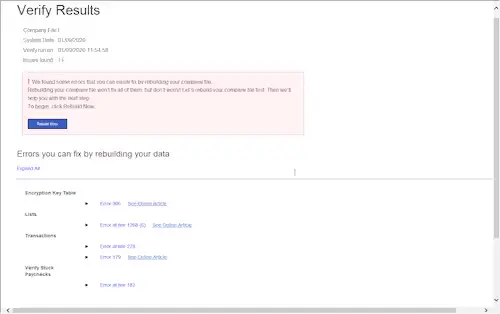
- Select See Online Article for the steps to fix the error.
For more, talk to our senior QuickBooks specialist at +1(866)409-5111 and rebuild your QuickBooks data and company file.
Conclusion
Thanks for being with us and appreciating our work for your relentless efforts to provide you with the most effective fixes and solutions on QuickBooks, verify and rebuild data in QuickBooks desktop. We recommend that you bookmark this guide for your future reference.
Since these are the standard fixes, in case you are looking for more information or having a complex situation to complete a task, contact our senior QuickBooks specialist at +1(866)409-5111.
Frequently Asked Questions
What is verify and rebuild data in QuickBooks Desktop?
In the accounting application QuickBooks Desktop, verify data checks for any data damage in your company file and report it. Whereas, Rebuild Data is used to fix the issue identified during verification.
What does Verify Data do in QuickBooks?
- Data integrity: The verify data scans the QuickBooks company file to check for any damage or corruption.
- Reports findings: When any problem is detected in the QuickBooks company file, QuickBooks will report and notify you of the same with the details.
- Identifies the Repairing needs: It conveys that the file that was found to be damaged requires a rebuilding process to fill the damage.
What does Rebuild Data do in QuickBooks?
Rebuilt data also performs multi-functions such as fixing errors, creating a backup, and restoring data integrity.
- Fixes errors: Those errors or issues that were identified by the Verify Data are fixed by the Rebuilt data.
- Creates backup: This prompts you to create a backup of your company file before you finally proceed with the rebuild process.
- Restores database integrity: The Rebuild process will restore the integrity of the data so that QuickBooks users have no errors with their workflow anymore.

