QuickBooks Save as PDF Not Working Issue [Fixing It]
Are you unable to save invoices or other documents as PDFs in QuickBooks Desktop, or encountering errors when trying to print them? If so, this comprehensive guide will help you troubleshoot the QuickBooks Save as PDF Not Working issue effectively.
Saving documents as PDFs for record-keeping or printing them to share with clients and employees is essential for businesses. However, you may face challenges and see error messages such as:
- PDF Converter shows offline.
- Cannot print directly to the QuickBooks PDF Converter.
This blog provides expert-curated troubleshooting steps to resolve these issues efficiently. Follow the instructions carefully to get your QuickBooks PDF functionality back on track.
What Causes Printing and Saving as PDF Issues in QuickBooks?
Issues when printing or saving as PDFs are often triggered by outdated or damaged components, incorrect settings, and other factors. Let’s discover them one by one:
- You might not be using an up-to-date version of QuickBooks
- The PDF reader could be corrupted.
- Missing or damaged PDF components might be the culprit.
- Issues with connecting to the default printer can lead to this problem.
- Lack of access permissions to the system’s TEMP folder.
- Improper printer settings may also prevent saving PDF files.
- The Windows PDF components might be damaged or corrupted.
Resolve the Print and PDF Problems in QuickBooks Desktop
Effective troubleshooting involves a systematic approach to identifying, analyzing, and resolving problems. Let us ensure there are minor issues that prevent PDFs and printing with the key consideration points:
Note: If the issue persists, make sure to perform each fix given below.
Key considerations
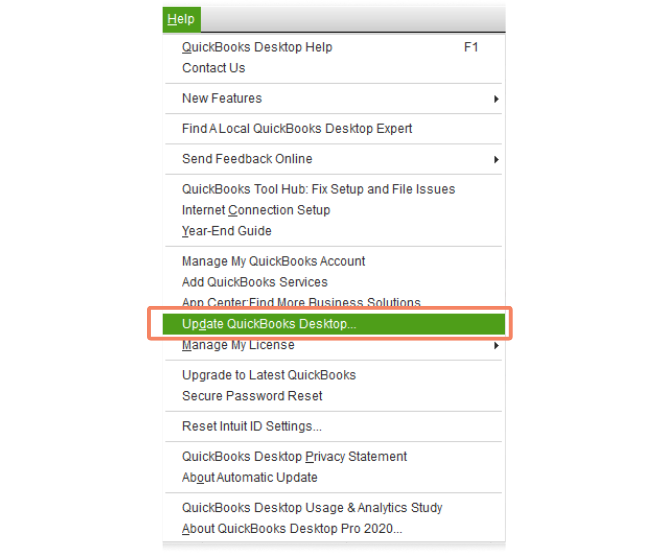
a. Update QuickBooks Desktop
If QuickBooks components are outdated or corrupted, you may fail to save them as PDFs or when printing. Consider updating QuickBooks Desktop to the latest release for a seamless experience, and also ensure the Windows OS is compatible and up-to-date.
b. Create a company file backup
A company file backup protect the data file from accidental losses when troubleshooting:
- Launch QB Desktop.
- Navigate to File, then select Back Up Company.
- Now, click on Create Local Backup.
- Follow the instructions on your screen to create a backup of the company file.
Move to the below fixes if you still see QuickBooks save as PDF not working.
1. Run the QuickBooks PDF & Print Repair tool
The QuickBooks PDF & Print Repair Tool automatically detects issues that prevent saving as PDF or printing and applies a quick fix.
Note: To use the tool and ensure it functions properly, download and install the latest version of QuickBooks Tool Hub from the official Intuit website.
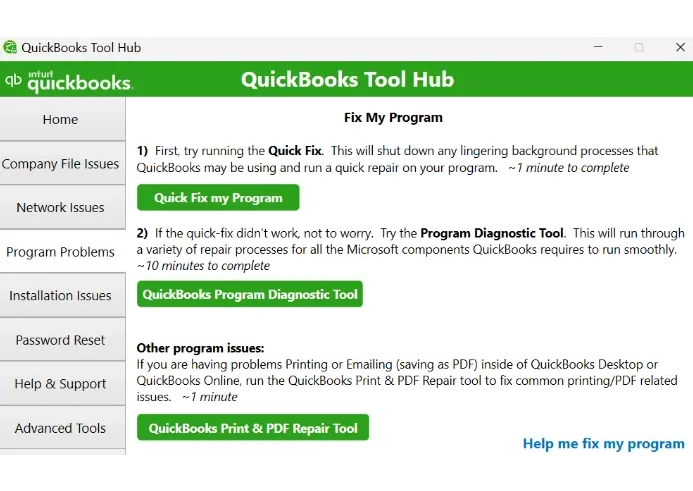
- Launch QuickBooks Tool Hub.
- Select Program Problems in the left pane.
- Hit on QuickBooks PDF & Print Repair Tool. The tool will take about a minute to run.
- Once done, print, email, or save a PDF using QuickBooks Desktop again.
If this doesn’t fix the issue, move on to the next solution.
2. Reset the TEMP folder permissions
Let’s restart the computer and clear the temporary folder permissions to refresh the system and ensure seamless functioning.
a. Restart your computer
When you restart a computer, it automatically clears the temporary files, refreshes the system and resources, and potentially fixes software conflicts, which might be hampering the PDF components in QuickBooks.
A simple restart can resolve common problems, such as QuickBooks detecting a missing PDF component or issues with printing or saving as PDF.
b. Clear the Temp folder permissions
- Press the Windows+R keys to launch the RUN command.
- In the Run bar, type %TEMP% and press Enter.
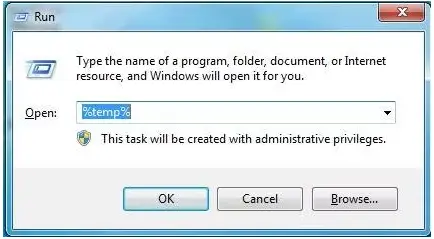
- Right-click anywhere on the temp folder, and choose Properties.
- Navigate to the Security tab.
- Make sure to display all usernames and groups on the Security tab that have Full Control.
Once done, try again to save it as a PDF again within QuickBooks after all the permissions are set to Full Control.
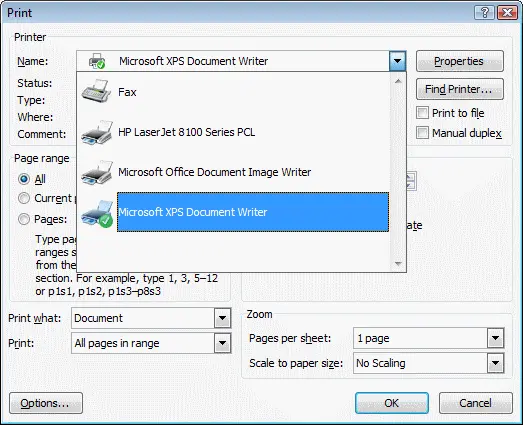
c. Test if you can print to your XPS (only for Save as PDF and Email issues)
When saving as a PDF, QuickBooks uses parts of the XPS Document Writer. Test the XPS Document Writer to see if you can print:
- Launch Notepad.
- Type Test, then select File and click Print.
- Choose the XPS Document Writer, then click Print.
Note: You must permit your computer to print to your XPS printer if you do not see XPS Document Writer.
- Name this file and save it to your desktop.
- Finally, go to your desktop and view or check the XPS Document you printed using the notepad.
If you fail to print using the XPS printer or the actual printer outside of QuickBooks, it is recommended that you connect with a QuickBooks or IT professional.
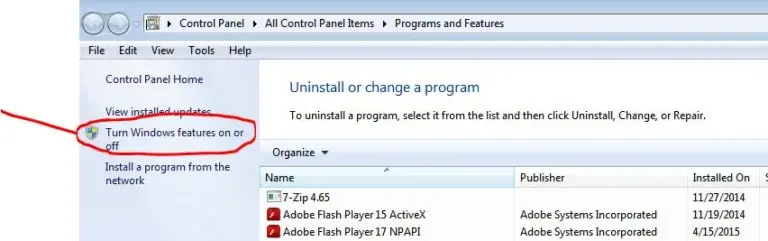
Allow your computer to print to your XPS printer
- Launch the Windows Start menu.
- Type Control Panel, then switch it to Category View.
- Navigate to Programs.
- Select Turn Windows features on or off in Programs and Features.
- In the list of services, select Microsoft XPS Document Writer.
- Finally, click OK.
3. Create a new template
You may experience the QuickBooks Save as PDF not working due to a corrupted or incorrect template. Considering creating a new one to save and print correctly:
- Create a new template for the form you are printing.
- Modify the template of your transaction.
- Finally, create a .pdf file.
4. Update the Print Spooler service properties
Updating the Print Spooler service properties, such as its startup type or recovery options, can improve printing reliability and performance. It can also help mitigate security vulnerabilities associated with the service. Here’s how to update the service:
- Launch the Windows Start menu.
- Type Run in the search and press Enter.
- In the Run field, type Services.msc and press Enter.
- Now, look for the Print Spooler service.
- Right-click on the Print Spooler service and hit on Properties.
- Navigate to Startup type, then choose Automatic.
- Select Apply, then click OK.
- Right-click on the Print Spooler service. Then, click Start to start the service.
Try again to save the file as a PDF.
5. Troubleshoot issues with XPS Document Writer
For printing documents, QuickBooks uses the XPS Document Writer, a Microsoft Windows component. Ensure the XPS Document Writer operates smoothly without any issues. Perform the below steps to ensure that:
- Exit QuickBooks Desktop.
- Open Notepad, then type TEST.
- Select File and Print, then choose the XPS Document Writer.
- Hit on Print and name your company file.
- Save your file on the desktop and open it to ensure the format is correct.
- If you fail to open the file, it signifies that there is some issue with the Microsoft XPS Document Writer.
If you encounter issues while printing using the XPS printer (or the actual printer) outside of QuickBooks, contact IT or Microsoft experts for assistance.
If the XPS Document Writer works well, ensure that you have selected the correct printer in QuickBooks Desktop.
You can try the below steps to resolve the QuickBooks save as PDF not working issue:
a. Check if the XPS services are turned ON
- Press the Windows logo key.
- Type Control Panel in the Windows Start menu.
- Choose Programs, then click on Turn Windows features on or off option.
- Locate to XPS Service in the Windows feature.
- Mark the checkbox for XPS Service and click OK.
- Once done, try again to save as a PDF in QuickBooks.
Move to the below steps if unsuccessful.
b. Reinstall Microsoft XPS Document Writer
- Launch the Run command by pressing the Windows+R keys.
- Type Control Printers in the search box.
- Press Enter, then choose the Add Printer option.
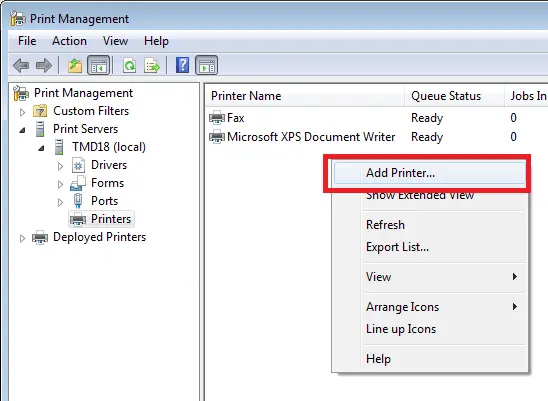
- Now, select The printer what I want isn’t listed option, then hit on Add a local printer or Network printer with manual settings option.
- Choose Use an existing port and hit Next.
- Select Microsoft from the left pane.
- Choose Microsoft XPS document writer, then hit on Next.
Try saving a document in PDF format using QuickBooks again after reinstalling XPS Document Writer to see if this fixes the issue.
c. Modify security software configurations
The system security applications may block your QuickBooks processes, including saving as a PDF. To run QuickBooks processes without interruptions, ensure that you configure the Windows Firewall or other anti-virus or anti-malware settings.
d. Modify Windows user permissions for the XPS Document Writer
Not having the proper set of permissions can be the reason why QuickBooks save as PDF not working or fails when printing using the XPS Document Writer. To fix the issue, ensure that you run the program with administrator rights.
If the issue persists, proceed with the advanced troubleshooting solutions.
6. Remove the logo from the invoice template (for QuickBooks Online)
Create a fresh template for the form or document you are printing or saving as a PDF, allowing a customized template for transactions.
Follow the below steps to do so:
- Go to the Lists menu.
- Click on Templates, then choose the drop-down option next to Templates on the page.
- Hit New and choose the Template Type.
- Tap OK.
- Select Additional Customization to review the available details.
- After making the suitable changes, hit OK to save the template.
- Once done, try saving it as a PDF or printing documents in QuickBooks Online again.
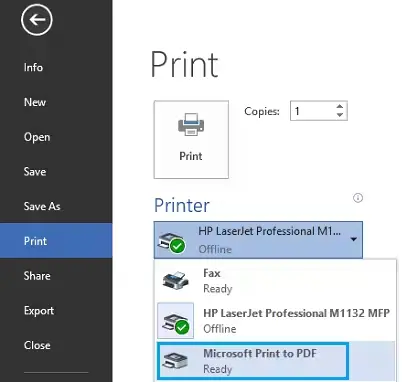
7. Change how you save a PDF
Change method of saving the file as a PDF:
Try this instead of opting for Save and then Save as PDF:
- Navigate to File.
- Hit on Print Invoice and select Microsoft Print to PDF as the printer.
Conclusion
We’ve reached the end of this guide on troubleshooting the ‘QuickBooks save as PDF not working‘ issue. We hope the steps provided have helped you successfully save your documents as PDFs and print files without any interruptions.
If you encounter any challenges or need expert assistance, feel free to contact our QuickBooks professionals via our toll-free number +1-866-409-5111 , available 24/7!

