QuickBooks Email Setup: Webmail, Outlook, and More
Are you wondering if you can email your documents, invoices, or other transactions to your customers or vendors directly from QuickBooks Desktop?
QuickBooks has an in-built email feature that allows you to send documents or invoices to your customers directly from the software. It allows businesses to improve communication with their customers & vendors, and maintain better record-keeping without manual efforts.
To get started with the feature, you must do the QuickBooks email setup. You can do it three ways: either using Webmail, Outlook, or the built-in email service. Go through this detailed guide and explore the steps below to set up your preferred email feature and save time.
Why Setup QuickBooks Email?
Setting up email in QuickBooks offers businesses several key benefits, most notably enhanced efficiency and improved communication. It allows you to send invoices, payment reminders, reports, and other financial documents directly from QuickBooks, saving time and reducing manual effort. This integration also streamlines communication with customers and vendors, improves record-keeping, and enhances professionalism through branded email templates.
Different Ways to Setup Email in QuickBooks Desktop
QuickBooks has an in-built email services feature through which you can directly email your invoices, transactions and other documents. If you prefer using Outlook or Webmail, you can also configure the software for these email services allowing your manage your emails accordingly.
- Webmail: Launched in 2011, QuickBooks’ Webmail feature enables seamless email sending through providers like Gmail, Yahoo, and others.
- Outlook: If Microsoft Outlook is installed, you can use it to send emails. It’s a popular choice due to its user-friendly interface.
- QuickBooks Email: You can also send emails directly through QuickBooks’ built-in email service.
If you don’t have these email options except for the in-built one, it indicates that either your QuickBooks doesn’t have a supported version or might not be compatible enough. To fix this, either upgrade Quickbooks Desktop to the higher edition or update it to the latest release.
Learn How to Connect Your Email to QuickBooks Desktop
As previously discussed, QuickBooks enables you to send emails through three different services: Microsoft Outlook, Webmail, or the QuickBooks Email service. Choose your preferred email service and proceed with the steps below accordingly:
Note: Make sure to keep your QuickBooks up-to-date to the latest release.
1. Set up Outlook to work with QuickBooks
To configure email in QuickBooks, use an existing Outlook profile or set up a new one. Ensure you have the necessary details ready beforehand. If you lack these details, contact your Internet Service Provider (ISP).
Note: Before setting up Outlook with QuickBooks, verify that you’re using Outlook 2010 or a later version. Additionally, confirm you have an Outlook email profile established.
a. Contact your internet or email provider to get the following info
- Username
- Password
- Incoming email server address
- Incoming email server type
- Outgoing email server address
b. Set up Outlook
- Select the Edit menu in QuickBooks.
- Choose Preferences, then click on Send Forms.
- Now, choose Outlook and click OK.
2. Set up webmail to work with QuickBooks
Do you prefer webmail as your email service application for sending emails? Easily set up webmail in QuickBooks Desktop by following these steps:
Before getting started
- Verify the webmail servers and the port settings with your ISP.
- Users must enable their accounting for two-step verification for Webmail providers.
- For the most common email service providers, QuickBooks may auto-fill the info.
Set up Webmail
- Go to the Edit menu in QuickBooks.
- Select Preferences and click on Send Forms.
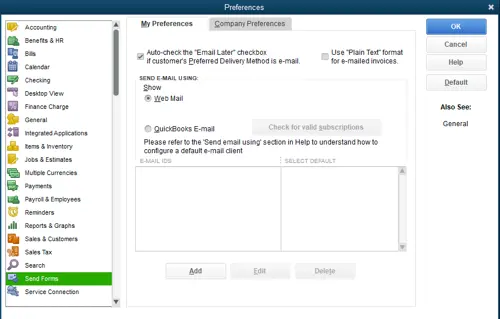
- Choose Web Mail and hit on Add.
- Now, enter the Add Email Info and select OK.
- Save the changes by clicking OK.
- This will display the webmail provider’s login page. Sign in to Intuit and grant the access.
Setup Secure Webmail in QuickBooks
- Enable on 2-step verification for your Google account.
- Launch QuickBooks and go to the Edit menu.
- Select Preferences and hit on Send Forms.
- Now, select Web Mail, then click Add.
- Choose the email service provider as Gmail from the drop-down menu and type your email address from step 1.
- Now, continue with Use enhanced security selected, then click OK. Intuit may also ask you to sign in to your Intuit account to finish the process.
- The Gmail Sign-in page will display on your screen. Now, sign in to Intuit to grant the access.
Things to know
- Hosted environments may still require you to sign in to your webmail when you send emails. (Such as Rightworks.)
- If your password isn’t accepted, see QuickBooks will not accept my webmail password for more info.
- For specific Google instructions, see Set up enhanced security in Gmail for QuickBooks Desktop.
3. Setup QuickBooks Email Service
Here’s how to setup email service in QuickBooks:
- In the Send email using section, select QuickBooks Email option.
- Now, make sure you have a valid subscription for QuickBooks. The email feature in QuickBooks only processes an email when you have an Inuit’s service active subscriptions such as Accountant’s Copy File Transfer, QuickBooks Payroll, QB Enterprise Full Service, IMS (Intuit Merchant Service), or QB Billing Solution.
- Follow the on-screen instructions that appears on your screen to finish the QuickBooks email setup.
- Finally, enter the require information such as email address, username, password, incoming & Outgoing email settings, and server details.
Note: Keep in mind that, QuickBooks doesn’t save a copy of the emails that you send. It is recommended to enter any of your email address to keep a track.
If you’re a Cox or CableOne user struggling to set up email in QuickBooks, we’ve got you covered! The following details will resolve your queries:
- For Cox Users: Cox’s standard SMTP settings don’t use SSL or login credentials for sending emails in QuickBooks. QuickBooks Desktop requires an SSL connection and login details to send emails. Using port 25 without SSL won’t work with QuickBooks Desktop. Instead, opt for port 587 or 465.
NOTE: If port 465 fails, switch to port 587. Ensure SSL is enabled when using either port for sending emails.
- For CableOne Users: CableOne users can use the following settings to configure email in QuickBooks, as they rely on Google servers:
- Email Provider: Gmail
- Email Address: Your User ID
- SSL: Yes
- Port: 465 or 587
To avoid confusion with ports and internet service providers, refer to the table below, which consolidates all the necessary information for easy setup.
- Internet Service Provider (ISP) and Port Information
| ISP (Internet Service Provider) | SMTP Server | SMTP Port |
| 1AND1.com | smtp.1and1.com | 587 (SSL enabled, with password) |
| ADELPHIA | mail.adelphia.net | 110 |
| AOL | smtp.aol.com | 465 or 587 (Check Note) (SSL enabled for incoming and outgoing mail servers) |
| BELL SOUTH | mail.bellsouth.net | 110 |
| COMCAST | smtp.comcast.net | 587 |
| COMPUSERV | smtp.compuserve.comsmtp.aol.com | 110 or 587 |
| COX Business | smarthost.coxmail.com | 465 or 587 (see Note) |
| COX Central | smtp.central.cox.net | 465 or 587 (see Note) |
| COX EAST | smtp.east.cox.net | 465 or 587 (see Note) |
| COX WEST | smtp.west.cox.net | 465 or 587 (see Note) |
| EARTHLINK | smtpauth.earthlink.net | 25 (with password) |
| LYCOS | smtp.mail.lycos.com | 25 |
| MICROSOFT OUTLOOK 365 | outlook.office365.com | 587 (SSL enabled) |
| NETSCAPE | smtp.isp.netscape.com | 25 (SSL enabled) |
| PRODIGY | smtp.prodigy.net | 25 (SSL enabled) |
| ROADRUNNER | smtp-server.sc.rr.com | 587 |
| SPRINT PCS | smtp.sprintpcs.com | 25 |
| VERIZON | outgoing.verizon.net | 465 |
| VERIZON YAHOO | outgoing.yahoo.verizon.net | 465 |
Note: If PORT Number 465 doesn’t work, change the port to 587. Don’t forget to enable SSL when trying both ports.
Conclusion
This concludes our blog, which provides a step-by-step guide for QuickBooks Email Setup. As discussed, QuickBooks sent your transactions through three possible email applications. You can choose your preferred one and set it up accordingly. Once the setup is complete, try sending a test email to verify that the setup was done correctly.
If you need further assistance, we recommend you consulting to a professional. Dial +1(866)409-5111 to connect with a QuickBooks ProAdvisor now!
Frequently Asked Questions
To set up default email in QuickBooks Desktop, go to Edit > Preferences > Send Forms > Company Preferences, then choose the desired email service (Webmail or Outlook).
Yes, QuickBooks allows you directly email your transactions such as invoices, estimates and statements. You can also email other reports and documents. QuickBooks offers the in-built functionality to mail directly from the software.
QuickBooks primarily uses emails from the @intuit.com domain for various communications, including those related to QuickBooks products, QuickBooks Self-Employed, and QuickBooks Online Payroll. Specifically, emails from QuickBooks may come from addresses like do_not_reply@intuit.com, intuit@eq.intuit.com, or quickbooks@notification.intuit.com.
To find emails you’ve sent from QuickBooks, navigate to the relevant Customer or Vendor Center and locate the “Sent Email” tab. This tab displays a history of all emails sent to that specific contact, including details like recipient, date, subject, and attachments.
To customize emails in QuickBooks, you can modify email templates for sales forms or set up default email messages for different types of transactions. This lets you personalize the subject line and body of emails you send to customers, including dynamic fields such as customer name or invoice number.

