Effective Ways to Troubleshoot QuickBooks Error 1334
Are you encountering QuickBooks Error 1334 during software installation, updates, or repairs? This guide provides solutions to fix the issue and resume your tasks.
The error appears with a warning message:
“Error 1334: The file cannot be installed.”
This issue may stem from incorrect installation, corrupted Windows components, or other factors. We’ll explore all possible causes and provide effective methods to resolve the error, ensuring a smooth and successful software installation process.
What Trigger Installation Error 1334 in QuickBooks?
Here’s a list of the possible factors causing QuickBooks error 1334 when installing, updating, or repairing the software:
- Damaged or corrupted Windows components
- The Windows registry might be damaged
- Incorrect company file extension preventing to install the file
- The Windows Firewall or other security application might b blocking QuickBooks
- Incorrect installation of QuickBooks or the program file is damaged
How to Resolve QuickBooks Error 1334 for a Smooth Installation?
Familiar with what hampers the software installation or update and causes QuickBooks error code 1334? Now, proceed with the troubleshooting steps to get past the issue and enjoy the accounting experience with QuickBooks.
1. Repair or reinstall Windows components
To resolve QuickBooks error 1334, which occurs during installation, updating, repairing, or uninstalling QuickBooks Desktop, manually repair Windows components like MSXML, Microsoft .NET Framework, or C++.
a. Repair or reinstall Microsoft .NET Framework
For Windows 10 and newer
- Close all open programs on your computer.
- Open the Windows Start menu.
- Type Control Panel in the search bar and press Enter.
- Go to Programs and Features.
- Select Uninstall a Program (no programs will be removed).
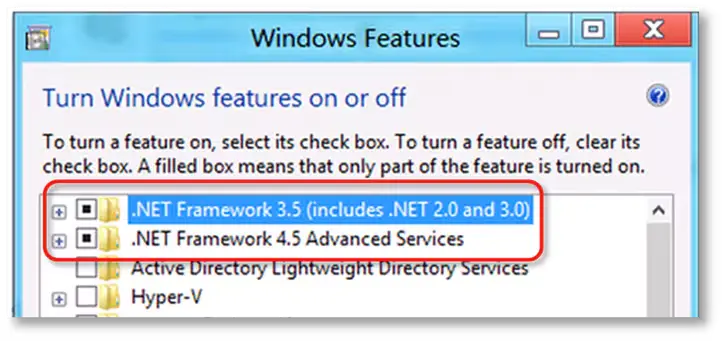
- Click Turn Windows features on or off.
- Locate the .NET Framework service in the list.
- Verify settings for both .NET Framework 4.5 (or later) and .NET Framework 3.5 SP1.
Note: The steps to repair .NET Framework 4.5, 4.6, 4.7, and 4.8 are identical.
Check NET Framework 4.5 (or later)
If .NET Framework 4.5 (or later) is not enabled:
- Check the box for .NET Framework 4.5 (or later) to enable it.
- Click OK to save the changes.
- Restart your computer to apply the settings.
If .NET Framework 4.5 (or later) is not enabled:
- Check the box for .NET Framework 4.5 (or later) to disable it. Do not re-enable it yet.
- Click OK to save the changes.
- Restart your computer.
- After signing back into Windows, ensure .NET Framework 4.5 is re-enabled.
Check NET Framework 3.5 SP1
If .NET Framework 3.5 SP1 is not enabled:
- Check the box for .NET Framework 3.5 SP1 to enable it.
- Click OK to save the changes.
- Restart your computer to apply the settings.
If .NET Framework 3.5 SP1 is already enabled:
- Check the box for .NET Framework 3.5 SP1 to disable it. Do not re-enable it yet.
- Click OK to save the changes.
- Restart your computer.
- After signing back into Windows, follow the steps to re-enable .NET Framework 3.5 SP1.
b. Repair Microsoft MSXML
If .NET Framework 3.5 SP1 is not enabled:
- Check the box for .NET Framework 3.5 SP1 to enable it.
- Click OK to save the changes.
- Restart your computer to apply the settings.
In case .NET Framework 3.5 SP1 is already enabled:
- Check the box for .NET Framework 3.5 SP1 to disable it. Do not re-enable it yet.
- Click OK to save the changes.
- Restart your computer.
- After signing back into Windows, follow the steps to re-enable .NET Framework 3.5 SP1.
If you face issues enabling or disabling .NET Framework, contact an IT professional or Microsoft support, as the issue may be related to your operating system, not QuickBooks.
2. Repair Windows registry
The SFC scan will verify the damage or corruption to Windows and run a quick fix to repair it. Proceed with the below steps to learn how to run the System File Checker utility:
- On your keyboard, press the Windows + X shortcut key combination.
- Select Command Prompt (Admin) from the menu bar.
NOTE: System File Checker (SFC) is executable via Windows PowerShell with administrative privileges.
- Click Yes on the User Account Control (UAC) prompt.
- Type SFC /scannow in the command prompt window, then press Enter.
- The System File Checker utility will verify the integrity of Windows system files and also runs a quick repair if required.
- Once done, reboot your computer.
3. Manually resolve QuickBooks error code 1334
Try resolving the error manually by following the below steps:
- Login to your QuickBooks as an Administrator.
- Go to Accessories and Programs, then click on System Tools.
- Now, hit on Restore.
- Select Restore my PC with an earlier date option, then Next.
- Choose a restoration point list and click on Next.
- Hit on Next again and choose the most recent system restore data on the verification screen.
- Finally, restart your computer.
4. Verify QuickBooks company file extension
Incorrect file extension can cause issues when trying to update or repair the QuickBooks program. Proceed with the below steps to verify the file extension is accurate:
- Launch Windows File Explorer.
- Navigate to C: \Users \Public \Documents \Intuit\ QuickBooks.
- Verify the file extension and it should be (.qbw). If it’s not then right-click on the file and select Rename.
- Replace the incorrect file extension with .qbw at the end of the file name.
5. Configure the Windows Firewall and other security software
The Windows Firewall and other security software may block QuickBooks if it is considered a threat to your computer or due to incorrectly configured settings. This security software controls the port to verify that the entering and exiting data is secure for system security and blocks anything that is suspicious. To fix QuickBooks error 1334, you must configure the Windows Firewall settings for QuickBooks and ensure a seamless installation or update.
6. Reinstall QuickBooks
If the installation is faulty or program files are corrupted, it may hinder software installation and cause QuickBooks error 1334.
Reinstall QuickBooks Desktop to replace existing program files with fresh ones, fixing related issues and ensuring a smooth update or installation process.
a. Remove QuickBooks
- Launch the Windows Start menu.
- Type Control Panel in the search filed and press Enter.
- Select Programs and Features or click on Uninstall a Program.

- Choose the QuickBooks Desktop version you are uninstalling from the list.
- Hit on Uninstall/Change, Remove and select Next.
If you don’t see this option, sign out and then sign in back to Windows with all the admin rights.
b. Install QuickBooks Desktop again
- Connect your system with the an active internet connection.
- Locate the QuickBooks program file QuickBooks.exe.
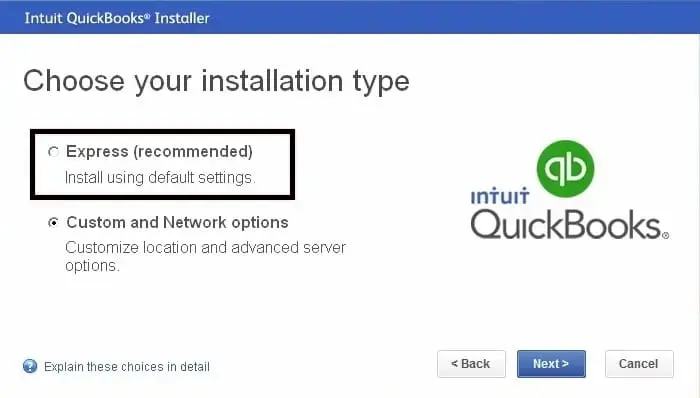
- Now, choose
- Express install: Overwrites your existing QuickBooks version, preserving preferences. To access the prior version, use Custom Install for re-installation.
- Custom and Network Options: Installs the new version in a separate location, keeping older versions. Prior version preferences are not transferred to the new installation.
- Hit on Next, then select Install.
- Finally, choose Open QuickBooks and try again to update it.
Conclusion
So, this is end of this detailed guide to resolve QuickBooks error 1334 and install, update or repair the software without any issues. Hopefully, this guide is helpful to you and the error is resolved.
However, if the troubleshooting seems hard being a non-tech person. In such a case, we recommend you connecting with QuickBooks professional and enjoy the consultancy at any hour of the day. Dial +1(866)409-5111 to talk to an expert now!

