A Quick Guide to Fix QuickBooks Error 1904 When Installing
Whether you are a new user or the existing one, it is quite common to experience the sudden failure to install QuickBooks Desktop. If this happens to you too, you may encounter QuickBooks error 1904 on your screen with a warning message that states,
“Error 1904: [file path / name / extension] failed to register.”
However, there’s nothing to worry about, as that’s quite common to encounter technical issues in any software. Damaged Microsoft components or insufficient administrator permissions may cause the problem. In this guide, we will analyze error 1904 in detail and provide you with expert-recommended solutions to resolve it. So let’s get started.
What Triggers Error Code 1904 in QuickBooks?
QuickBooks error 1904 may be triggered during software installation due to various reasons. Let us explore these possible reasons one by one in the section below:
- Windows components interacting with QuickBooks might be damaged.
- Issues with your QuickBooks program files
- Incorrect Windows account settings or not having enough permissions
- The antivirus on your computer, such as Bitdefender, might be blocking QuickBooks from installing.
- Possible issues with the QbversionTool.dll file
- You may encounter error 1904 when installing Adobe Flash Player due to incorrect installation or possible damage to the program files.
- Incorrect installation of the QuickBooks program might damage
Learn How to Resolve QuickBooks Error 1904 When Trying to Install
In this section, we will explore the different methods that work in resolving the factors that cause error code 1904 when installing QuickBooks. As there are no specific reasons behind the error, you will need to try multiple methods of resolution. Let’s perform these fixes carefully:
1. Restart your computer
Restarting your computer may help resolve Install Error 1904 in QuickBooks by addressing potential issues, such as conflicts with Windows components or temporary files, or by shutting down unnecessary programs and freeing up system resources. This allows QuickBooks to register the necessary files during installation or update. If the error persists, running the QuickBooks Install Diagnostic Tool from the QuickBooks Tool Hub is recommended.
2. Run the QuickBooks Install Diagnostic tool
The QuickBooks Install Diagnostic utility automatically identifies issues with Microsoft components that your QuickBooks program uses and runs a quick fix to resolve them.
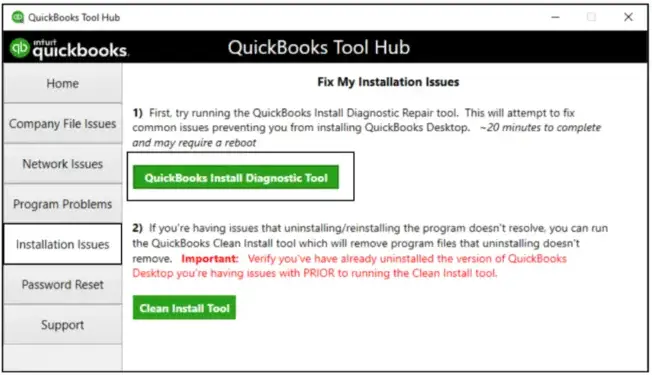
- Launch QB Tool Hub.
- Select Installation Issues from the left pane.
- Hit the QuickBooks Install Diagnostic Tool. The tool usually takes up to 20 minutes; wait until the process completes.
- Once it’s done, restart your computer and launch QB Desktop.
If QuickBooks Desktop is working, everything is fixed.
Read More- Fix Common QB Errors and Issues Using QuickBooks Tool Hub
3. Manually fix Windows components
Possible damage or corruption to crucial Windows components, such as the Microsoft .NET Framework and Microsoft MSXML, which interact with the software, can trigger error 1904, hindering the installation process.
Proceed with the below steps to repair such components or reinstall them:
a. Repair or reinstall Microsoft .NET Framework
The steps below are only applicable for Windows or Newer versions. If you are using an older version, consider reaching out to QuickBooks or Microsoft experts for assistance.
- Exit all the open programs.
- Launch the Windows Start menu on your computer.
- In the search field, type Control Panel and press Enter to open it.
- Navigate to Programs and Features.

- Click on Uninstall a Program. Don’t worry, we won’t uninstalling anything here.
- Hit on Turn Windows features on or off.
- Look for the .NET Framework on the list.
- Now, select the settings for both .NET Framework 4.5 (or later) and .NET Framework 3.5 SP1.
Note: Whether it’s .NET. For Frameworks 4.5, 4.6, 4.7, and 4.8, the steps are the same.
Check NET Framework 4.5 (or later)
In case .NET Framework 4.5 (or later) isn’t checked:
- Mark the checkbox for .NET Framework 4.5 (or later) to turn it on.
- Save the changes by clicking OK.
- Now, restart your computer to take the changes into effect.
If the .NET Framework 4.5 (or later) option is selected:
- Select the .NET Framework 4.5 (or later) checkbox to turn it off. And do not turn it back on.
- Hit OK to save the changes.
- Finally, restart your computer.
Once signed back in to Windows, follow the steps below to turn on .NET Framework 4.5 again.
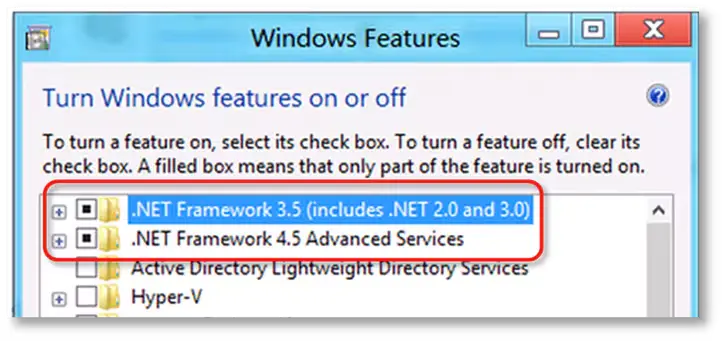
Check NET Framework 3.5 SP1
If the .NET Framework 3.5 SP1 checkbox isn’t checked:
- Mark the checkbox for .NET Framework 3.5 SP1 to turn it on.
- Hit OK to save your changes.
- Now, restart your computer to let changes take an effect.
If you have already selected the .NET Framework 3.5 SP1 checkbox:
- Mark the checkbox for .NET Framework 3.5 SP1 to turn it off. Do not turn it back on.
- Hit OK to save your changes.
- Now, restart your computer.
Once signed back into Windows, proceed with the on-screen steps to turn .NET Framework 3.5 SP1 on again.
If you encounter any error when turning the .NET Framework on or off, you must talk to an IT professional or Microsoft. The issue might be related to Windows OS, not QuickBooks.
Also Read- Update QuickBooks Desktop
b. Repair Microsoft MSXML
Let us register the Microsoft MSXML by following the steps below and resolve the associated issues:
Register the MSXML DLL files
Register MSXML by following the steps below if you use 64-bit operating system:
- Launch the Windows Start menu on your computer.
- Type cmd in the search bar, then press Enter.
- Now, right-click on cmd and select Run as Administrator.
- In the C: prompt, type cd\windows\syswow64.
- Now, type regsvr32 MSXML6.dll, then press Enter.
- Once done, install your QuickBooks Desktop.
Proceed with the below steps if you use 32-bit operating system:
- Press Windows+R on your keyboard to launch the Run command.
- In the Run prompt, type cmd, then press Enter.
- Type regsvr32 MSXML6.dll and press the Enter key.
- Finally, try to install your QuickBooks Desktop again.
4. Change your Windows account settings
Switch to the Windows Administrator account to change some settings that will help you install your QuickBooks Desktop without any issues:
a. Switch to your Windows Administrator account
- Launch the Windows Start menu.
- In the search field, type CMD.
- Right-click on CMD in the search results and select Run as administrator.
- In the command prompt, type “net user administrator /active:yes” and press Enter. Once the command is complete, exit the command window.
- Open the Windows Start menu again and select Sign out.
- Now, select the Administrator account and sign in. You will easily sign in without a password.
b. Change your user permissions
- Launch the Windows Start menu.
- In the search field, type File Explorer and then press Enter.
- Now, go to this location: C:\Program Files\Common Files.
- Right-click on your Common Files folder and choose Properties from the options.
- Move to the Security tab and click Edit.
- Select users in the Group or User Names section.
- Now, enable the following permissions in the Permissions for Users section: Modify, Read & Execute, List Folder Contents, Read, and Write.
- Finally, select Apply and hit OK.
c. Reinstall QuickBooks and sign out
- Follow the steps on your screen only if you require the detailed instructions to install QuickBooks Desktop. This will not impact any of your company files.
- Once the installation is finished, open the Windows Start menu and sign out of the administrator account.
- Now, sign in again to your usual user account.
- Again, open the Windows Start menu.
- Into the search field, type CMD. Right-click on the CMD icon and select Run as administrator.
- Now, type “net user administrator /active:no” in the command window and press Enter. This will hide your administrator account.
If these technical steps fail to resolve QuickBooks error 1904, we recommend contacting IT professionals, as there may be a general issue with your computer or Windows OS.
5. Add QuickBooks Desktop to your Bitdefender exclusion list
The Bitdefender on your computer may block QuickBooks, considering it a threat to your computer. To resolve this issue, create an exclusion for the QuickBooks program files to ensure a smoother installation.
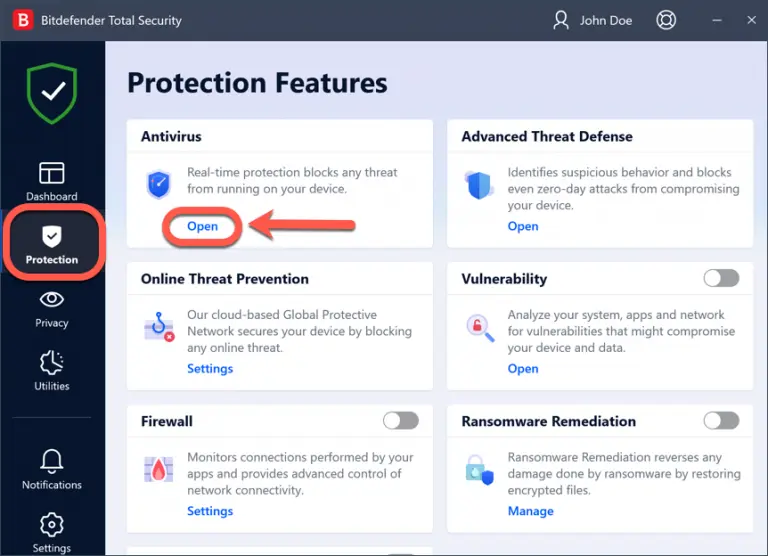
- Select Protection from the navigation bar in the Bitdefender interface.
- Now, click Open in the Antivirus pane.
- Navigate to Settings tab and click Manage Exceptions.
- Hit the +Add an Exception button.
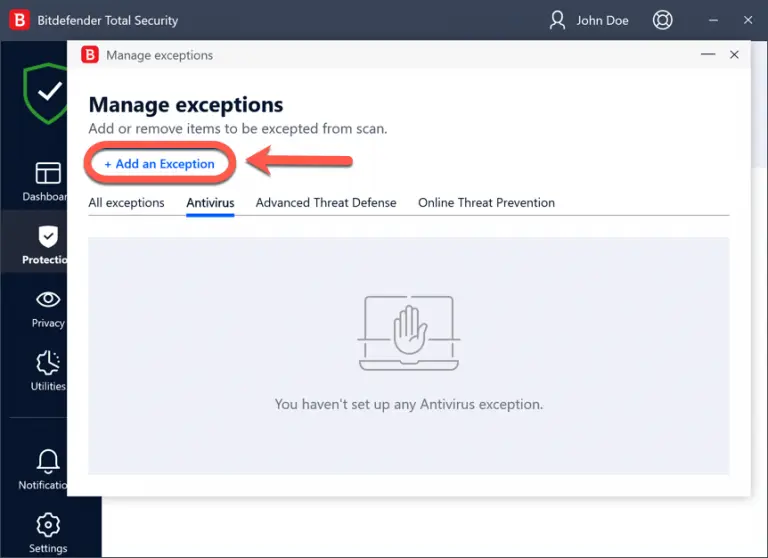
- Now, enter these paths depending on the Windows OS you use to exclude from scan in the corresponding field:
- If you use a 32-bit Windows OS, add “C:\Program Files\Common Files.”
- If you use a 64-bit Windows OS, add “C:\Program Files\Intuit (C:\Program Files(x86)\Intuit.“
- You can also browse the drives of your computer to the file/folder and exclude it:
- In the Exceptions window, click on the magnifying glass on the right side.
- Follow the path to the folder where your applications file is saved.
- Choose the file or folder that you want to create an exception for to avoid the scan, and then click OK.
- Now, turn on the switch next to Antivirus.
- Finally, click Save. This will create a new rule for the list of Antivirus exclusions.
6. Fix error 1904 while installing Adobe Flash Player
The Adobe Flash Player installation may be corrupted, triggering error code 1904. Consider manually repairing the software by following these steps:
- Run the QuickBooks Install Diagnostic tool as we did above.
- Once finishes, launch the Windows Start menu.
- In the search field, type Control Panel and select Control Panel to open it.
- Select Uninstall a program.
- Now, choose Adobe Flash Player ActiveX from the list of applications and click Uninstall.
- Follow the on-screen instructions to uninstall the program.
- Once done, download and reinstall the Adobe Flash Player.
7. If the Error 1904 message refers to QBversionTool.dll
Follow the first two sections of this article to run the QuickBooks Install Diagnostic tool and change your admin settings.
Then, follow the steps in the following sections until the issue is fixed:
a. Test your permissions
If you are still getting QuickBooks error 1904, run the test to determine if there is something else causing the issue:
- Launch the Windows Start menu.
- In the search field, type Notepad and press Enter.
- Now, type QBTest in the note file.
- Navigate to File and click on Save As. Now, save the file either to “C:\Program Files\Common Files” or “C:\Program Files(x86)\Common Files“.
If you failed to save the note to the folder, sign in and install your QuickBooks Desktop as an admin in the below section.
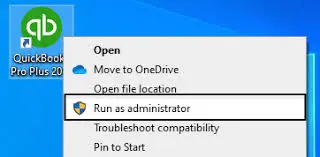
b. Install QuickBooks as an administrator
- Launch the Windows Start menu and then sign out.
- Choose the account that says Administrator and then sign in again. It won’t require a password to do so.
- Now, install your QuickBooks Desktop as an administrator.
If nothing helps to resolve the installation error 1904 in QB, connect with an IT professional. There can be some general issues with your computer.
8. Reinstall QuickBooks Desktop
If you still fail to install QuickBooks Desktop, it may be due to damage or corruption to the program files. To resolve this issue, try reinstalling QuickBooks Desktop, which involves uninstalling the current version and then reinstalling it again.
Let’s see how to replace the already existing QuickBooks files with the new ones and resolve error code 1904:
a. Remove QuickBooks
- On your computer, launch the Windows Start menu.
- In the search field, type Control Panel and press the Enter key.
- Go to Programs and Features or simply click on Uninstall a Program.
- Now, select the QuickBooks Desktop version you want to remove from the list of programs.
- Select Uninstall/Change, Remove, then click Next.
If you don’t see the option to delete QuickBooks, sign out and then sign in again as an administrator.
b. Install QuickBooks Desktop again
- Make sure your computer has an active internet connection.
- Locate your QuickBooks Desktop file QuickBooks.exe.
- Now, choose
- Express Install: Updates QuickBooks to the new version and keeps your settings. Use Custom Install to reinstall the old version if needed.
- Custom and Network Options: Installs the new version separately from the old one, without copying settings from the previous version.
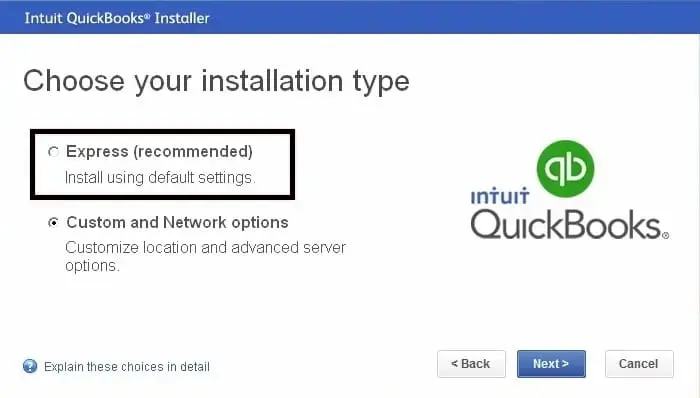
- Select Next and click on Install.
- Finally, choose Open QuickBooks.
Conclusion
We’ve reached the end of this blog, outlining potential factors causing QuickBooks error 1904 during software installation, along with effective troubleshooting solutions to help you install your preferred accounting software seamlessly. If the issue persists despite this guidance, we recommend contacting QuickBooks professionals for expert assistance.
Dial the +1(866)409-5111 and speak with a QuickBooks ProAdvisor today!
Frequently Asked Questions
There could be multiple reasons why QuickBooks updates are not installing, such as not having the proper set of permissions, antivirus or Windows Firewall might be blocking Quickbooks, failure to verify the digital signature, or due to common internet connectivity issues.
Error 1603 when installing QuickBooks Desktop is one of the installation errors that usually indicates a problem with the Windows Installer service or with the installation files themselves. This error can manifest as a “Fatal error during installation” or “The update installer has encountered an internal error“.
Right now, QuickBooks Desktop is available in its latest release version, i.e., 2024. However, as per QuickBooks’ discontinuation policy, Intuit will discontinue its desktop services after three years following the 2024 release. It will not release any new versions. To continue using the software, you will have to upgrade to the QuickBooks Online version or choose an alternative accounting service.
To install QuickBooks Desktop, locate the downloaded QuickBooks program file and follow the on-screen instructions. Now, choose the installation type, such as Express Install or Custom and Network Options, and then click Next > Install. Once complete, QuickBooks will be installed on your system, allowing you to get started.
To fix damaged QuickBooks program files, start by checking and rebuilding the data file in the application. If this doesn’t resolve the problem, use the “Quick Fix my File” or “Quick Fix My Program” features of the QuickBooks Tool Hub.

