Fix QuickBooks Error 6175 When Opening Company File
In QuickBooks, the multi-user mode allows you to work simultaneously with the team, enhancing efficiency and improving workflow. However, you may encounter QuickBooks error 6175 when trying to switch to multi-user mode with a warning message,
“QuickBooks is trying to access the company file, but the database server is not responding.”
This usually happens due to incorrect hosting settings and other possible factors, which we will discuss in the below guide. We have covered a list of suitable troubleshooting steps to help you restore the connection to work on the network. Read this detailed guide and resolve error code 6175 promptly.
What Causes QuickBooks Error 6175?
A variety of factors can hamper the multi-user connection in QuickBooks, triggering error code 6175 when switching to multi-user mode. Let’s see what usually hampers the connection:
- Using an outdated version of QuickBooks
- The Windows OS might be compatible or outdated
- Incorrect hosting settings on your workstation and the server
- The company file might not be scanned with QBDSM
- Possible damages, corruption, or network connectivity issues
- Hosting settings might be configured on the workstation instead of the server
- The Windows Firewall might be blocking QuickBooks Desktop
- Antivirus or antimalware software might block the software
- Damaged program files or the incorrect installation
Let’s Resolve Company File Error 6175 in QuickBooks Promptly
Fixing QuickBooks error 6175 requires you to follow the suitable steps to address the issues discussed in the above section. Let us explore these steps one by one and switch to the multi-user mode without any interruption.
1. Update QuickBooks Desktop
You must keep your QuickBooks software up to date to ensure you have the latest fixes, features, and security patches to protect it from viruses and malware. Receiving the latest updates also ensures a seamless software experience when managing your business accounting and other services.
2. Update Windows OS
An outdated version of the Windows OS causes incompatibility with the software and its components, impacting how QuickBooks interacts with the operating system. This can also hamper the multi-user connection on the server, causing QuickBooks error 6175.
- Launch the Windows Start by pressing the Windows logo key.
- In the search field, type Settings and press the Enter key.
- From the left pane, click on Windows Update.
- When prompted, click on Check for Windows update.
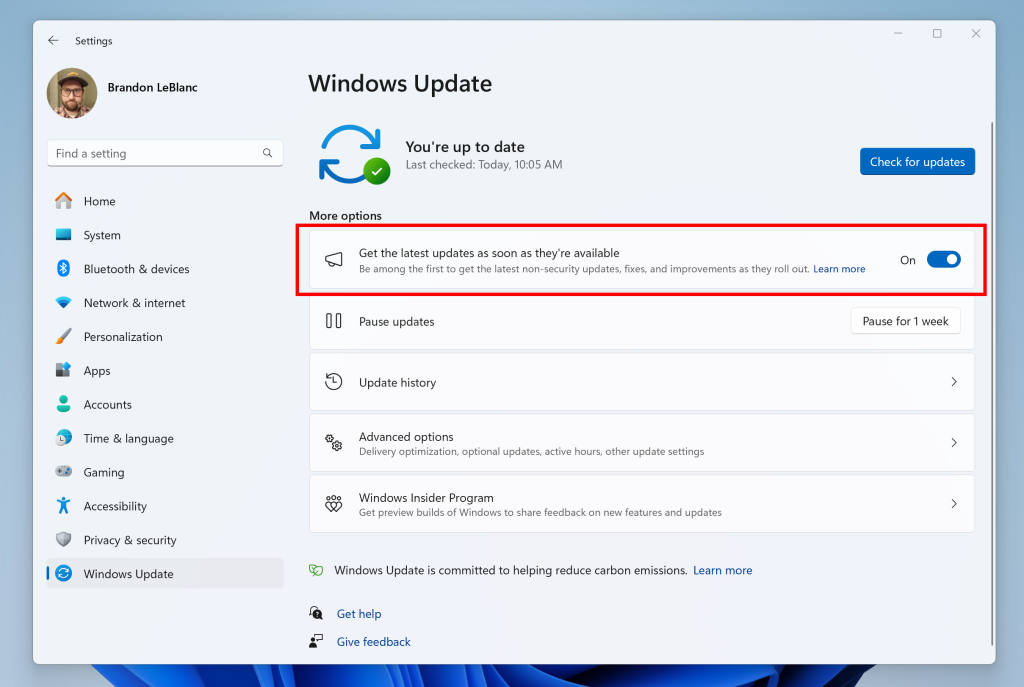
- When the updates are available, hit on Download & Install.
- Finally, restart your computer to apply the updates.
3. Review your hosting settings
It is necessary to configure the hosting settings before switching to multi-user mode and avoid QuickBooks error 6175, 0 and other issues. Proceed with the below section to learn how to configure the hosting for your workstations and the server:
a. Check the settings on your workstations
If the one or more workstations might be set as a sever for QuickBooks. The workstations might be set as multi-user mode. Your server is the only computer that host your company file and the hosting settings should be enabled.
Review other workstations too means the computer connected to your system to ensure the Host Multi-User Access option is off.
Note: You may perform these steps before trying to open a company file.
- Launch QB Desktop on your workstation where you see error code 6175.
- Go to File at the top and choose Utilities from the drop-down.
- If the option says Host Multi-User Access option, do not select it. Move to your next workstations as this one isn’t causing the problem.
- Select the option is it’s Stop Hosting Multi-User Access.
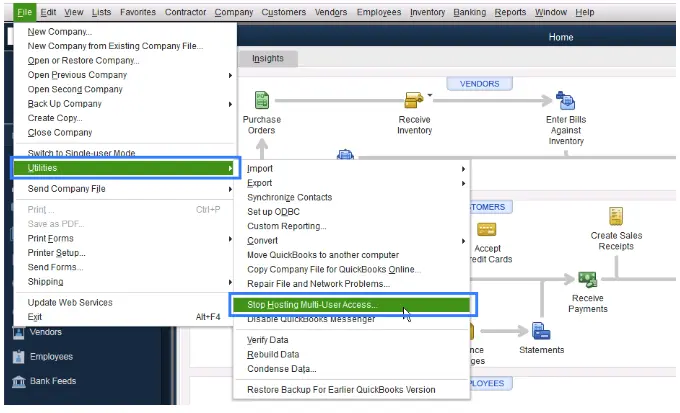
- Repeat the above stepson each workstation where you see error code 6175, 0.
b. Check your server settings
Depending on your setup of QuickBooks, proceed with the below steps:
If you have the full version of QuickBooks Desktop installed on your server
After cheeking all the workstations, move to your server computer and reset your hosting settings for the server computer.
- Launch QB Desktop on your server computer.
- Select the File menu and click on Utilities.
- If the option says, Host Multi-user Access, select it. Now, repeat the process and choose Stop Hosting Multi-User Access. This resets multi-user mode connection on your QuickBooks.
- Finally, repeat the process one more time and click on Host Multi-User Access.
If you don’t have the full version of QuickBooks Desktop installed on your server
This means that you only have QuickBooks Database Server manager on the main computer. Make sure to scan the folder holding your company file in the next step.
4. Scan your company files with QBDSM
Once you installed the Database Server Manager, scan your company files to enable access from other computers on your network. This allows you and your team to collaborate in QuickBooks Desktop across multiple computers.
a. Scan your company files
Here’s how to scan your company file folder:
- On the server computer hosting your company files, open the Windows Start menu.
- Type Database in the search and launch QuickBooks Database Server Manager.
- Navigate to the Scan Folders tab.
- Click Browse, then choose the folders with your company files (QBW).
- Click OK when done.
- Select Start Scan when ready.
After the scan completes, the folders will appear in the QuickBooks company files found section, allowing access to these files from other networked computers.
b. Monitor your drives
After scanning folders, the drives containing them appear in the Monitored Drives tab. Select the drive to monitor these folders, so you won’t need to rescan if company files are changed or moved.
- Navigate to the Monitored Drives tab.
- Check the boxes for the hard drives storing your company files.
- Only select drives hosting these files.
Note: Mapped drives cannot be monitored.
c. Manage Database Server Manager
Other tabs in Database Server Manager ensure smooth operation.
- The System tab shows where Database Server Manager is installed.
- The Database Server tab displays the tool’s real-time status and connected users.
5. Use QuickBooks File Doctor
The QuickBooks File Doctor performs a quick check on your company file and performs a repair if any issues are detected. Before getting started, ensure that you download and install the latest release of QuickBooks Tool Hub.
- Open QB Tool Hub.
- Go to Company File Issues from the left menu bar.
- Hit on Run QuickBooks File Doctor. Wait up to one minute or more to open the file doctor as it may take up to that.
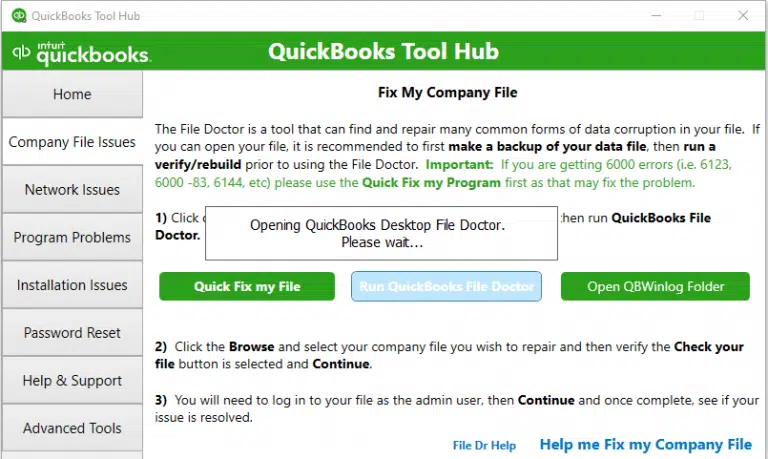
Note: If QB File Doctor doesn’t open, manually search for QuickBooks File Doctor and open it manually.
- Choose your company file from the drop-down menu in QuickBooks File Doctor. If you can’t see the file, click on Browse and look for your company file.
- Hit on Check your file (middle option only) and then click Continue.
- Allow the connection by entering the QuickBooks admin password and click Next.
The company file scan may take 10-15 minutes or more depending on the company file size. It may even say it was unsuccessful even if it fixes your issues. Once done, launch QB Desktop and then open your company file.
6. Turn off Hosting on all workstations
If you encounter Quickbooks Error H101, H303, or H505, one or more workstations may be incorrectly set as the server for QuickBooks. Only the server computer, which stores your company files, should be configured to host multi-user mode.
Ensure the Host Multi-User Access option is disabled on all workstations—computers on your network that don’t store company files. The server should be the sole host.
Note: You can perform these steps before opening a company file.
- Launch QuickBooks on any workstation showing H101, H303, or H505.
- Instead of opening your company file, go to File, then Utilities.
- If Host Multi-User Access is visible, skip this workstation—it’s not the issue.
- If Stop Hosting Multi-User Access is available, select it.
Repeat these steps on all workstations displaying Error H101, H303, or H505.
Read More- QuickBooks Multi User Error H202
7. Configure the Windows Firewall settings
Windows Firewall is a system security application that controls the ports, allowing existing and incoming data to enter your system. If there’s something that’s considered a threat to your computer, it may block software and all associated processes for system integrity. This may trigger QuickBooks error 6715 when switching to multi-user mode. Moreover, incorrectly configured settings for QuickBooks can also cause similar issues. Configure the Windows Firewall settings for QuickBooks Desktop and enjoy a smoother experience when managing accounting.
8. Recreate the QuickBooksDBXX Service to a Local System
Recreating the QuickBooksDBXX service to run under the Local System account may resolve QuickBooks error 6175, 0, which is often related to multi-user mode problems. This change gives the service the permissions it needs to access company files and function correctly over the network.
Important: If you encounter a permissions error indicating your Windows user account lacks sufficient rights, switch to a Windows admin account or consult an IT professional for help.
- Exit QuickBooks.
- Press Windows key + R to open the Run dialog.
- Enter services.msc and hit Enter.
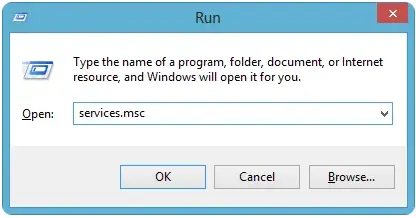
- Locate the service corresponding to your QuickBooks version, right-click it, and select Properties:
- QuickBooks 2020: QuickBooksDB30
- QuickBooks 2019: QuickBooksDB29
- QuickBooks 2018: QuickBooksDB28
Navigate to the Log On tab and choose This Account.
Note: Avoid selecting Local System, as it only works in specific configurations.
Remove the qbdataserviceuserXX account: - Press Windows key + R to open the Run dialog.
- Type Control Panel and click OK.
- Go to User Accounts, then select Remove user account.
- Choose the qbdataserviceuserXX matching your version and delete it.
- Restart QuickBooks.
Note: If hosting is active, disable it and then re-enable it. If it’s off, enable it. - When prompted to run the Database Server Manager, click OK.
- Launch the Database Server Manager and perform a file scan to recreate the qbdataserviceuser.
9. Create antivirus exclusion for your program
Antivirus or anti-malware software blocks the software that are a threat to your computer for the protection from viruses and malware. First, repair QuickBooks Desktop and create antivirus exclusion for your program to ensure you run the related processes seamlessly and can host the company file in multi-user mode.
10. Clean Install QuickBooks Desktop
A clean install of QuickBooks Desktop installs a fresh copy of the software by removing corrupted or conflicting files, thereby resolving related issues, such as QuickBooks error 6175, 0 that occurs when switching to multi-user mode. This process ensures a clean slate and removes potential problems related to old installation files or configurations that may be causing the error.
Conclusion
This was all about QuickBooks error 6175 when attempting to switch to multi-user mode or open a company file on the network. We understand how crucial this operation is to manage your business more swiftly.
We hope the information has helped you resolve the error quickly and ensure a seamless workflow. However, if the error persists, connecting with QuickBooks workflow is recommended. Dial +1(866)409-5111 to talk to a QuickBooks ProAdvisor now!

