Resolve QuickBooks Error H101 When Hosting on the Network
Are you unable to host or open your company file on the network, or encountering QuickBooks error H101 when trying to switch to multi-user mode?
The hosting mode in QuickBooks Desktop allows you to share your company file with your team and work simultaneously on the network. This enhances your workflow and ensures seamless collaboration. However, error code H101 can disrupt the connection between the server and workstations, making it challenging to open a company file.
Read this comprehensive guide to understand what causes this connection issue and explore various solutions to resolve the error for a smooth and collaborative experience.
QuickBooks Error H101: An Overview
The H-series errors in QuickBooks, including H101, H202, H303, and H505, typically occur when QuickBooks cannot connect to the company file hosted on another computer over a network. These errors are often accompanied by a message like,
“This company file is on another computer, and QuickBooks needs some help connecting.”
| QuickBooks Multi-User Mode Errors |
| QuickBooks Error H202 | QuickBooks Error H303 | QuickBooks Error H505 |
Below, I’ll outline the possible causes and solutions for resolving these H-series errors.
What Causes Multi-User Mode Error H101 in QuickBooks?
Several factors can disrupt the network connection when hosting a company file in QuickBooks Desktop. Let’s examine each of these reasons in detail below:
- Incorrect hosting settings on the server or workstations
- The Windows services might not be running on the server computer
- Not having the proper set of permissions to access a company file on the network
- The incorrect Windows Firewall settings might be blocking the connection
- Not running QuickBooks Database Server Manager on the server
- Possible data damage or network connectivity issues
- The workstation may not be connected to the server
Read More- QuickBooks Multi User Mode Not Working When Hosting
Troubleshooting Steps for Multi-User Network Error H101 in QuickBooks
To address QuickBooks error H202, first identify its cause, then confidently apply the most suitable troubleshooting fix with precision and care provided in the section below.
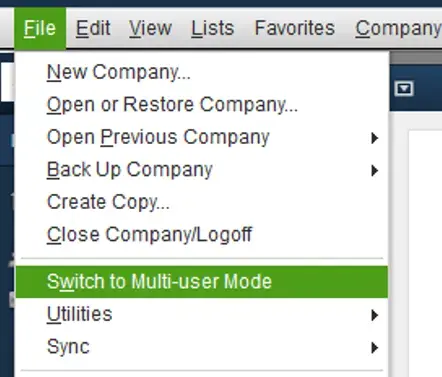
1. Check hosting settings in QuickBooks
Your server is the main computer where you host the company file, and the other computers are connected. The hosting settings must be enabled only on the server computer. Incorrect configuration can cause errors when hosting or sharing the company file with other users.
Make sure the workstations are not acting like the server computer and the hosting settings are correct by following the steps below:
Note: You can perform these steps simply by opening the company file.
- Launch QuickBooks on any workstations where you see H101.
- Do not open the company file. Instead, go to File and choose Utilities.
- If the option says ‘Host Multi-User Access,’ don’t select it. Move to the next workstations, as this isn’t causing the problem.
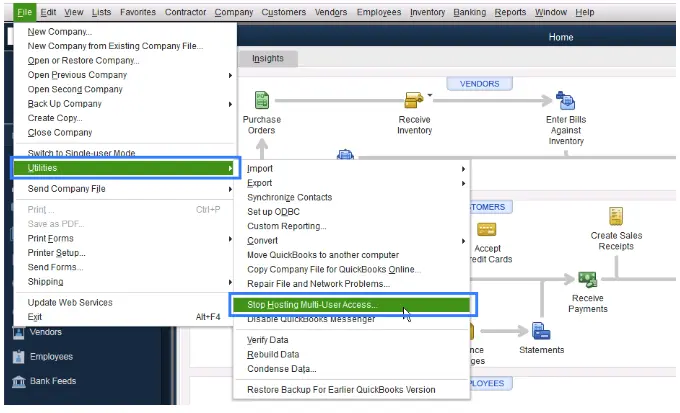
- Perform the steps, and if Stop Hosting Multi-User Access is an option, select it.
- Repeat these steps on all the workstations where you are getting Error H101.
After checking all the workstations, move to the server computer. This computer hosts your company file.
- Launch QuickBooks on the server computer.
- Go to File, then Utilities.
- If you see Host Multi-User Access is an option, select it and skip; if you see Stop Hosting Multi-User Access.
2. Check the services on your server
| Important for the Full Program option: If you use the full version of QuickBooks on the server computer, ensure the hosting settings are enabled. Launch QB Desktop on the server computer. Go to File and select Utilities. If Host Multi-User Access is an option, select it; if you see Stop Hosting Multi-User Access, don’t select it. |
Make sure the QuickBooks Windows services are running on the server computer. Follow the steps below to check QuickBooksDBXX. Once done, follow the same steps for QBCFMonitorService.
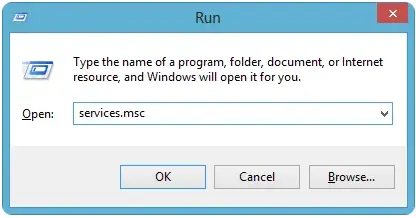
- Launch the Windows Start menu on the server computer.
- In the search field, type Run and press Enter.
- Type “services.msc” into the Run window, then press Enter.
- On the services list, find and double-click QuickBooksDBXX. Here, XX notes your version of QuickBooks plus 10. For example, QuickBooks 2023 is QuickBooksDB33.
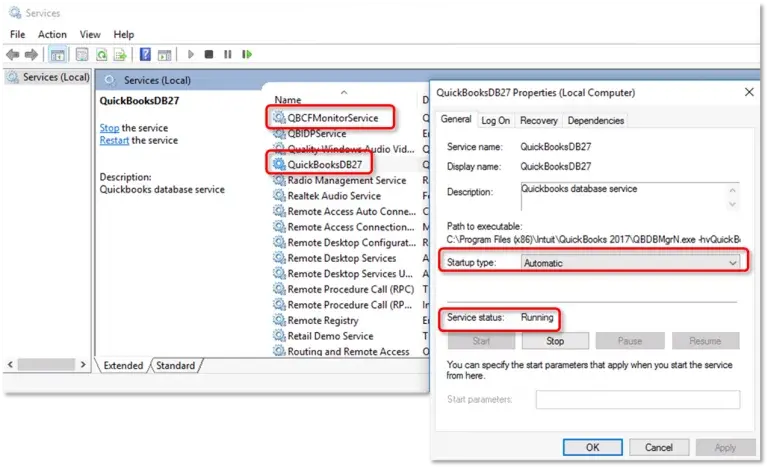
- Choose Automatic for the Startup Type.
- The Service Status should be Running or Started. If it’s neither, select Start.
- Go to the Recovery tab.
- Choose Restart the Service from each dropdown menu: First failure, Second failure, and Subsequent failures.
- Hit Apply and then select OK to save the changes.
- Repeat these steps for QBCFMonitorService.
When you’re done, launch QuickBooks on each workstation. Navigate to File and choose the Switch to Multi-user Mode option. If everything opens correctly, the error is fixed.
3. Add services to your Windows admin group on your server
If you haven’t already, allow the QuickBooksDBXX and QBCFMonitorService services the admin permissions on the server computer. Follow the steps below to allow Windows access permissions to share the company file on the network.
a. Set up folder permissions
Verify that the permissions are set correctly
- Launch the Windows Start menu and search for File Explorer.
- Right-click on the company file folder and choose Properties.
- Go to the Security tab and choose Advanced.
- Select QBDataServiceUserXX and click on Edit.
- Set the following settings to Allowed:
- Traverse Folder/Execute File
- List Folder/Read Data
- Read Attributes
- Read Extended Attributes
- Create Files/Write Data
- Create Folders/Append Data
- Write Attributes
- Write Extended Attributes
- Read Permissions
Set the permissions correctly:
- Right-click on your company file folder and choose Properties.
- Go to Security, then select Edit.
- Choose QBDataServiceUserXX, select Full Control, and then Allow.
- Finally, select Apply, then OK.
Change the folder permissions
If you need to adjust folder permissions:
- Launch the Windows Start menu.
- Type File Explorer and select it to open.
- Find the folders listed below and right-click one each:
- C:\Program Data\Intuit\Entitlement Client\v8
- C:\Program Data\Intuit\Entitlement Client\v6.0
- C:\Program Data\Intuit\Entitlement Client\v5
- C:\Program Data\Intuit\Entitlement Client\v3
- C:\Program Data\Intuit\Entitlement Client
- C:\Program Data\Intuit\QuickBooks Enterprise Solutions X.0 (X = version) or C:\Program Data\Intuit\QuickBooks 20XX (XX = year)
- C:\Program Data\COMMON FILES\INTUIT
- C:\Program Data\COMMON FILES\INTUIT\QUICKBOOKS
- C:\Users\Public\Public Documents\Intuit\QuickBooks\FAMXX (XX = year)
- C:\Users\Public\Public Documents\Intuit\QuickBooks\Company Files
- C:\Users\Public\Public Documents\Intuit\QuickBooks\Sample Company Files\QuickBooks Enterprise Solutions X.0 (X = version) or C:\Users\Public\Public Documents\Intuit\QuickBooks\Sample Company Files\QuickBooks 20XX (XX = year)
Now, perform the steps listed below. Keep in mind that you may not have all the folders, as some are specific to certain versions of QuickBooks Desktop:
- Right-click on the folder and choose Properties.
- Go to the Security tab and choose Everyone.
Note: If you don’t find Everyone is not listed in the Group or User Name checkbox, choose Add and type in Everyone. Then, select OK.
- Choose Full Control, then click Apply and OK.
b. Set Windows access permissions to share company files
Ensure that QuickBooks has the proper permissions to access the company file in multi-user mode to avoid future issues. The steps below are applicable only to Windows 10 or newer.
- Launch the Windows Start menu and search for File Explorer.
- Look for the QB company file folder and right-click on it.
- Choose Properties, then Sharing, and then click on Share Add.
- Select the QBDataServiceUserXX for the QB version you use.
- Set the proper level of permissions for both users to Full Control and select Share.
4. Configure the Windows Firewall settings on the server
The Windows Firewall is a security application that controls incoming and outgoing data through your system’s ports. It may block the source or related software processes if it detects a potential threat. To resolve issues with QuickBooks, ensure the Windows Firewall is correctly configured for QuickBooks Desktop and all associated software processes.
5. Run QuickBooks Database Server Manager
The QuickBooks Database Server Manager lets you connect your server to the workstations and seamlessly host your company files. Make sure to run it on the server computer.
If you still see issues, it is recommended that you run the QuickBooks File Doctor to fix them and repair any possible data damage.
Also Read- QuickBooks Tool Hub (1.6.0.8) Version
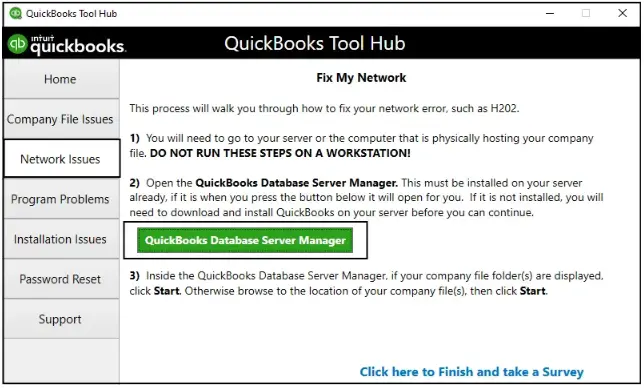
a. Run QB Database Server Manager
- In the left pane, choose Network Issues.
- Click on QuickBooks Database Server Manager. If QuickBooks isn’t on your server, it will prompt you to install it.
- When you see the company file folder or folders in the QuickBooks Database Server Manager, choose Start Scan. If not, click Browse and locate your company file, and then select Start Scan.

- QuickBooks Database Server Manager automatically repairs your firewall permissions. Click Close after the scan is complete.
- On every workstation where you encounter Error H202, launch QuickBooks. Choose File, select Multi-user Mode. If you use your server computer as a workstation, make sure to check it as well.
b. Run QuickBooks File Doctor
- Select Company File Issues from the left pane.
- Hit on Run QuickBooks File Doctor. The tool might take a minute or more to open; wait until the.
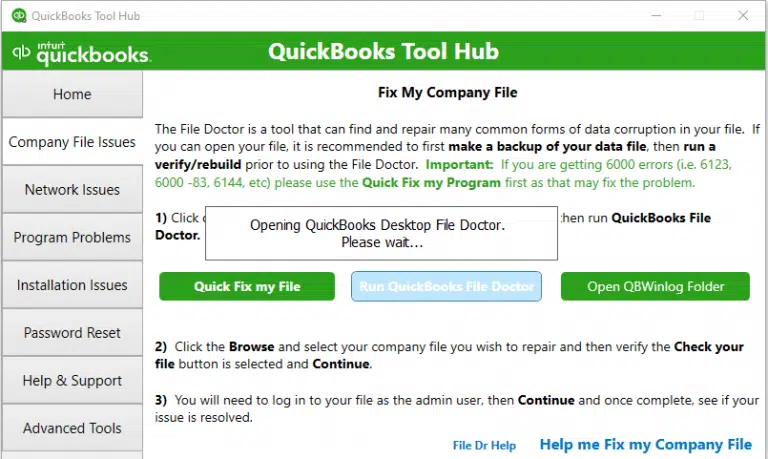
Note: If the File Doctor doesn’t open, search for QuickBooks Desktop File Doc in the Windows Start Menu and open it manually.
- Choose your company file from the drop-down in the File Doctor. If you don’t see your file, click Browse and search for it.
- Hit on Check your file and Network (top option), and then Continue.
- Enter the admin password to allow access and hit Next. ‘
If you can run your workstation in multi-user mode without any issues, everything is fixed.
6. Ping your server from a workstation
Ping your server from a workstation to verify the connection. You need to ping from every workstation where you see error H101.
To start, enable the Network Discovery on the server computer and any workstations with error H101:
- Launch the Windows Start menu on your server and workstations.
- In the search, type Network and open the Network and Sharing Centre.
- Click on Change advanced sharing settings.
- Ensure the Turn on network discovery option is selected in the Network Discovery and File and Printer sharing sections.
Now, get the server name from your server computer:
- Press the Windows logo key to open the Windows Start menu.
- Type Run into the search and select Run.
- In the Run prompt, type CMD and press Enter.
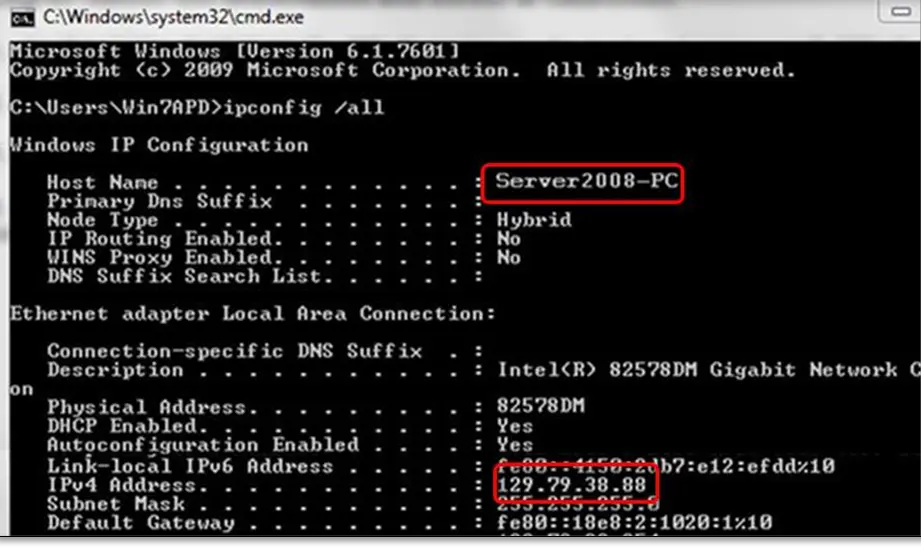
- In the CMD window, type “ipconfig/all,” then press Enter.
- Look for the Host Name in the Windows IP Configuration section. The server name is on the right.
- Note down the hostname, or copy it to a Word document so you can easily access it.
Move back to the workstation to test the server. These steps are quite complex, so seek help from IT professionals.
- Launch the Windows Start menu on your workstation.
- Type Run in the search field and open Run.
- In the Run window, type CMD and press Enter.

- Type “ping [your server name],” and then press Enter. Ensure that the brackets are not included around the server name; they are just for reference.
- Repeat the same steps on each workstation where you see error H202.
- In case you receive a reply for each packet without any loss, the server is working fine.
If there’s packet loss or a very slow response, stop there. Connect to an IT professional with your network.
Conclusion
This concludes our blog on why you encounter QuickBooks error H101, related errors you may face, and various methods to resolve these issues. We understand that performing these fixes can be challenging. Still, we hope the steps provided have helped you host and access your company file on the network without issues.
For further assistance, connect with our team of QuickBooks professionals via +1(866)409-5111 for an error-free experience on the network.
Frequently Asked Questions
QuickBooks multi-user mode allows multiple users to access and work on the same company file on the same computer simultaneously over a network. This helps you enhance the workflow and manage the company file with your team, contrasting with the single-user mode, where only a single user can work at a time.
To resolve QuickBooks multi-user mode issues, ensure the hosting settings are configured properly on the server and workstations. Check the system security applications, such as Windows Firewall or antivirus settings. Additionally, check network connectivity, potentially using QuickBooks File Doctor to diagnose and fix problems.
To switch from multi-user to single-user mode in QuickBooks Desktop, navigate to the File menu and select Switch to Single-User Mode. If the option is grayed out, the file is already in single-user mode.
QuickBooks H-series errors are H101, H202, H303, and H505, which start with H or are stated as hosting errors on the multi-user network. The error occurs when QuickBooks fails to connect with the company file on the network or other computers. You will probably see the error when switching to multi-user mode or accessing a company file located on a different workstation.
Run the QuickBooks in-built Verify and Rebuild Data to repair a damaged company file. The Verify Data utility helps you verify the company file for possible damages and runs a quick rebuild.

