Fix QuickBooks Error H202: Multi-User Mode Switching Issue
Learn what is QuickBooks error H202 and what to do when you encounter the error when trying to host the company file or switching to multi-user mode.
Error code H202 also displays a warning message on your screen: “The company file is on another computer, and QuickBooks needs some help connecting.” This generally means something is blocking the multi-user connection to the server computer.
Incorrect hosting settings, not running the QuickBooks Database Server Manager, and other possible reasons can hamper the connection. Let us explore the possible causes and the multiple ways to resolve it promptly.
Possible H-Series Errors You May encounter
As mentioned earlier, QuickBooks Error H202 is part of the H-series errors that occur when hosting or switching to a multi-user environment.
We will discuss the causes and solutions for these errors in the sections below. For now, let’s explore the possible H-series errors you may encounter due to similar issues in multi-user mode.
| Possible H-Series Errors | |
| QuickBooks Error H101 | QuickBooks Error H202 |
| QuickBooks Error H303 | QuickBooks Error H505 |
What Triggers Multi-User Error H202 in QuickBooks?
Here’s a complete breakdown of the possible reasons that trigger QuickBooks multi-user error H202 when opening a company file:
- Your QuickBooks might not be set up in multi-user mode.
- The QuickBooks Database Server Manager might not be running on the server computer.
- Using an outdated QuickBooks or Database Server Manager version can also trigger error H202.
- QuickBooksDBXX services are not running on the host computer.
- You might not have added the Database Sever Manager services to the Windows admin group.
- Incorrectly configured Windows Firewall settings can prevent you from hosting the company file.
Top Fixes for Multi-User Error H202 When Opening Company File
After knowing what triggers QuickBooks multi-user error H202, you must look for suitable fixes and eliminate the problem.
Below, we have mentioned the appropriate fixes to help you with the same; ensure to follow each one carefully:
1. Update QuickBooks and Database Server Manager to the Latest Version
QB Database Server Manager is part of the QuickBooks Desktop file, which means that updating the program will automatically download the most recent version of Database Server Manager.
Here’s how to ensure you are using the most recent version of QuickBooks Desktop:
- Launch QB and select Help at the top.
- Select Update QuickBooks Desktop from the drop-down.
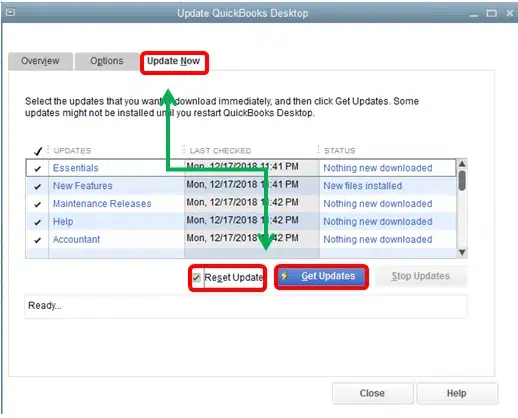
- Go to the Update Now tab in the redirected window.
- Mark the Reset Update checkbox to clear the previously downloaded updates, then click Get Updates.
- Once done, reopen QuickBooks and click Yes on the prompt to start the installation.
- This will ensure you are using the newest version of QuickBooks and the Database Server Manager.
2. Ensure your QuickBooks is set to multi-user mode
You may encounter QuickBooks multi-user hosting error H202 on the server is still set to single-user mode rather than multi-user. Therefore, to fix the issue, consider switching your main computer to multi-user mode.
- Launch QB Desktop.
- Click on the File menu at the top.
- Tap on Switch to Multi-user Mode.

- Reopen your QuickBooks and then try to host your company file in multi-user mode again and ensure error H202 is fixed.
3. Run QuickBooks Database Server Manager on the Server
When you set up a server computer to host the company file, running the QuickBooks Database Server Manager is necessary to allow users access to the company file on the network. Not running the tool can trigger error H202 or similar errors and prevent you from opening the company file.
QB Database Server Manager is part of the QB program file that is automatically installed when getting QuickBooks. Adhere to the below steps to learn how to run the Database Server Manager:
| Note: Make sure to download and install QuickBooks Tool Hub to the latest release available. |
Step 1: Make Use of QuickBooks Database Server Manager on the Server
A server computer is a computer that hosts a company file, and other computers or workstations are connected to it. So, running the Database Server Manager on the server is recommended only to grant permission rather than on any workstation.
- Launch QB Tool Hub.
- Select Network Issues from the left pane.
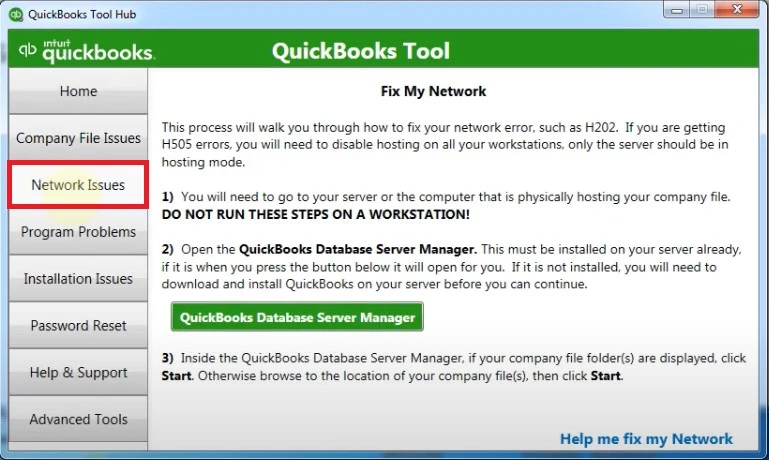
- Click on QuickBooks Database Server Manager. If you haven’t set it up on the server yet, it will prompt you to do so.
- Once done, launch the Database Server Manager and tap on the Start Scan button if you see your company file folder. If you don’t, Browse to the location of your company file and then click Start Scan.
- Running the scan will automatically detect and fix the firewall or other issues. Once the scan finishes, hit Close.
- Finally, launch QB on each workstation where you see error code H202, switch the program to multi-user mode and ensure you can open a company file in multi-user mode without any error.
Step 2: Run the QuickBooks File Doctor Utility
If the problem appears due to any network issues or data damage, experts recommend running the File Doctor tool. Here’s how you can access run from the Tool Hub:
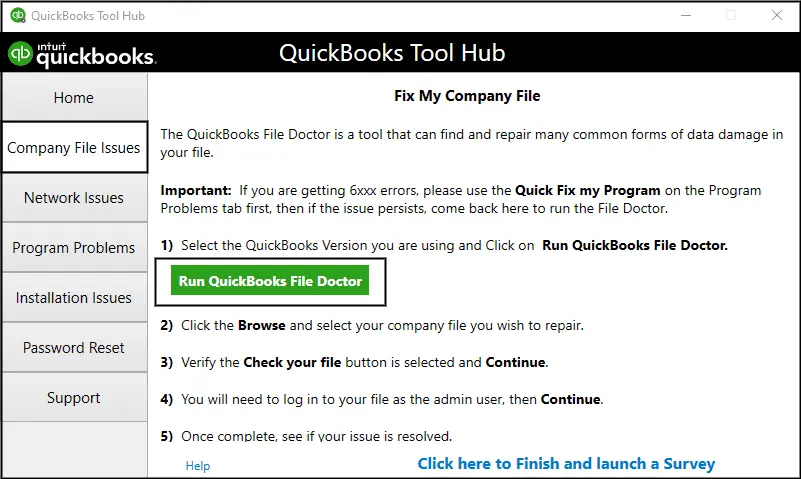
- Tap on Company File Issues in the Tool Hub.
- Choose Run QuickBooks File Doctor. The tool might take sometime in open; wait until then.
- Now, choose your company file from the drop-down menu in the File Doctor. If you cannot find the file, click Browse and then look for the file.
- Tap on Check your file and network, and then click Continue.
- Enter the QB admin password to allow access and click Next. If you can successfully switch to multi-user mode; you’re good to go.
4. Configure the Windows Firewall Settings
The Windows Firewall is a system security application that controls the existing from your computer to enter the security ports. It may block these processes if data is considered a threat.
QuickBooks uses multiple executable files to run various tasks, including opening a company file. If it is considered a threat or the settings are configured incorrectly for QuickBooks Desktop, you will need to configure the Windows Firewall settings and ensure the multi-user function in QuickBooks works fine.
5. Ensure QuickBooksDBXX Services are Running on the Host Computer
QuickBooksDBXX or Database Server Manager services allow users to access the company file in multi-user mode. If these services are not running, error H202 or related ones may occur.
Following the steps, let’s check whether QuickBooksDBXX is running. Then, consider repeating the same steps for QBCFMonitorService.
- Press the Windows logo key to open the Windows Start menu.
- In the search bar, enter Run press Enter.
- In the Run prompt, type services.msc and hit Enter.
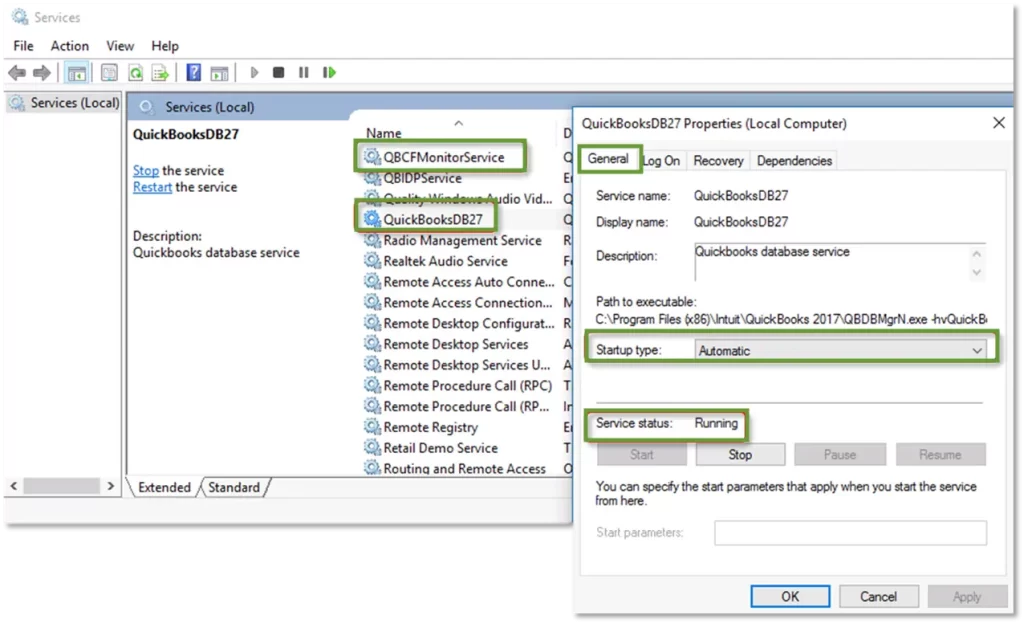
- Look for the QuickBooksDBXX service in the prompted window and double-click on it. Here, XX denotes the version of QuickBooks plus 10. For instance, QuickBooks 2024 is QuickBooksDB34.
- Further, choose the Startup Type as Automatic in the General tab.
- Check the service status; it should either be Running or Started. Click Start if it’s neither.
- Move to the Recovery tab.
- Choose Restart the Service for each drop-down: First Failure, Second Failure and Subsequent Failures.
- Now, Apply the changes and click Save.
- Repeat these steps for QBCFMonitorService.
- When you’re done, launch QB on each workstation. Select the File menu and then click on Switch to Multi-user Mode.
If everything works well, the issue is fixed. However, if QuickBooks multi-user hosting error H202 persists; continue moving to the next solution.
6. Add the Database Manager Services to Your Windows Admin Group
Successfully hosting the company file on the network requires the Windows admin right to access the QuickBooksDBXX services.
If you haven’t already given QuickBooksDBXX and QBCFMonitorService admin permissions on the server computer, follow the below steps to share the permissions and access the company file without any issues:
Verify that permissions are set correctly
- Tap the Window icon key on your keyboard and search for File Explorer.
- Open File Explorer.
- Look for the QuickBooks company file folder and right-click on it. Then, choose Properties.
- Move to the Security tab and click on Advanced.
- Select QBDataServiceUserXX and the click Edit.
- Now, set the following settings to Allowed:
- Traverse Folder/Execute File
- List Folder/Read Data
- Read Attributes
- Read Extended Attributes
- Create Files/Write Data
- Create Folders/Append Data
- Write Attributes
- Write Extended Attributes
- Read Permissions
Follow these steps if the permissions are not set correctly:
- Right-click on the company file folder and then click on Properties.
- Tap on Security and select Edit.
- Choose QBDataServiceUserXX, hit Full Control, and then select Allow.
- Finally, Apply these changes and then click OK.
Change the Company File Folder Permissions
- On your computer, launch File Explorer.
- Now, locate to the below and right-click on each:
- C:\Program Data\Intuit\Entitlement Client\v8
- C:\Program Data\Intuit\Entitlement Client\v6.0
- C:\Program Data\Intuit\Entitlement Client\v5
- C:\Program Data\Intuit\Entitlement Client\v3
- C:\Program Data\Intuit\Entitlement Client
- C:\Program Data\Intuit\QuickBooks Enterprise Solutions X.0 (X = version) or C:\Program Data\Intuit\QuickBooks 20XX (XX = year)
- C:\Program Data\COMMON FILES\INTUIT
- C:\Program Data\COMMON FILES\INTUIT\QUICKBOOKS
- C:\Users\Public\Public Documents\Intuit\QuickBooks\FAMXX (XX = year)
- C:\Users\Public\Public Documents\Intuit\QuickBooks\Company Files
- C:\Users\Public\Public Documents\Intuit\QuickBooks\Sample Company Files\QuickBooks Enterprise Solutions X.0 (X = version) or C:\Users\Public\Public Documents\Intuit\QuickBooks\Sample Company Files\QuickBooks 20XX (XX = year)
Now, perform the following steps for each of these folders. Also, remember that you might not have each folder as some are version-specific.
- Right-click the folder and then hit on Properties.
- Move to the Security tab and choose Everyone.
- Further, click on Properties and Sharing. Then, hit on Share Add.
- Select the corresponding of QBDataServiceUserXX for the QuickBooks version you are using.
- Configure the permission level of both admin and other users to Full Control and then Share.
7. Set the Windows permissions to access the company file
If QuickBooks doesn’t have proper access or permission, users can have problems accessing or sharing the company file over the network.
Let’s ensure the company file has the right level of permissions for Windows 10:
| Note: The steps for permission setup would be similar for other Windows versions, too, but with minor feature variations. |
- Go to the Windows Taskbar at the bottom and click the Windows icon.
- Search for File Explorer and then open it from the search results.
- Find and locate the QuickBooks file folder and then right-click on it.
- Choose Properties from the drop-down and click on Sharing. Then, click Share Add.
- Select the corresponding service QBDataServiceUserXX for your QB version.
- Finally, set the permissions level of both users to Full Control and then click Share.
8. Ping Your Server from a Workstation
Sometimes, the server computer or workstation can have connectivity issues and fail to open the company file on the network, resulting in error H202. The ping function can help you determine whether a system is online and capable of communicating with other computers or network devices.
Before starting, turn on the Network Discovery on your server or the workstations wherever you encounter the error.
- Open the Windows Start menu on your server computer and workstations.
- In the search field, type Network and open Network and Sharing Centre.
- Click on Change advanced sharing settings.
- Ensure to select the Turn on network discovery option in the Network Discovery and File and Printer sharing sections.
Now, you need to get the server name from your server computer:
- Press the Windows logo + R keys together to launch the Run prompt.
- In the run window, type CMD and press then Enter.
- Look for the Host Name in the Windows IP Configuration section. You will see the server name on the right.
- Note down the hostname or save it in a Word or Docs file to keep it handy.
Return to the server and run a connectivity test using the steps below:
| Note: These steps get complex if you are not tech-savvy. So, consider getting help from an IT expert. |
- Open the Windows Start menu on the server and search for Run.
- Choose Run from the search result to open and type CMD in the prompt. Then, press Enter.
- Further, type ping [your server name] and hit the Enter key. While typing the name, ensure not to add brackets.

- Repeat the same steps for each workstation where you get QB error H202.
Your server will work fine if you receive a response for each pocket on the workstation. However, if there’s any packet loss or the response time is too long, you must get help from IT experts or connect with QuickBooks Pro Advisors.
Conclusion
In this blog, we have explored a range of H-series errors that may occur when switching to multi-user mode in QuickBooks. One of these errors, QuickBooks Error H202, can disrupt your workflow, but we’ve covered its possible causes and step-by-step troubleshooting solutions in detail.
We hope this expertly curated guide has helped you resolve the error and enables you to share company file access with your team seamlessly. For further assistance, contact QuickBooks ProAdvisors by dialing the toll-free number +1-866-409-5111.
Frequently Asked Questions
Error H202 usually appears in QuickBooks Desktop when a user tries to host a company file on the network or switches QuickBooks to multi-user mode. The error indicates a problem in the connection between the QuickBooks Desktop application and the server hosting the company file.
The ‘Cannot communicate with the company file because of a firewall’ error in QuickBooks means the firewall permissions are not set up or incorrectly configured for the software. You will configure the Windows Firewall settings or create a port exception for the blocked program files.
To enable multi-user mode in QuickBooks Desktop, you must first open QuickBooks on the host computer and select ‘Switch to Multi-User Mode’ from the File menu. After that, you can add a user by going to Company > Users > Set Up Users and Roles and selecting New.
To repair a QuickBooks file, you can use the Verify and Rebuild Utility or QuickBooks File Doctor. The Verify and Rebuild Utility can fix minor problems, while QuickBooks File Doctor can help with more complex issues like network problems and file damage
Error code H303 in QuickBooks Desktop appears when there is an issue with the multi-user hosting. It indicates issues interrupting the multi-user connection and the ability to access the company file stored on another computer or server. This mainly appears when your workstation tries to act like a server on the multi-user environment.

