How to Reinstall QuickBooks Desktop | Fix Common Errors
We all know that QuickBooks Desktop is prone to errors and issues, such as problems when opening company files, installing software updates, and more. To tackle these challenges, you can utilize various utilities like the QuickBooks Install Diagnostic Tool and other relevant tools from the QuickBooks Tool Hub, or apply general troubleshooting solutions.
However, the most effective approach to resolve installation errors, corrupted files, and performance issues—such as 6000 series errors, 1603 errors, or cases where the software fails to open after updates or crashes frequently—is to uninstall and reinstall QuickBooks. In this detailed guide, we will outline the steps to reinstall QuickBooks Desktop. Let’s dive into the blog…
Why Reinstall QuickBooks Desktop?
When you remove and reinstall the QB application, it replaces the old program files with the new ones. Doing this often resolves common issues such as software crashes, slow performance, and errors related to damaged installations. A clean installation, which removes leftover files, ensures a smooth and error-free experience. This process is especially useful when standard troubleshooting methods fail to fix persistent problems.
Learn How to Uninstall and Reinstall QuickBooks Desktop to Resolve the Issues
Usually, you can remove QuickBooks from your computer and then reinstall it. However, in some cases, this method may not work, so we will also explain how to reinstall QuickBooks Desktop on Windows 11 manually.
Follow the methods below to learn how to remove and reinstall QuickBooks Desktop:
1. Remove QuickBooks Desktop and Install the Software Again
Follow the steps below to clean install QuickBooks Desktop on your computer:
Before you start
- Download the installer for your version of QuickBooks.
- Note down the license number somewhere, you will find it on the original package. If you bought the product online, you must have the purchase confirmation email.
Note: You can also get the same information from the account management portal.
a. Remove QuickBooks
- Press the Windows logo icon key to launch the Windows Start menu.
- Type Control Panel in the search field and press Enter.
- Go to Programs and Features or simply click on Uninstall a Program.

- Choose the version of QuickBooks Desktop you want to remove from the list of programs.
- Hit on Uninstall/Change, Remove and then click Next.
If you can’t see the option to remove QuickBooks, sign out and then sign in back to Windows as an admin.
b. Install QuickBooks Desktop again
- Connect your computer to an active internet connection.
- Locate to the QuickBooks program file QuickBooks.exe.
- Now, select
- Express Install: Updates your QuickBooks to the new version, keeping your preferences. Use Custom Install to reinstall the old version if needed.
- Custom and Network Options: Installs the new version alongside the old one, without transferring preferences from the previous version.
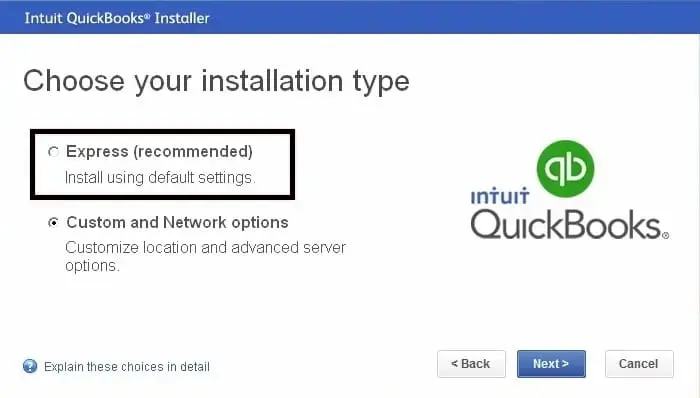
- Click on Next and then Install.
- Finally, choose Open QuickBooks and try again to update it.
2. Manually uninstall QuickBooks and rename installation folders
You can reinstall QuickBooks without deleting files from your computer. The steps below explain how you can rename the installation folders and install them again on your computer:
- Remove QuickBooks Desktop as you did above.
- Launch the Windows Start menu and type File Explorer.
- Now, press Enter to open File Explorer.
- Look for the QuickBooks file folder and open it. This is the usual QuickBooks folder and you will need it on one of these locations:
- C:\ProgramData\Intuit\QuickBooks (year)
- C:\Users\(current user)\AppData\Local\Intuit\QuickBooks (year)
- C:\Program Files\Intuit\QuickBooks (year)
- 64-bit version C:\Program Files (x86)\Intuit\QuickBooks (year)
- Right-click on the same folder and choose Rename.
- Add .OLD word at the end of the folder name to replace it with the new folder when reinstalling. This also prevents QuickBooks from opening the old one when you reinstall the QuickBooks Desktop software.
- Finally, install your QuickBooks Desktop again.
If you get an access error message when you try to rename the folder:
- Right-click on the Windows Task Bar, then choose Task Manager.
- Move to the Processes tab.
- Select the Name column header and sort the list.
- Choose the following processes and select End Process for each of them: QBDBMgrN.exe, QBDBMgr.exe, QBCFMonitorService.exe, Qbw32.exe.
- If you see a warning message, “WARNING: Terminating a process can cause undesired results…“, select Yes.
Conclusion
Finally, we have reached the end of this comprehensive guide, which covers the steps to reinstall QuickBooks Desktop. This allows you to resolve all the errors or problems associated with the old program files and ensure a smooth workflow.
For further assistance, we recommend consulting with QuickBooks ProAdvisors at Qbookshub Dial +1(866)409-5111 to talk to an expert now!
Frequently Asked Questions
Can I uninstall QuickBooks and reinstall without losing my data?
Yes, you can uninstall and reinstall QuickBooks Desktop without losing your company data, as long as you have a backup of your company file. Reinstalling QuickBooks over an existing installation or using the QuickBooks Clean Install Tool will not affect your data.
How to restore company file in QuickBooks Desktop?
To restore your company file backup in QuickBooks: go to File> Open or Restore Company > Restore a backup copy within QuickBooks. Then, select either “Local Backup” or “Online Backup” depending on where your backup file is stored. Browse to the backup file (.qbb), select it, and choose a location to restore the file. Ensure you don’t overwrite your current file if you intend to keep it.
How do I reset QuickBooks Desktop?
To reset QuickBooks Desktop, you can reset Intuit ID settings, reset updates, or reset company file. Resetting Intuit ID settings can help refresh your Intuit account. Resetting updates clears all previous update downloads.
How to repair QuickBooks Desktop installation?
To repair a QuickBooks Desktop installation, you can utilize the built-in repair tool or the QuickBooks Install Diagnostic Tool. The repair tool, found in the Control Panel, can fix common issues. The Diagnostic Tool, available in the QuickBooks Tool Hub, specifically addresses issues with Microsoft components used by QuickBooks.
How do I delete everything in QuickBooks Desktop and start over?
To delete everything in QuickBooks Desktop and start fresh, you’ll need to create a new company file. QuickBooks Desktop doesn’t offer a “purge” or “reset” function like QuickBooks Online. You can either manually delete individual lists and transactions, or create a new company file.

